| CARVIEW |
The post Setting up a landline phone for kids appeared first on Chris Hardie's Tech and Software Blog.
]]>(Just today, a few days after I did this, The Atlantic came out with an article expanding on this thinking: The Dumbest Phone Is Parenting Genius: Landlines encourage connection—without the downsides of smartphones. Hat tip to Damon for sending me the link.)
We’re referring to it as a landline since it has all the appearance and functionality of one — a single push-button phone connected to the wall with a cord — but behind the scenes it’s VOIP technology with some fun parental control features built in. It was relatively easy to set up as my home tech tinkering projects go, so I thought I’d share the details here.
My costs for this project were $61.90 in set up costs and around $5/month or less to operate, depending on call volume. (If your kid talks on the phone a lot, the voip provider I’m recommending offers a flat $4.25/month plan for up to 3,500 minutes, instead of the $0.009 to $0.01 per-minute rate I’m set up with.)
If you have more money than time, you could also look at Tin Can, as it seems to be a well-thought-out “landline for kids” product and service for $75 one time plus $10/month (first month free) and a few more polished parental control features. I haven’t tried it directly myself.
Requirements and Equipment
- High speed home internet connection
- An ethernet port somewhere near where you want the phone to be set up, and/or a really long phone cord
- Grandstream 2-FXS Port Analog Telephone Adapter (HT802) – $46 at Amazon
- A cheap, regular push-button phone, e.g. Slimline Black Colored Phone – $14 at Amazon. Do not buy a VOIP phone, you don’t need it.
- A Voip.ms account
Some of the links above are affiliate links; I may receive a small commission if you purchase through them.
Get a phone number
Once your voip.ms account is created and you’ve enabled two-factor authentication, add some funds to your account via credit/debit card, maybe $10 to start with. You can also set the account up to auto-replenish your balance when the amount gets low.
Order a phone number, referred to on the site as a “DID” (direct inward dialing) number. This will cost $0.40 one time and then be $0.85/month after. (If you have an existing number you want to use, you can port it in to your voip.ms account, a process that has several steps but is perfectly manageable.)
When you’re asked to pick a registration server, pick one near where you live. I ran some ping tests on each nearby option, and the round trip times / latency were approximately similar, so I just picked the “first” server in a city’s available group.
If this line will be available to your kids when you are not home and you live in the US, I also suggest paying for E911 services, which is a $1.50 one time fee and $1.50/month after. This allows your kid to call 911 and have emergency services dispatched to the correct residential address. (Depending on how you look at it, the ability to make emergency calls that depend on a working internet connection, power, etc. could be a bad idea to rely on!)
Configure your VOIP account
Create a sub-account that will only be used for this phone number and line. This avoids having to use your main voip.ms account password in setting up the line configuration.
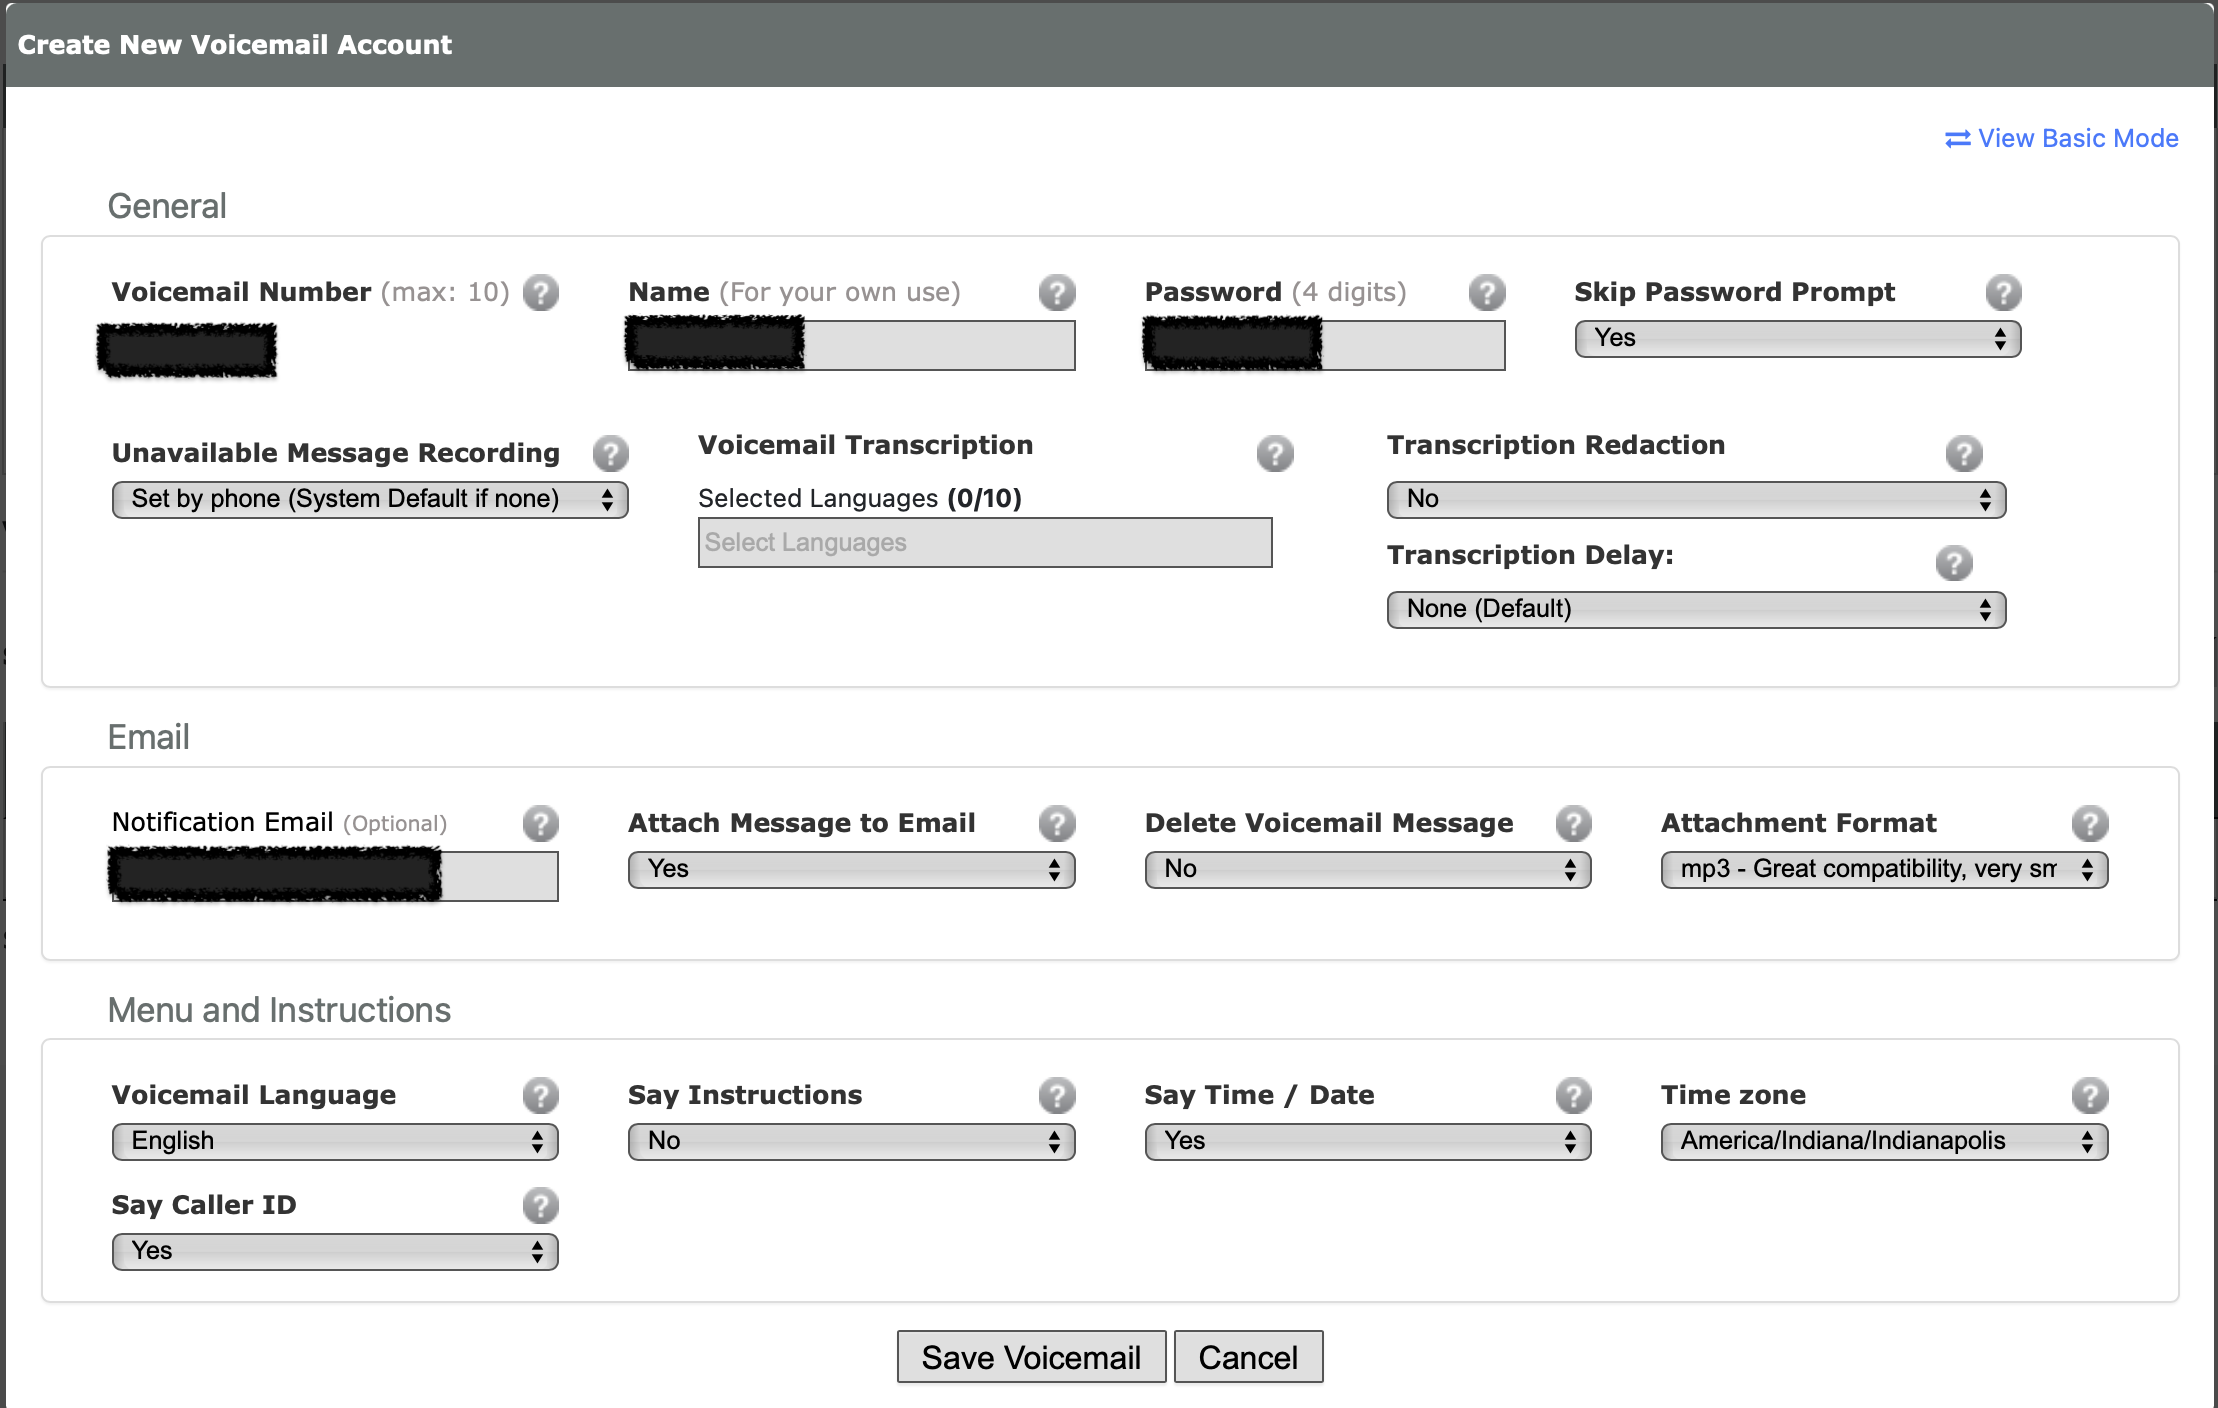
Create a voicemail account that your kid can receive voicemail messages on. It’s no extra cost unless you add in fancy transcription features. You can have voicemail recordings emailed; consider using an alias/address that goes to both your kid and adults in the household, or just the adults. Your kid will still be able access the voicemails directly by the phone itself.
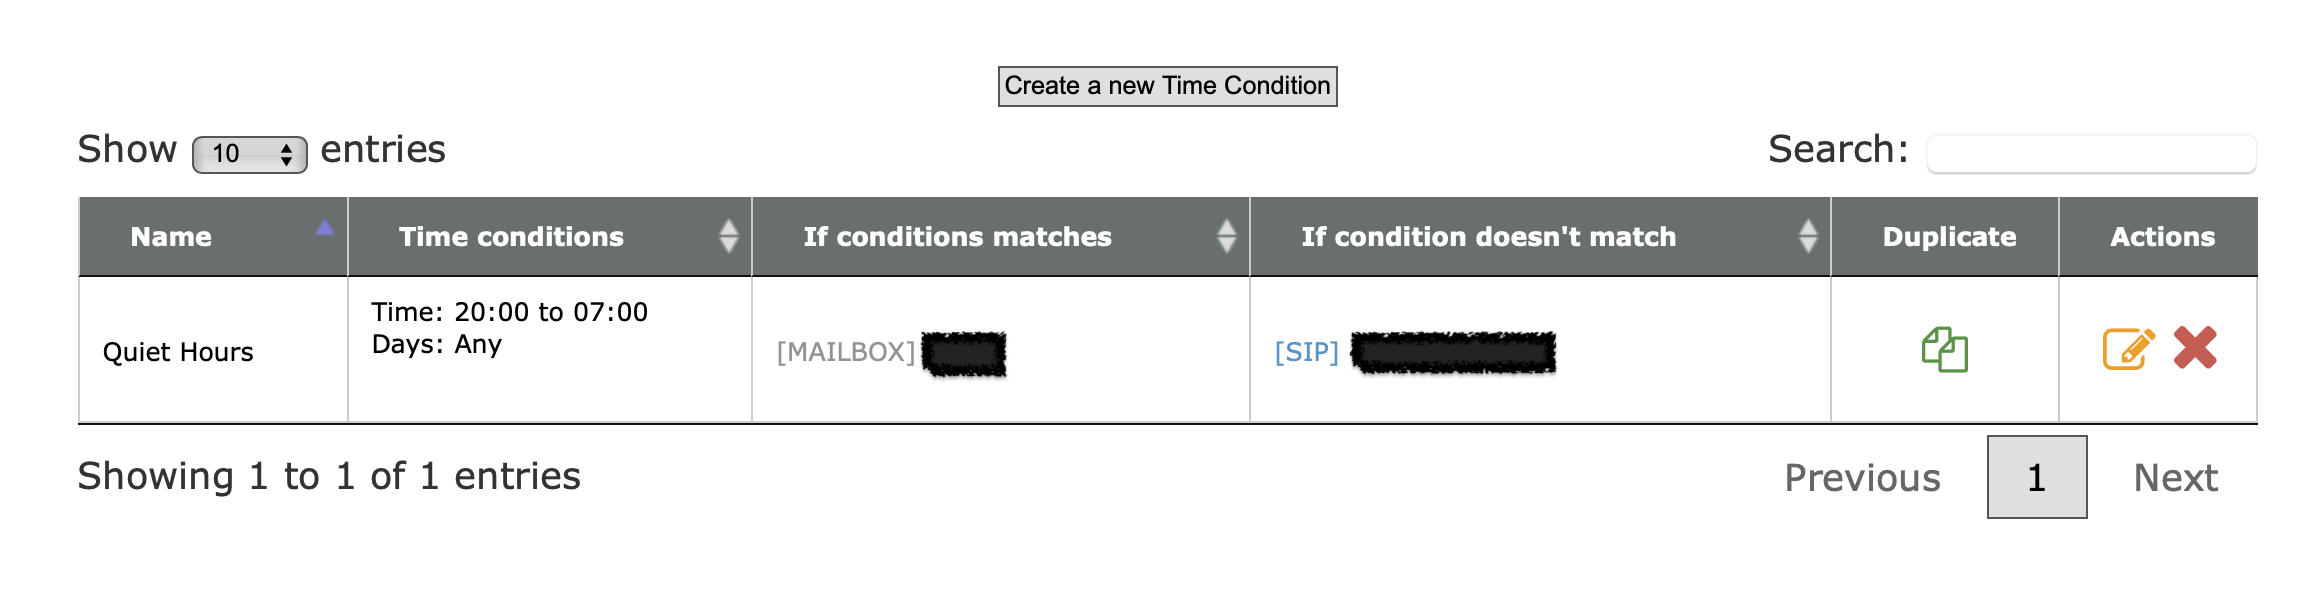
Consider setting up “do not disturb” hours. This is done with the Time Conditions feature at voip.ms.
Consider setting up CallerID filtering. You can import a list of phone numbers that are allowed to call in to your kid’s phone, and block everything else.

There are lots of other cool features that voip.ms offers for free as a part of having a DID number with them, so I encourage you to poke around their documentation and interface.
I will eventually shift away from managing the line’s features on voip.ms directly and use FreePBX running on a Raspberry Pi instead. This would expand the parental controls available (e.g. preventing outbound calls at certain times, limiting calls to certain numbers) also enable some cool additional integrations and fun features.
Set up the Grandstream device
This device will be the bridge between your traditional telephone and the VOIP.ms service. It’s what you will need to plug in to an ethernet port on your router or a switch connected to your router, and it’s also what your kids phone will be connected to. Again, a long phone cord may be the way to help them access the phone easily without needing to get to your home networking setup.
I recommend following the steps in this guide from the voip.ms folks to the letter. This is probably the most technical and potentially intimidating part of the process, but while some of the options on newer firmware versions of the Grandstream are labeled differently, it should be relatively straightforward.
Make sure you use the sub-account username and password you created above, not your main voip.ms account info.
I enabled encryption for calls, which involves enabling it both on the SIP subaccount and on the Grandstream device.
I also enabled message waiting indication (MWI) which gives a stuttered dial tone when there’s a new voicemail message waiting.
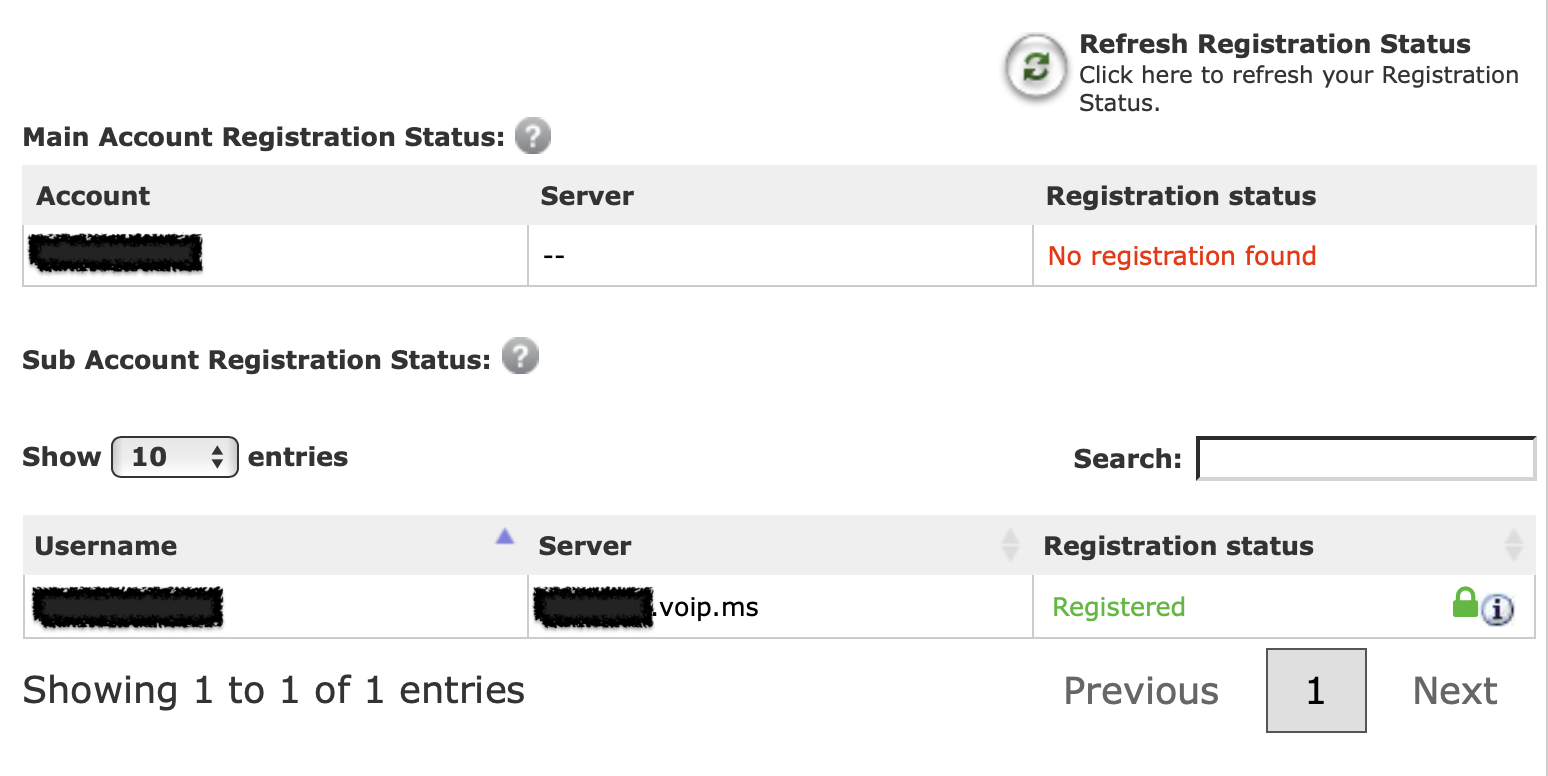
When everything is working correctly, you should see a blue light on the port 1 phone icon on the Grandstream device, and the subaccount should show as registered in your voip.ms account.
Plug in the phone and make calls!
After you plug in the phone to the port on the Grandstream device and pick it up, you should hear a dial tone, and you should be able to make and receive calls.
Even though my daughter had talked to others on one of our smartphones many times, she was so delighted to make and receive her first calls on her own phone line.
You can view the Call Detail Records (CDR) report in your voip.ms account to understand how much calls are costing, where calls are coming from and going to, etc.
The post Setting up a landline phone for kids appeared first on Chris Hardie's Tech and Software Blog.
]]>The post Using Laravel and an e-ink tablet to make a DIY digital sign for dynamic office window message display appeared first on Chris Hardie's Tech and Software Blog.
]]>If you’ve ever researched this category of products, you know there are many vendors out there who will happily sell you very expensive devices and supporting accessories to make this happen. This is “call us for pricing” level product sales meant for hotels, convention centers, malls and large office buildings, not for a small community newspaper on a budget.
Even the few standalone products I was able to find for sale on Amazon and elsewhere seemed pretty janky. I’d have to download an app or install a hub with a proprietary communication technology or be constrained to a certain number of characters and layout, or some other limitation I wasn’t quite happy with.
I decided to ask the Fediverse:
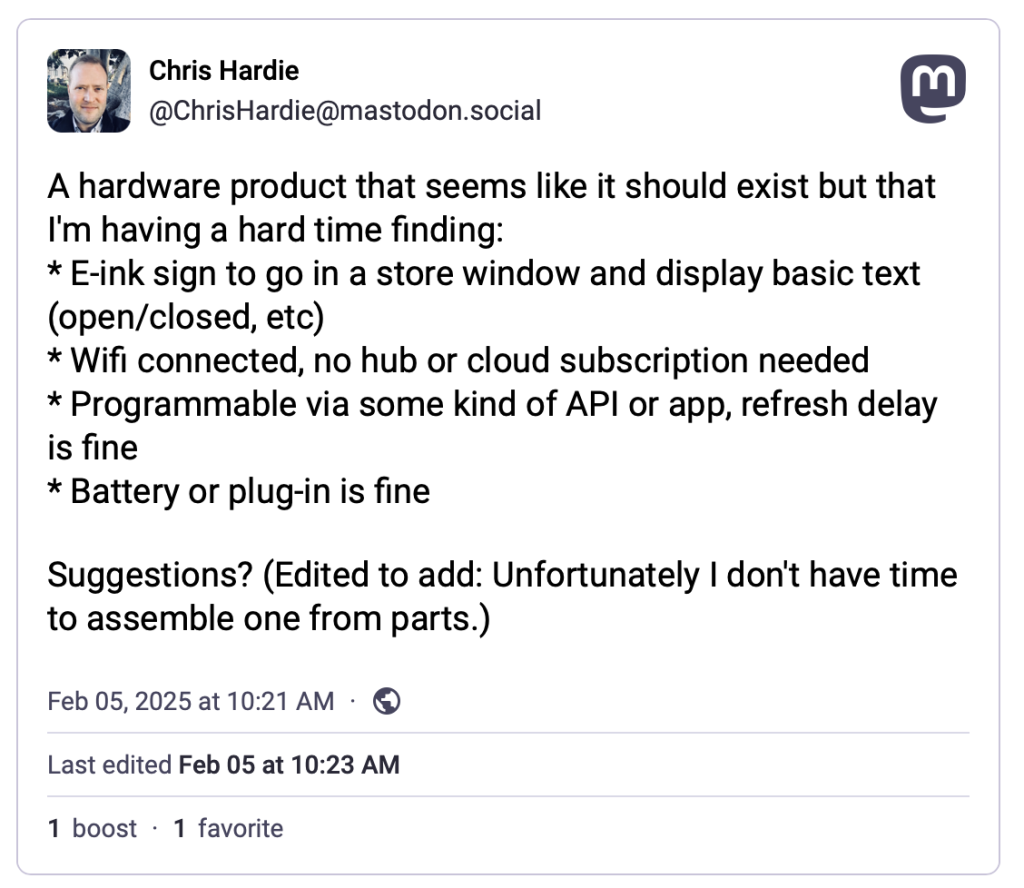
(I learned while writing this that Mastodon posts do not seem to embed in WordPress seamlessly – tragic!)
At first, the responses were reinforcing how difficult this might be to find, but then my colleague Scott Evans made a comment that sparked the eventual solution:
I feel like an e-ink reader of some kind might be your best bet (one that can run Android apps). Then you could install a kiosk style browser and update the page it’s pointing at. Something from Onyx?
https://toot.scott.ee/@scott/statuses/01JKBE3QZWEZCMN2QZZH75R6BY
After some searching I found this wonderful blog post by Jan Miksovsky, MomBoard: E-ink display for a parent with amnesia. Jan described using a BOOX Note Air2 Series e-ink device to create a dynamic sign display for Jan’s mom. They used a web browser to load a simple website that would display the latest customized messages based on details configured in web interface elsewhere, source code here. I love it!
I emailed Jan with some questions about the setup and Jan was kind enough to write back with a clarification that the original BOOX ability to launch a web browser on device restart appears to have been removed, but a request is in to restore this functionality.
Jan also had a helpful thought about how to launch the browser in to full-screen mode, which I haven’t tried yet: “That’s controlled by whether a website has a web app manifest defined for it. If it does, then the browser “Add to Home Screen” command should allow you to add the site to your home screen. When launched, it should open in full screen mode.“
I found a used Note Air2 device on eBay for $189 plus shipping and tax. A non-trivial expense, but far less expensive than any of the other options I was finding.
When it arrived I turned off all of the “auto-sleep” type settings so that the device would basically stay on all the time. I tested out having the web browser stay open on one page for days on end, and it worked! Now I just needed to figure out my own web interface to manage the sign message.
Since I already have a Laravel-powered application that manages many functions of our newspaper business, I thought it would make sense to build this functionality in to that. I created two new models, one for storing the current sign message on a given sign (yes, I’m over-engineering this a bit) and one to store templates that can be loaded to populate a sign message, either manually or on a schedule.
class SignMessage extends Model
{
    protected $fillable = [
        'location',
        'message',
        'status',
        'last_loaded_at',
        'is_locked',
    ];
    protected $casts = [
        'is_locked' => 'boolean',
        'last_loaded_at' => 'datetime',
    ];
}
class SignTemplate extends Model
{
    protected $fillable = [
        'location',
        'name',
        'message',
        'is_default',
        'sets_status',
    ];
    protected $casts = [
        'is_default' => 'boolean',
    ];
}
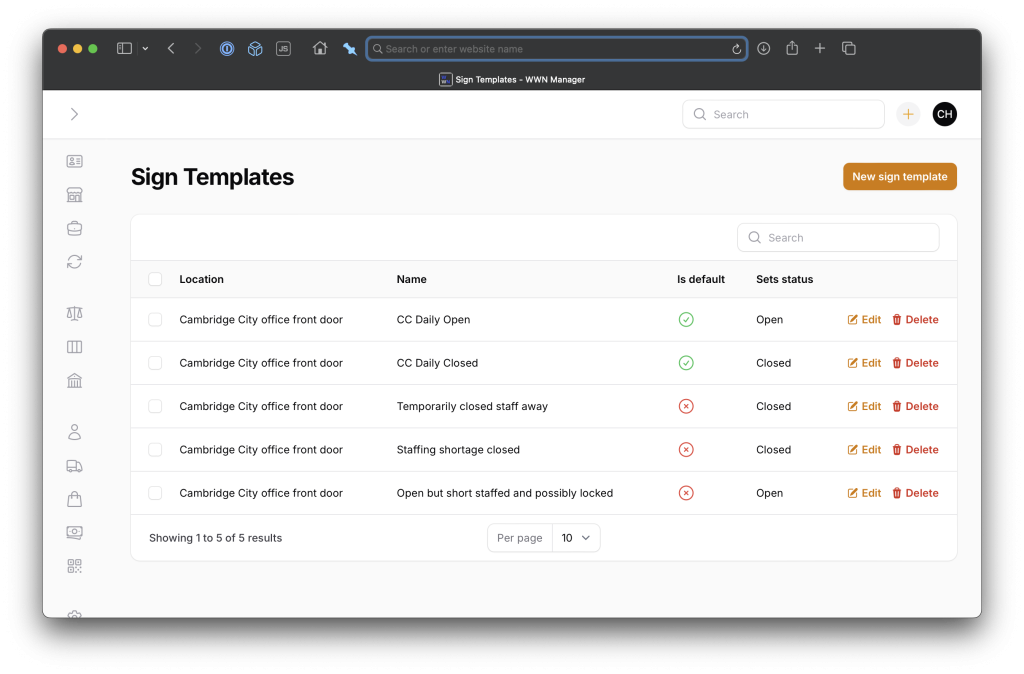
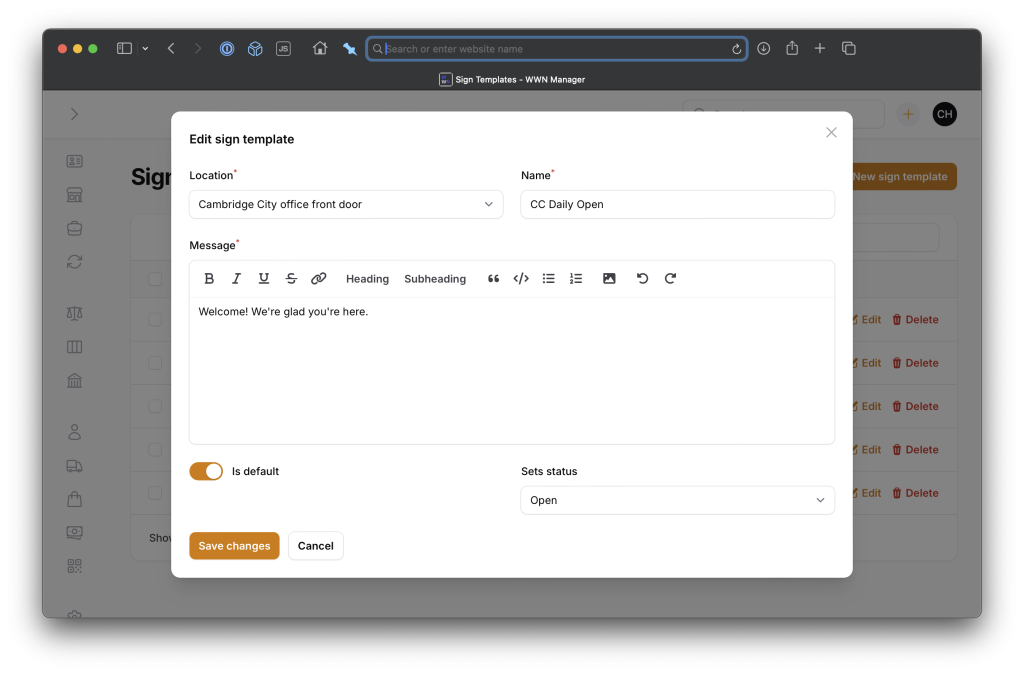
Then, I made use of the always-amazing Filament admin panel building package to whip up an administrative interface to manage the data. Here’s managing and editing sign templates:
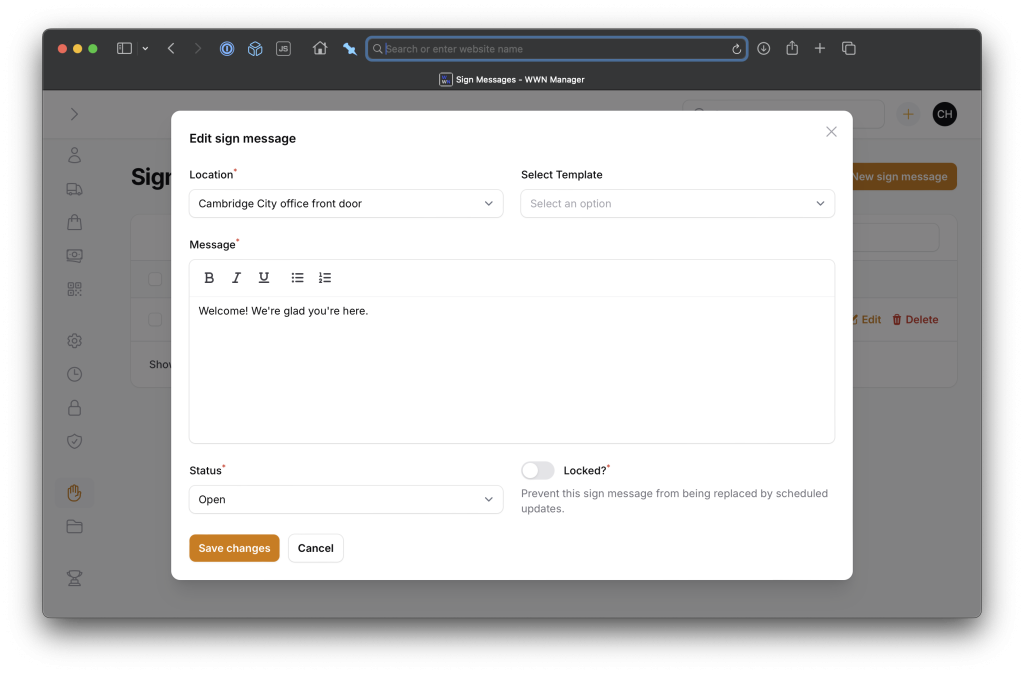
Here’s managing the actual sign message:
Since my sign template management suggests defining a sign message that should be the default for certain statuses (open and closed), I needed a way to activate those on a schedule. Here’s the Laravel command that handles that and sends a message to a Slack channel with the result:
<?php
namespace App\Console\Commands;
use App\Models\SignMessage;
use App\Models\SignTemplate;
use Illuminate\Console\Command;
use Spatie\SlackAlerts\Facades\SlackAlert;
class SetSignMessageCommand extends Command
{
    /**
     * The name and signature of the console command.
     *
     * @var string
     */
    protected $signature = 'wwn:set-sign-message
        { --location=ccfront : Location of the sign }
        { --status= : Status to set for the sign }';
    /**
     * The console command description.
     *
     * @var string
     */
    protected $description = 'Set the status and message of a sign at a certain location.';
    /**
     * Execute the console command.
     */
    public function handle()
    {
        // If current message can be auto-updated / not locked
        $currentMessage = SignMessage::where('location', $this->option('location'))->first();
        if ($currentMessage && $currentMessage->is_locked) {
            return Command::SUCCESS;
        }
        // Get first message that is default status
        $newMessage = SignTemplate::where('location', $this->option('location'))
            ->where('is_default', true)
            ->where('sets_status', $this->option('status'))
            ->first();
        // Set message and status
        if ($newMessage) {
            if ($currentMessage) {
                $currentMessage->update([
                    'message' => $newMessage->message,
                    'status' => $this->option('status'),
                ]);
            } else {
                SignMessage::create([
                    'location' => $this->option('location'),
                    'status' => $this->option('status'),
                    'message' => $newMessage->message,
                    'is_locked' => false,
                ]);
            }
            if (! empty(config('wwn.signs.slack_channels')[$this->option('location')])) {
                SlackAlert::to('ops')
                    ->toChannel(config('wwn.signs.slack_channels')[$this->option('location')])
                    ->message("Sign at {$this->option('location')} set to {$this->option('status')} with new message.");
            }
        }
        return Command::SUCCESS;
    }
}
Then, I can run that command on a schedule according to our office hours:
        /**
         * Sign changes
         */
        // T-F, open at 9 am
        $schedule->command('wwn:set-sign-message --status=open')
            ->timezone(config('wwn.timezone'))
            ->days([Schedule::TUESDAY, Schedule::WEDNESDAY, Schedule::THURSDAY, Schedule::FRIDAY])
            ->at('09:00');
        // M, T, W, F close at 5 pm
        $schedule->command('wwn:set-sign-message --status=closed')
            ->timezone(config('wwn.timezone'))
            ->days([Schedule::MONDAY, Schedule::TUESDAY, Schedule::WEDNESDAY, Schedule::FRIDAY])
            ->at('17:00');
        // Th close at 12 noon
        $schedule->command('wwn:set-sign-message --status=closed')
            ->timezone(config('wwn.timezone'))
            ->days([Schedule::THURSDAY])
            ->at('12:00');
Finally, I needed to render the sign message at a URL where the BOOX device could load it, and in a way that would refresh automatically when the message changed.
I used a simple Laravel blade file with a Livewire component that would poll for updates on a regular basis. Here’s the blade file, with messy CSS courtesy of ChatGPT:
<!DOCTYPE html>
<html lang="en">
<head>
    <meta http-equiv="refresh" content="86400">
    <title>Sign for {{ $signMessage->location }}</title>
    <style>
        html, body {
            width: 100%;
            height: 100%;
            margin: 0;
            padding: 0;
            font-family: Arial, Helvetica, sans-serif;
            display: flex;
            flex-direction: column;
            justify-content: flex-start; /* Reduce excess top margin */
            align-items: center;
        }
        h1 {
            text-transform: uppercase;
            font-size: 20vh; /* Fill top 1/4th of screen */
            white-space: nowrap;
            overflow: hidden;
            text-overflow: clip;
            width: 100%;
            line-height: 1;
            margin: 2vh 0;
            text-align: center;
            flex: 0 0 auto;
        }
        #message {
            flex: 1; /* Fill remaining space */
            font-size: 6vh;
            max-width: 90%;
            max-height: 75vh;
            overflow: hidden;
            display: flex;
            flex-direction: column;
            justify-content: flex-start; /* Reduce excess space at top */
            align-items: flex-start; /* Align message content to the left */
            text-align: left;
            word-wrap: break-word;
            padding: 0 5%;
            margin-top: 3vh; /* Add spacing between status and message */
        }
        #message p {
            margin: 1.5vh 0; /* Slightly more spacing between paragraphs */
            max-width: 100%;
            word-wrap: break-word;
        }
    </style>
</head>
<body>
    @livewire('sign-display', ['location' => $signMessage->location])
</body>
</html>
Here’s the Livewire component:
<div id="sign-display" wire:poll.{{ config('wwn.signs.refresh_rate.default_ms') }}ms="updateSignData">
    @if($signMessage->status)
        <h1 id="status">{{ $signMessage->status_label }}</h1>
    @endif
    <div id="message">
        {!! $signMessage->message !!}
    </div>
</div>
You’ll notice that there are actually two refresh mechanisms in use, one in the HTML header to refresh the entire page once per day, and one in the Livewire component to refresh its content at a configurable rate, currently every 5 minutes. This ended up being necessary because I discovered that even for anonymous/logged-out web requests, Laravel still sets a CSRF token that expires after a few days, and so the Livewire component would eventually stop working. The whole-page refresh solves this.
I did try for a while to have the Livewire component dynamically set its polling interval, as there are some hours of the day where the message is almost certain not to change and a longer wait time would be fine, and others where a faster refresh would be ideal, but this was more trouble than it was worth given the technical complexity it added. So for now, our office staff is content to know that from the time you change the message in the web interface to the time it refreshes on the device may be as much as five minutes. If you need to change it more urgently than that…use a paper sign? 😅
Here’s the Livewire component code:
<?php
namespace App\Livewire;
use App\Models\SignMessage;
use Illuminate\Support\Carbon;
use Illuminate\Support\Facades\Log;
use Livewire\Component;
class SignDisplay extends Component
{
    public $signMessage;
    public $location;
    public function mount(string $location)
    {
        $this->location = $location;
        $this->loadSignMessage();
    }
    public function updateSignData(): void
    {
        $this->loadSignMessage();
    }
    public function loadSignMessage(): void
    {
        $this->signMessage = SignMessage::where('location', $this->location)->first();
        if (! $this->signMessage) {
            abort(404);
        }
        $this->signMessage->touch('last_loaded_at');
    }
    public function render()
    {
        return view('livewire.sign-display');
    }
}
Finally, I needed a Laravel HTTP controller to serve up the sign message:
<?php
namespace App\Http\Controllers;
use App\Models\SignMessage;
use Illuminate\Http\Request;
class SignMessageController extends Controller
{
    /**
     * Handle the incoming request.
     */
    public function __invoke(Request $request, string $location)
    {
        $signMessage = SignMessage::where('location', $location)->first();
        abort_if(! $signMessage, 404);
        $signMessage->touch('last_loaded_at');
        return view('signs.sign-message', compact('signMessage'));
    }
}
and a web route to point to it:
    // Office signs
    Route::get('/signs/{location}', \App\Http\Controllers\SignMessageController::class);
The web route is a part of a middleware group that ensures requests can only come from known IP addresses of our office locations, as one form of authentication.
I use the “last_loaded_at” model attribute as a quick way to confirm that the sign is successfully loading the latest message, even if I can’t put my eyes on it. In theory I will set up monitoring and alerting for when this value becomes scale; in reality I will not.
I set the device’s browser’s home tab to the desired URL, launched the browser, and it worked!
I went looking for a way to securely mount the BOOX device to the window and it was actually kind of hard to find something suitable since most people apparently don’t mount their e-readers to windows. In the end I found a $30 mounting kit designed to mount a satellite communications device to your vehicle’s sunroof for mobile internet access (affiliate link). Again, way over-engineered but it’s going to hold that sucker in place through a lot.
The end result? It’s beautiful!

I’ve used it a few times now to post special messages welcoming certain office visitors. If I have time I may add in an announcement about when the latest issue of the paper has arrived for sale, breaking news headlines, etc. What dreams may come.
I’m glad for any feedback or suggestions, especially if you try your own version of this. Thanks again to Jan Miksovsky and Scott Evans for the breakthrough ideas, and to others on Mastodon who helped with ideas and details.
The post Using Laravel and an e-ink tablet to make a DIY digital sign for dynamic office window message display appeared first on Chris Hardie's Tech and Software Blog.
]]>The post How far I’ll go to make an RSS feed of your website appeared first on Chris Hardie's Tech and Software Blog.
]]>Or even worse, you have played some role in designing or building a tool or service that other people use to publish timely content on the Internet, and you unforgivably allowed it to ship without support for RSS feeds.
And you probably just assume that a few remaining RSS feed nerds out there are just quietly backing away in defeat. “They’ll just have to manually visit the site every day if they want updates,” you rationalize. “They can download our app and get push notifications instead,” you somehow say with a straight face.
No.
I don’t know who you are. I don’t know what you want. If you are looking for clicks, I can tell you I don’t have any clicks left to give.

But what I do have are a very particular set of skills, skills I have acquired over a very long career. Skills that make me a nightmare for people like you.
If you publish your content in an RSS feed now, that’ll be the end of it. I will not look for you, I will not pursue you, I will simply subscribe to your feed.
But if you don’t, I will look for you, I will find you, and I will make an RSS feed of your website.
And here’s how I’ll do it.
(Psst, this last bit is a playful reference to the movie Taken, I am a nice person IRL and don’t actually tend to threaten or intimidate people around their technology choices. But my impersonation of a militant RSS advocate continues herein…)
Jump straight to a scenario and solution:
- You’re just hiding your RSS feed
- You’re hiding your RSS feed URL structure in documentation or forum responses
- You forgot that feeds are special URLs
- Your feed is malformed
- You have no feed but your content is structured
- You use asynchronous requests to fetch JSON and render your content
- You block requests from hosted servers
- You’re super in to email newsletters
- Your email newsletter has no RSS feed
- Your mobile app is where you put all the good stuff
You’re just hiding your RSS feed
Okay, heh, simple misunderstanding, you actually DO have an RSS feed but you do not mention or link to it anywhere obvious on your home page or content index. You know what, you’re using a <link rel="alternate" type="application/rss+xml" href="..." /> tag, so good for you.
I found it, I’m subscribing, we’re moving on, but for crying out loud please also throw a link in the footer or something to help the next person out.
Further reading and resources
You’re hiding your RSS feed URL structure in documentation or forum responses
Oh so you don’t have an advertised RSS feed or <link> tag but you do still support RSS feeds after all, it’s just that you tucked that fact away in some kind of obscure knowledgebase article or a customer support rep’s response in a community forum?
Fine. I would like you to feel a bit bad about this and I briefly considered writing a strongly worded email to that end, but instead I’m using the documented syntax to grab the link, subscribe and move on. Just…do better.
Further reading and resources
You forgot that feeds are special URLs
You decided to put your RSS feed behind a Cloudflare access check. Or you aggressively cached it. Or your web application firewall is blocking repeated accesses to the URL from strange network locations and user agents, which is exactly the profile of feed readers.
I understand, we can’t always remember to give every URL special attention.
But I will email your site administrator or tech support team about it, and you will open a low-priority ticket or send my request to your junk folder, and I will keep following up until you treat your RSS feed URLs with the respect they deserve.
Further reading and resources
Your feed is malformed
You somehow ended up with some terrible, custom, non-standard implementation of RSS feed publishing and you forgot to handle character encoding or media formats or timestamps or weird HTML tags or some other thing that every other established XML parsing and publishing library has long since dealt with and now you have an RSS feed that does not validate.
Guess what, RSS feeds that don’t validate might as well be links to a Rick Astley video on YouTube given how picky most RSS feed readers are. It’s just not going to work.
But I will work with that. I will write a cron job that downloads your feed every hour and republishes it with fixes needed to make it valid.
#!/bin/sh
# Define variables for URLs, file paths, and the fix to apply
RSS_FEED_URL="https://example.com/rss.xml"
TEMP_FILE="/tmp/rss_feed.broken"
OUTPUT_FILE="/path/to/feeds/rss_feed.xml"
SEARCH_STRING="Parks & Recreation"
REPLACEMENT_STRING="Parks & Recreation"
# Download the RSS feed
curl -s -L -o "$TEMP_FILE" "$RSS_FEED_URL"
# Fix invalid characters or strings in the RSS feed
perl -pi -e "s/$SEARCH_STRING/$REPLACEMENT_STRING/gi;" "$TEMP_FILE"
# Move the fixed file to the desired output location
cp "$TEMP_FILE" "$OUTPUT_FILE"
# Clean up the temporary file
rm "$TEMP_FILE"
If I want to embarrass you in front of your friends I will announce the new, valid feed URL publicly and let others use it too. But really, you should just fix your feed and use a standard library.
Further reading and resources
You have no feed but your content is structured
You programmatically publish your timely content in a structured format from a structured source but offer no RSS feed? What a terrible decision you’ve made for the distribution of your information, for your readers, for your stakeholders, and for the whole world.
But ’tis no matter, I’ll have an RSS feed of your site up and running shortly using a DOM crawler (e.g. Symfony’s DomCralwer component in PHP) that can navigate HTML and XML documents using XPath, HTML tags or CSS selectors to get me what I want.
Your stuff’s generated using an HTML/CSS template with a loop? Great? Or it’s even just in a plain HTML table? Let’s do this.
$nodes = $crawler->filter('.post_content table tr');
foreach ($nodes as $node) {
	$tr = new Crawler($node);
	$date         = $tr->filter('td')->eq(0)->text();
	$title_column = $tr->filter('td')->eq(1);
	$title        = $title_column->text();
	$links        = $title_column->filter('a');
	if ($links->count()) {
		$url = $this->resolveUrl($source, $links->first()->attr('href'));
	} else {
		continue;
	}
	$items[] = array(
		'pubDate' => Carbon::createFromFormat('!m-d-Y', $date),
		'title' => ucwords(strtolower($title)),
		'url' => $url,
	);
}
My software will programmatically visit your site every hour to see what it finds and publish an RSS feed of the latest.
Further reading and resources
You use asynchronous requests to fetch JSON and render your content
You were right there at the finish line, buddy, and you choked.
You had everything you need — structured data storage, knowledge of how to convey data from one place to another in a structured format, probably some API endpoints that already serve up exactly what you need — all so you can dynamically render your webpage with a fancy pagination system or a super fast search/filter feature.
And yet, still, you somehow left out publishing your content in one of the most commonly used structured data formats on the web. (Psst, that’s RSS that I’m talking about. Pay attention, this whole thing is an RSS thing!)
So I will come for your asynchronous requests. I will use my browser’s dev tools to inspect the network requests made when you render your search results, and I will pick apart the GET or POST query issued and the headers and data that are passed with it, and I will strip out the unnecessary stuff so that we have the simplest query possible.
If it’s GraphQL, I will still wade through that nonsense. If it uses a referring URL check as some kind of weak authentication, I will emulate that. If you set an obscurely named cookie on first page visit that is required to get the content on page visit two, be assured that I will find and eat and regurgitate that cookie.
And then I will set up a regularly running script to ingest the JSON response and create a corresponding RSS feed that you could have been providing all along. I can do this all day long.
public function generateRssItems(Source $source): RssItemCollection
{
	$response = HTTP::withUserAgent($userAgent)
		->get($source->source_url);
	$this->searchResultsToArray($response->json(), $source);
	return RssItemCollection::make($this->feedItems);
}
private function searchResultsToArray(array $results, Source $source): void
{
	if (! empty($results['combined_feeds'])) {
		foreach ($results['combined_feeds'] as $result) {
			$this->feedItems[] = array(
				'pubDate' => $this->getPubDate($result),
				'title' => $this->getTitle($result),
				'url' => $this->getArticleUrl($result, $source),
				'description' => $this->getArticleContent($result),
			);
		}
		return;
	}
}
Further reading and resources
You block requests from hosted servers
Even though I build my content fetching tools to be good citizens on the web — at most checking once per hour, exponential backoff if there are problems, etc. — you may still decide to block random web requests for random reasons. Maybe it’s the number of queries to a certain URL, maybe it’s the user agent, or maybe it’s because they’re coming from the IP address of a VPS in a data center that you assume is attacking you.

Fine. Whatever. I used to spend time trying to work around individual fingerprinting and blocking mechanisms, but I got tired of that. So now I pay about $25/year for access to rotating residential IP addresses to serve as proxies for my requests.
I don’t like supporting these providers but when I come to make an RSS feed of your content, it will look like it’s from random Jane Doe’s home computer in some Virginia suburb instead of a VPS in a data center.
Look what you made me do.
Further reading and resources
You’re super in to email newsletters
You don’t put timely new content on your website, but you sure do love your fancy email newsletters with the timely updates your audience is looking for. You like them so much that you favor them over every other possible content distribution channel, including a website with an RSS feed.
That’s okay. Fortunately, many email newsletter platforms have figured out that offering a web-based archive of past newsletter campaigns is a valuable service they can provide to, um, people like you, and many of those have figured out that including an RSS feed of said campaigns is worthwhile too.
Mailchimp puts a link to right there in the header of their web-based view of an individual campaign send unless (boo) a list owner has turned off public archives, which you should seriously NOT do unless your list really needs to be private/subscribers only.
Further reading and resources
Your email newsletter has no RSS feed
You’re using an email newsletter platform that doesn’t have RSS feeds built in?
Please, allow me to make one for you. I will subscribe to your email newsletter with a special address that routes messages to a WordPress site I set up just for the purpose of creating public posts with your newsletter content. Once that’s done, the RSS part is easy given that WordPress has that support built right in.
I’ve detailed the technical pieces of that particular puzzle in a separate post:
Your mobile app is where you put all the good stuff
No RSS feed. No email newsletter. The timely content updates are locked up in your mobile app where the developers involved have absolutely no incentive to provide alternative channels you didn’t ask for.
No hope? This is probably where a reasonable person would say “nah, I’m out.” Me? I’m still here.
The nice thing is that if a mobile app is reasonably well designed and supports any kind of information feed, push notifications, etc. then it almost has to have some kind of API driving that. Sometimes the APIs are gloriously rich in the information they make available, but of course usually also completely undocumented and private.
I’ve found Proxyman to be an indispensable tool for what I need to do next:
- Intercept all web traffic from my mobile device and route it through my laptop
- Install a new certificate authority SSL certificate on my mobile device that tells it to trust my laptop as a source of truth when verifying the validity of SSL certificates for certain domains.
- Start making requests from your mobile app that loads the information I want to be in an RSS feed.
- Review the HTTP traffic being proxied through my laptop and look for a request that has a good chance of being what I want.
- Tell my laptop to intercept not only the traffic meta data but the secure SSL-encrypted traffic to the URL I care about.
- Inspect the request and response payload of the HTTPS request and learn what I need to know about how the API powering that mobile app feed operates.
It’s an amazing and beautiful process, and if it’s wrong I don’t want to be right.
If too many mobile app developers get wind of this kind of thing happening, they’ll start using SSL certificate pinning more, which builds in to the app the list of certificates/certificate authorities that can be trusted, removing the ability to intercept by installing a new one. So, you know, shhh. (Joking aside, secure all the things, use certificate pinning…but then also publish an RSS feed!)
Once I have your mobile app’s API information, it’s back to the mode of parsing a JSON response noted above, and generating my own RSS feed from it.
Further reading and resources
Escalations
There are other escalations possible, of course. Taking unstructured data and feeding it to an LLM to generate structured data. Recording and replaying all the keystrokes, mouse moves and clicks of a web browsing session. Convincing an unsuspecting IT department worker to build a special export process without really mentioning it to anyone. Scraping data from social media platforms.
I’ve done it all, none of it is fun, and none of it should be necessary.
Publish your info in a structured, standard way.
What do I do with all of these feeds?
Thanks for asking. I own a newspaper. We publish in print and online. Our job is to be aware of what’s happening in the community so we can distill what’s most important and useful in to reporting that benefits our readers. We have a very small staff tasked with keeping up with a lot of information. Aggregating at least some of it through RSS feeds has made a huge difference in our work.
Oh, you meant at the technical level? I have one Laravel app that is just a bunch of custom classes doing the stuff above and outputting standard RSS feeds. I have another Laravel app that aggregates all of the sources of community information I can find, including my custom feeds, in to a useful, free website and a corresponding useful, free daily email summary. I also read a lot of it in my own feed reader as a part of my personal news and information consumption habits.
Related writings
I’ve written a lot of stuff elsewhere about how to unlock information from one online source or another, and the general concepts of working on a more open, interoperable, standards-based web. If you enjoyed the above, you might like these:
- In rebuilding the open web, it’s up to technologists to make sure it’s also the best version of the web
- A proposed rubric for scoring sites on their commitment to the open web
- The importance of owning instead of renting our digital homes
- An example of why RSS is useful and important
- Personal banking needs an API
- Unlocking community event information from Facebook
Updated March 3, 2025 at 10 a.m. Eastern to note: Hacker News discussion
The post How far I’ll go to make an RSS feed of your website appeared first on Chris Hardie's Tech and Software Blog.
]]>The post Script to remove all asterisk call agents from all phone queues appeared first on Chris Hardie's Tech and Software Blog.
]]>One aspect of our setup that has taken some figuring out is having staff log in and out of the phone system so that they can be available to answer those queue calls at the right time.
Remembering to log in at the start of the day is fairly straightforward, though is still a habit all of us our developing. Remembering to log out at the end of the day is for some reason a bit more hit and miss; when my brain has decided it’s time to leave the office or stop working, for some reason logging out of the phone is frequently not top of mind, and apparently that’s often true for my coworkers as well.
It may not seem like it would be a big deal to just let folks stay logged in all the time, but it can mean the difference between a caller sitting on hold for an extra minute or two as the phone system rings the phones of folks who have left for the day, or the caller more quickly getting a useful message and the option to leave a voicemail. We could address this through more complex conditional logic in our phone system set up, but for now I’m trying to address it in a way that mostly maintains user-level control.
So, based on some other bits and pieces of scripts found on Stackoverflow and elsewhere (# #), I put together this Bash script that logs everyone out of all queues:
#!/usr/bin/bash
# Remove an Asterisk agent from queues, or all agents from all queues
Help()
{
   # Display Help
   echo "Remove Asterisk dynamic agents from queues."
   echo
   echo "Syntax: remove_from_queue.sh [-a|eh]"
   echo "options:"
   echo "a         Remove all members from all queues."
   echo "e <123>   Specify an extension to be removed ."
   echo "h         Print this help."
   echo
}
while getopts ":ahe:" option; do
   case $option in
      h) # display Help
         Help
         exit;;
      e) # Enter a specific extension to be removed
         member=$OPTARG;;
      a) # set all queue members to be removed
         all=true;;
      \?) # Invalid option
         echo "Error: Invalid option"
         exit;;
   esac
done
## all queues
declare -a queues=(`asterisk -rx "queue show" | cut -d " " -f1`  )
for q in "${queues[@]}"
do
    ## all agents in queue
    declare -a members=(`asterisk -rx "queue show $q" | grep "/" | cut -d"(" -f2 | cut -d" " -f1`)
    for m in "${members[@]}"
    do
       if [ ! -z $member ]; then
          if [[ $m == *"$member"* ]]; then
              echo "Removing member Local/$member@from-queue/n from $q"
              cmd="queue remove member Local/$member@from-queue/n from $q"
              asterisk -rx "$cmd"
          fi
       else
         if [ "$all" = "true" ]; then
             echo "Removing member $m from $q"
              cmd="queue remove member $m from $q"
              asterisk -rx "$cmd"
         fi
       fi
    done
done
I run it via cron like so:
# Remove all asterisk queue agents from all queues at the end of the day
0 18  *  *  *  root       /usr/local/bin/remove_from_queue.sh -a
The post Script to remove all asterisk call agents from all phone queues appeared first on Chris Hardie's Tech and Software Blog.
]]>The post Cloudflare helper scripts for nginx and ufw appeared first on Chris Hardie's Tech and Software Blog.
]]>When spinning up a new server on an infrastructure platform like Digital Ocean, it’s almost certain that the IP address assigned to it is going to immediately see traffic from bad actors using automated attempts to find a web-based exploit. Even if you put Cloudflare in front of a web service and lock things down, connection attempts directly to the IP address will bypass their proxy and get through.
That’s where this first script comes in handy. Instead of allowing all tcp network activity to ports 80 and 443 to get through, I want to only allow traffic from known Cloudflare IP addresses. We can do this using the Ubuntu ufw firewall and Cloudflare’s published IP address blocks.
GadElKareem shared a script that I’ve adapted a bit to make use of ufw’s application profiles:
#!/usr/bin/env bash
set -euo pipefail
# lock it
PIDFILE="/tmp/$(basename "${BASH_SOURCE[0]%.*}.pid")"
exec 200>${PIDFILE}
flock -n 200 || ( echo "${BASH_SOURCE[0]} script is already running. Aborting . ." && exit 1 )
PID=$$
echo ${PID} 1>&200
cd "$(dirname $(readlink -f "${BASH_SOURCE[0]}"))"
CUR_DIR="$(pwd)"
wget -q https://www.cloudflare.com/ips-v4 -O /tmp/cloudflare-ips-v4
wget -q https://www.cloudflare.com/ips-v6 -O /tmp/cloudflare-ips-v6
for cfip in `cat /tmp/cloudflare-ips-v4`; do /usr/sbin/ufw allow from $cfip to any app "Nginx Full" comment "cloudflare"; done
for cfip in `cat /tmp/cloudflare-ips-v6`; do /usr/sbin/ufw allow from $cfip to any app "Nginx Full" comment "cloudflare"; done
It basically downloads known Cloudflare IPv4 and IPv6 addresses and then adds ufw rules to allow traffic from those addresses. I run this on a cron job like so:
# Refresh cloudflare IPs in ufw
0 7 * * * /root/bin/cloudflare-only-web-ports-ufw.sh >/dev/null 2>&1
The final step is to remove any ufw rules that allow traffic through to ports 80 and 443 for any source IP. This kind of rule may or may not be in place as a part of your existing server configuration.
The end result is that any web connection attempts not from Cloudflare will not be allowed through.
A second challenge with Cloudflare is making sure anything you do with visitor IP addresses found in access logs is using the actual original visitor IP instead of the Cloudflare proxy IP. An example would be using fail2ban to block accesses from a host that has tried too many times to gain unauthorized access to a server.
Fortunately, Cloudflare passes through the original visitor IP as a header, so we just have to make use of that in our logs. This script, originally shared by ergin on GitHub, will download the published Cloudflare IP addresses and generate an nginx-friendly configuration file that adjusts the “real IP” of the visitor for logging and other purposes:
#!/bin/bash
CLOUDFLARE_FILE_PATH=/etc/nginx/conf.d/cloudflare-realips.conf
echo "#Cloudflare" > $CLOUDFLARE_FILE_PATH;
echo "" >> $CLOUDFLARE_FILE_PATH;
echo "# - IPv4" >> $CLOUDFLARE_FILE_PATH;
for i in `curl -s https://www.cloudflare.com/ips-v4/`; do
    echo "set_real_ip_from $i;" >> $CLOUDFLARE_FILE_PATH;
done
echo "" >> $CLOUDFLARE_FILE_PATH;
echo "# - IPv6" >> $CLOUDFLARE_FILE_PATH;
for i in `curl -s https://www.cloudflare.com/ips-v6/`; do
    echo "set_real_ip_from $i;" >> $CLOUDFLARE_FILE_PATH;
done
echo "" >> $CLOUDFLARE_FILE_PATH;
echo "real_ip_header CF-Connecting-IP;" >> $CLOUDFLARE_FILE_PATH;
#test configuration and reload nginx
nginx -t && systemctl reload nginx
I run this on cron like so:
# Refresh cloudflare IPs and reload nginx
30 4 * * * /root/bin/cloudflare-ip-whitelist-sync.sh >/dev/null 2>&1
Because the config file is output in the /conf.d/ directory in the nginx main directory, the default nginx config will pick up its contents without further action.
Continuing with the example of using fail2ban to block unwanted traffic from abusive hosts, you can set up a set of custom Cloudflare ban/unban actions in a file like /etc/fail2ban/action.d/cloudflare.conf, using this version adapted from the original by Mike Rushton:
[Definition]
actionstart =
actionstop =
actioncheck =
actionban = curl -s -X POST -H 'X-Auth-Email: <cfuser>' -H 'X-Auth-Key: <cftoken>' \
            -H 'Content-Type: application/json' -d '{ "mode": "block", "configuration": { "target": "ip", "value": "<ip>" } }' \
            https://api.cloudflare.com/client/v4/user/firewall/access_rules/rules
actionunban = curl -s -o /dev/null -X DELETE -H 'X-Auth-Email: <cfuser>' -H 'X-Auth-Key: <cftoken>' \
              https://api.cloudflare.com/client/v4/user/firewall/access_rules/rules/$(curl -s -X GET -H 'X-Auth-Email: <cfuser>' -H 'X-Auth-Key: <cftoken>' \
              'https://api.cloudflare.com/client/v4/user/firewall/access_rules/rules?mode=block&configuration_target=ip&configuration_value=<ip>&page=1&per_page=1' | tr -d '\n' | cut -d'"' -f6)
[Init]
cftoken =
cfuser =
and then in the jail.local file you can set this up as the default action:
cfemail=<your cloudflare@email here.com>
cfapikey=<your cloudflare API key here>
# Define CF ban action without mailing
action_cf = cloudflare[cfuser="%(cfemail)s", cftoken="%(cfapikey)s"]
# Set default action to Cloudflare ban/unban
action = %(action_cf)s
The end result is that bad actors never get past Cloudflare’s proxy protection to attempt additional foolishness directly on your server.
Thanks to all of the folks who created the original version of these scripts. If you have suggestions for improvement or your own fun Cloudflare tooling, please share!
The post Cloudflare helper scripts for nginx and ufw appeared first on Chris Hardie's Tech and Software Blog.
]]>The post Adobe InDesign script to pull newspaper stories from Airtable API appeared first on Chris Hardie's Tech and Software Blog.
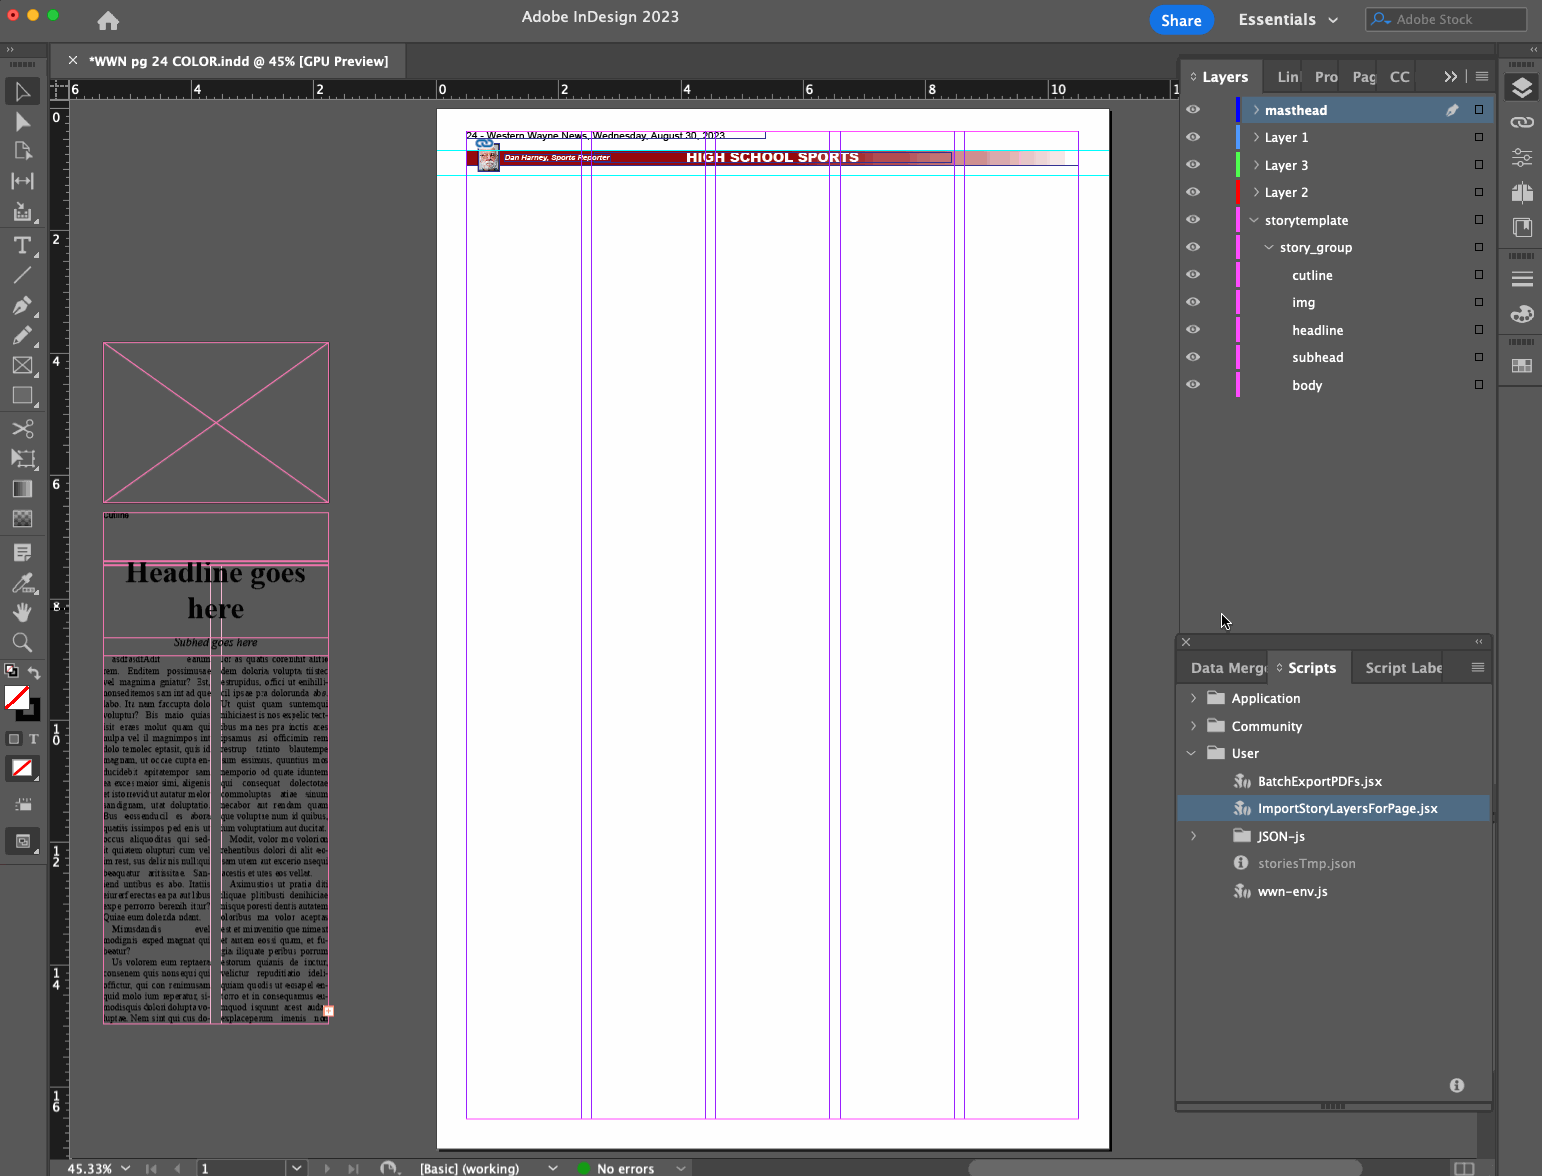
]]>One of them that was in progress at the time was a script to fetch articles and story content from our Airtable-managed story database for faster placement on the page, instead of copying and pasting.
That script is now in production and while it still has some rough edges, is also open sourced on GitHub. I thought I’d go into a little more detail here about how it works:
- Layout editor opens a page file they want to do layout on
- Layout editor runs InDesign script
- Script determines what page is being worked on based on the filename
- Script makes a call to a remote API with the page number as a query parameter, to see what stories are available and ready to be placed on that page, and gets them as a JSON data structure
- Using a base story layer that exists in our page template, script creates a new story layer with the headline, subhead, byline, story content, etc. filled in from the JSON data
- Script finds and replaces Markdown syntax in the content with established InDesign styles for bold, italics, body subheaders, bullet points, etc.
- Layout editor drags the new layer(s) into place, adjusts dimensions, and marks the stories as placed
- Rinse and repeat
We’re also working toward adding support for images and captions/cutlines.
This turns what could be a tens or hundreds of clicks process for a given story into just a few clicks. It saves more time on some stories than others, but especially for the ones that involved a lot of applying inline character styles that were being lost or mangled during copy/paste, I think it’s a clear win.
I referred to a “remote API” above because even though our stories are managed in Airtable right now, I chose to introduce an intermediate API for the InDesign script to call for simplicity and so that we weren’t locked in to Airtable’s way of doing things.
In our case, it’s implemented as a single action controller in Laravel, which essentially proxies the query on to the Airtable API and maps out a new, simpler data structure from the result with some content cleanup thrown in along the way:
$airtableResults = $this->getAirtableStories($pageNumber, $nextIssueDate);
$stories = $airtableResults->map(function (array $item) {
	$content = $this->processContent($item['fields']['Story Content']);
	return [
		'id' => $item['id'],
		'headline' => $this->extractHeadlineFromContent($content, $item['fields']['Story']),
		'subhead' => $this->extractSubtitleFromContent($content),
		'byline' => $this->getByline($item),
		'body' => $content,
	];
});
return response()->json([
	'status' => 'success',
	'count' => $stories->count(),
	'data' => $stories->toArray(),
]);
You can tell that there are some hacky things going on with how we represent headlines, subheads and bylines in the content of our stories, but that’s a blog post for another time.
Here’s what a response might look like:
{
  "status": "success",
  "count": 2,
  "data": [
    {
      "id": "record_id_1",
      "headline": "My first headline",
      "subhead": null,
      "byline": "From staff reports",
      "body": "Lectus viverra cubilia.",
      "image_url": "https://placehold.co/600x400",
      "cutline": "My image caption 1 here"
    },
    {
      "id": "record_id_2",
      "headline": "A second story",
      "subhead": "You should really read this",
      "byline": "By David Carr",
      "body": "Lectus viverra cubilia.",
      "image_url": null,
      "cutline": null
    }]
}
The README at the root of the repository explains further how the API query and response should work and includes some basic installation instructions. (If you use this, I recommend including some light caching so that you don’t over-query the Airtable API, or wherever your stories are stored.)
I realize everyone’s layout and story management tools are different and that the likelihood that our workflow matches up with yours is slim…but just in case this is helpful to anyone else, I wanted to get it out there! Let us know what you think.
The post Adobe InDesign script to pull newspaper stories from Airtable API appeared first on Chris Hardie's Tech and Software Blog.
]]>The post Use the WordPress REST API to create a custom taxonomy term appeared first on Chris Hardie's Tech and Software Blog.
]]>It ends up being fairly straightforward, so I’m sharing what I learned here in case it saves someone else time.
The developer REST API reference endpoint list doesn’t make any obvious reference to custom taxonomies or terms. If you end up on the tags endpoint reference page, you’ll see that there’s a way to work with these terms in the standard post_tag taxonomy, but no way to specify a custom taxonomy during write operations. There’s actually a taxonomies endpoint reference page that doesn’t seem to be linked to from the main navigation anywhere, but can be found in a search; still, nothing on it about working with terms in those taxonomies.
But eventually you’ll find your way to the page Adding REST API Support For Custom Content Types, which has a section Registering A Custom Taxonomy With REST API Support that finally makes it clear that in order to work with custom taxonomies in the REST API, you have to enable/create an endpoint for that purpose.
In your custom taxonomy definition, it ends up being pretty simple with these additional arguments to the register_taxonomy call:
    'show_in_rest'          => true,
    'rest_base'             => 'my-taxonomy-api-slug',
    'rest_controller_class' => 'WP_REST_Terms_Controller',
The second two are optional, where you can define the REST API url slug and controller you want to use; if you leave them out it will use the default terms controller and a slug derived from your taxonomy definition.
With this code in place, you’ll now have two new REST API endpoints available:
 /wp/v2/my-taxonomy-api-slug
 /wp/v2/my-taxonomy-api-slug/(?P<id>[\d]+)
You can then essentially treat those the same way as the tags endpoints, getting/posting to create, update and retrieve terms in that custom taxonomy. For example, to create a new term:
POST https://example.test/wp-json/wp/v2/my-taxonomy-api-slug
slug:my-first-term
name:My First Term
I’ve submitted a pull request to the WP API docs to add at least one pointer in the documentation to help others on a similar quest get there faster.
Updated May 3 @ 11:49 AM Eastern to note that the second two taxonomy registration options rest_base and rest_controller_class are optional to define, thanks to Marcus Kober for noting this.
The post Use the WordPress REST API to create a custom taxonomy term appeared first on Chris Hardie's Tech and Software Blog.
]]>The post WooCommerce Subscriptions API start_date bug workaround appeared first on Chris Hardie's Tech and Software Blog.
]]>I reported the bug to the WooCommerce folks in November 2022 and I believe it has a GitHub issue filed. When I checked in about it recently I was told it’s a low priority to fix. I consider it somewhat serious for my purposes — unexpectedly overwriting/losing key data about a record that’s used in calculating user-facing financial transactions — so I’m documenting it here for others who might encounter it, along with a possible workaround.
The bug is in the plugin file includes/api/class-wc-rest-subscriptions-controller.php that processes the incoming API request. In particular, in the function prepare_object_for_database() there’s this code:
// If the start date is not set in the request, set its default to now.
if ( ! isset( $request['start_date'] ) ) {
	$request['start_date'] = gmdate( 'Y-m-d H:i:s' );
}
All of the valid dates contained in the $request array are subsequently copied into an array called $dates. Later in the same function, there’s this code:
if ( ! empty( $dates ) ) {
	...
	try {
		$subscription->update_dates( $dates );
	} catch ( Exception $e ) {
		...
	}
}
The implication is that for completely unrelated API requests to change something like, say, a meta field value or the subscription’s status, the date validation and update logic will be run. And because the start date value is overridden to be the current date, it means that any API request to update a completely unrelated field is going to unintentionally reset the start date of the subscription.
Nothing about the documentation at https://woocommerce.github.io/subscriptions-rest-api-docs/?php#update-a-subscription indicates that a start_date value is required in the API requests. In fact, the example given in those docs where the status of a subscription is updated would trigger this bug.
I’ve even noticed this bug surfacing even in regular wp-admin operations involving WooCommerce Subscriptions, as I think some of the logic used to do something like put a subscription on hold or cancel it from within the admin interface is calling the same internal functions.
My workaround for this bug, at least on the API client side, introduces an extra API request, and so is less than ideal for any kind of production or long-term use.
For every API request I make to the Subscriptions API update endpoint, if I’m not explicitly setting/changing the start_date field in my request, I first fetch the existing subscription record and then set the start_date field in my request to the current value.
if ('subscription' === $recordType && empty($updateValues['start_date'])) {
      $current_values = $wooApiFacade::find($recordId);
      $updateValues['start_date'] = Carbon::parse($current_values['start_date_gmt'])->format('Y-m-d\ H:i:s');
}
Hopefully they’ll fix this issue sooner rather than later so that users of the plugin don’t unexpectedly see subscription start dates overwritten.
The post WooCommerce Subscriptions API start_date bug workaround appeared first on Chris Hardie's Tech and Software Blog.
]]>The post Tools and tech we’re using to publish a print, online newspaper appeared first on Chris Hardie's Tech and Software Blog.
]]>I’m sharing this because (a) I generally enjoy the topic of if/how tools can make life and business easier, and (b) I hope it could be useful to someone else publishing a newspaper or building a media organization.
Print Layout and Design
It’s Adobe Creative Cloud all the way, for better or worse. InDesign for newspaper layout, Photoshop for image editing. Given the way our staff is set up and our weekly newspaper production process works, almost everyone touches the newspaper pages at some point or another, so the monthly license costs to cover all of that is somewhat ouch. If there were a viable alternative to InDesign, we’d probably switch to it.
Issue and Story Budget Planning
We’re using an Airtable base that helps us record story ideas and plan for our upcoming issues by tracking what articles are going to go where, what state their in, and all the associated data that goes with them such as photos, source info, internal notes, etc. It’s pretty great and the real-time collaboration that it makes possible is hard to beat. I think down the road we may move toward a custom Laravel-powered solution that allows for tighter integration of all of our business operations, but that’s a ways off.
Phone System
We’re using a self-hosted FreePBX (Asterisk) installation with the Sysadmin Pro and EndPoint Manager paid add-on modules. Digital Ocean had a 1-click installer on their marketplace that made it super fast to get going. We’re using VOIP.ms for our trunk lines and they made DID porting in very easy.
Having used Asterisk in a previous business I was already familiar with its architecture and features, but FreePBX meant I could configure everything via web interface instead of editing dialplan files – amazing. We have extensions, queues, interactive voice menus, voicemail speech to text transcription (using this tool) and more, and it sets up a nice foundation for future integration with other tools like our CRM data.
We’re using Yealink T31P and T33G VOIP phones and so far Counterpath’s Bria Mobile has been the most compatible/feature complete softphone for iOS that I’ve found.
Email, Calendars, Contacts
As much as I’d rather not rely on Google for anything, the reality is that their Google Workspace product is still the best overall value and feature set for a small organization that doesn’t want to get in to self-hosting email/calendars/contacts and fighting deliverability issues. I wanted to try using Fastmail for this and they do have great team/org plans but it didn’t seem to support SAML/SSO in the way I needed (more on that below).
For servers and tools that need to send outbound email reliably, in some cases we’re using Google’s included SMTP relaying and in others we’re using SendGrid.
File Storage
We’re migrating away from a legacy on-premise server to use a self-hosted Nextcloud instance at Digital Ocean. This is also replacing our use of Adobe’s Creative Cloud file storage and syncing service, which we’ve had nothing but problems with in terms of reliability and performance.
Office Automation
We’re using Home Assistant to manage our energy usage by adjusting the thermostat and turning some appliances on and off based on when the office is in use. It also detects and alerts about power outages. I’ve used HA elsewhere and just love it for home/office automation of all sorts.
Internal Knowledgbase
We’re using the Bookstack open source application to manage a kind of internal wiki and knowledgebase. It’s self-hosted on a Digital Ocean droplet.
Internal Messaging and Calls
We’re using Slack for now. I have a RocketChat instance all ready to go after testing it out and being quite pleased, but my colleagues were going through enough change that I wanted to stick with a tool they were already somewhat familiar with. We’ll probably migrate later on. We sometimes also use Zoom.
Customer/Subscriber Conversations and Support
I really liked Helpscout for my one-person SaaS business and have had great experiences with it elsewhere, but the pricing didn’t scale sustainably for a multi-person team. I looked at a self-hosted option via Freescout and it looks really well done, but some of the modules/extensions that we would rely heavily on appeared to be abandoned or under-developed.
So for now we’re using Freshdesk to manage all of our public-facing organization interactions with our subscribers, advertisers and others by email, social media direct messages and other channels. My colleagues have gotten used to it pretty quickly and we’re beginning to use some automations, template responses and Slack integration to make it even more seamless.
Accounting
We’re using Quickbooks Online. As an accounting tool for small business, it works well. In terms of my daily user experience, I hate it because there are advertisements and upsells sprinkled throughout, ALL THE TIME. We’re talking “in between two line items in a random account register, there’s a fake line item advertisement encouraging you to sign up for their commercial checking account product” kind of intrusiveness. It’s just awful.
I wanted to use Zoho Books because I’ve had good experiences with it in my SaaS business, but some early pre-sales support questions to them went unanswered, which I’ve experienced before. I knew wouldn’t have time for with this new venture, despite feeling disinclined to support Intuit’s dominance, and most of the other options I looked at did not have the integrations I knew we would need.
Credit Card Processing
We’re using Square, as that’s the setup that’s been in place for a long time and migrating would make my head explode. While there are some other payment processors I tend to prefer, I have to acknowledge how seamless their tools are across online commerce, in-person point of sales hardware, a virtual web-based terminal and other tools. Their API is solid and their customer support has been responsive, so I’m happy for now.
Website, Paywall, Online Commerce
WordPress and WooCommerce are a pretty magical combination here. We’re using a modified version of the Largo theme for news sites (soon to be replaced) and the WooCommerce Subscriptions and Memberships plugins to create a simple kind of paywall for our PDF e-edition access. We use AutomateWoo to handle some commerce business logic, UsersInsights for a basic set of CRM tools within WP (soon to be replaced), Real3d Flipbook plugin for e-edition viewing, and a bunch of other plugins for various other bits of functionality. We use Plausible for analytics and are phasing out our previous use of Google Analytics.
We host at WP Engine and their pricing, support, functionality and reliability has been outstanding.
We use Buffer to post to our social media accounts.
Down the road we’ll be looking at using Leaky Paywall’s platform.
Monitoring and Outage Alerting
We’re using UptimeRobot along with email, Slack and Pushover integrations to alert us about problems with our own sites/tools as well as services we depend on.
Single Sign On
I really wanted to give my colleagues the experience of having one login/password that gave them access to as many of our tools and services as possible, so I set out to educate myself on this space. I was close to deciding on Auth0 and think it’s probably the best option for a non-technical small business infrastructure person to use for this need, but my interest in self-hosting and using a custom domain for portability while saving money led me to pursue other options.
After looking at Authelia and Authentik I was getting a little worried, and then I thought I’d found the holy grail in SimpleSAMLphp. A SAML SSO tool written in PHP, awesome! Then I started setting it up (along with OpenLDAP for user directory purposes and PrivacyIdea for MFA) and let’s just say that while I’m glad it exists as a project, it turned out to be a bit of a nightmare to work with.
I had passed over Keycloak in my initial research after reading some reviews and documentation that made it seem hard to work with, but after my SimpleSAMLphp experience, it looked like it would be a breeze. Using this guide from Till Sanders and other more recent info I found online, I was able to get a Keycloak instance up on Digital Ocean’s app platform pretty quickly. It’s a very nice tool and has made setting up SSO with both SAML and OpenID very smooth across many of our tools and services.
Password Management
Even with SSO, there’s still a lot of accounts/passwords to manage that don’t connect to our SSO setup. So, 1Password is amazing as always and 1Password for Teams is a great offering at a great price point.
CRM
This is an area that’s still evolving for us. We need to bring together a legacy database of print subscribers, our online WooCommerce customer database and order history, our transaction history with our credit card processor, and some future needs that are to be determined. I was ready to go all in on Zoho CRM because of previous good experiences, but then as with the accounting category above, I had a couple of really discouraging interactions with their support / pre-sales team, and had to put the brakes on.
After exploring MANY other CRM tools and services and very much wishing I could just throw money at one of them to take care of this for us, we’re going with a custom Laravel application instead. The first version is probably launching next week.
Email Marketing Automation
The business has been using Mailchimp so we’ll keep using that for the moment, but because of pricing and interface bloat concerns, I think when we ramp up our use of email we’ll be switching over to MailerLite. I’ve had great experiences with both in past business ventures, but MailerLite’s a bit more fun and easy to use from a developer perspective.
Code Hosting and Version Control
We’re using Git with an organization GitHub account. GitHub is awesome.
Other
We have a couple of custom built Laravel and Laravel Zero applications that perform various automation/integration tasks, such as processing webhooks from various tools noted above, interacting with Airtable or Slack, fetching and processing data we include in the newspaper, and more. These are typically just self-hosted on a Digital Ocean droplet.
Most of our other office equipment is pretty standard but our Vibe S1 Smart Whiteboard has made collaboration and remote communication pretty fun, and I really like my Fujitsu ScanSnap iX1600 document scanner for quickly getting paper things turned in to digital things.
Well, that’s the list for now. If you have any questions or want more detail on any of these, just ask. And if you run a small print + online newspaper / media company, I’d love to learn about what tools you’re using in the categories above.
The post Tools and tech we’re using to publish a print, online newspaper appeared first on Chris Hardie's Tech and Software Blog.
]]>The post Define, fire and listen for custom Laravel model events within a trait appeared first on Chris Hardie's Tech and Software Blog.
]]>Let’s say you have a model Post that you set up as having a “draft” status by default, but eventually will have a status of “publish”. Let’s also say you want to make the act of publishing a post a custom model event that can be listened for in addition to the standard model events like “created” or “updated”. And let’s say you want to do all of this using a trait so that you can apply the same logic to another model in the future, such as comments on the post, without repeating yourself.
Here’s what my Post model might look like:
<?php
namespace App\Models;
class Post extends Model
{
    //
}
Let’s create a Publishable trait that can be applied to this model:
<?php
namespace App\Models\Traits;
trait Publishable
{
    // Add to the list of observable events on any publishable model
    public function initializePublishable()
    {
        $this->addObservableEvents([
            'publishing',
            'published',
        ]);
    }
    // Create a publish method that we'll use to transition the
    // status of any publishable model, and fire off the before/after events
    public function publish()
    {
        if (false === $this->fireModelEvent('publishing')) {
            return false;
        }
        $this->forceFill(['status' => 'publish'])->save();
        $this->fireModelEvent('published');
    }
    // Register the existence of the publishing model event
    public static function publishing($callback)
    {
        static::registerModelEvent('publishing', $callback);
    }
    // Register the existence of the published model event
    public static function published($callback)
    {
        static::registerModelEvent('published', $callback);
    }
}
This new trait can now be applied to the Post model:
<?php
namespace App\Models;
class Post extends Model
{
    use Publishable;
    // ...
}
Now, when I want to publish a post, I can call $post->publish(); and Laravel will not only update the value of the publish field in the database, but also fire off the publishing and published model events.
I can listen for these events just like any other model event. I can do this in an observer for the Post model:
<?php
namespace App\Observers;
use App\Models\Post;
use App\Notifications\Posted;
use Illuminate\Support\Facades\Notification;
class PostObserver
{
    public function publishing(Post $post)
    {
        $post->generatePermalink();
    }
    public function published(Post $post)
    {
        Notification::send(User::all(), new Posted($post));
    }
    public function creating(Post $post)
    {
        //
    }
    ...
}
Or even within my own new trait:
    protected static function bootPublishable()
    {
        // When the publishable model is published, log it
        static::published(function ($model) {
            Log::debug('Just published: ' . $model->title);
        });
    }
(Note that in the examples above I’m making use of Laravel’s special boot{traitName} and initialize{traitName} methods that should be used with traits to avoid unexpected problems with the usual boot / parent methods.) I can do the same for something like applying a global scope that, say, makes sure I’m always only fetching published posts unless I explicitly request unpublished ones:
    public static function bootPublishable()
    {
        static::addGlobalScope(new PublishedScope);
    }
I like how this approach keeps all of the publish/publishing related logic in one place, and keeps my main model class nice and clean.
That’s it! If you have tips or suggestions for improvement, let us know in the comments.
The post Define, fire and listen for custom Laravel model events within a trait appeared first on Chris Hardie's Tech and Software Blog.
]]>