| CARVIEW |
Also looked at other cloud image sources like Docker hub, and I could see an image their for Trixie. So I looked into how I can generate a Vagrant image locally for Debian to use.
make install-build-deps
Searched on Salsa and stumbled upon https://salsa.debian.org/cloud-team/debian-vagrant-images
Cloned the repo from salsa
$ git clone https://salsa.debian.org/cloud-team/debian-vagrant-images.gitInstall the build dependencies
$ make install-build-depsthis will install some dependency packages, will ask for sudo password if need to install something not already installed.
Let's call make help
$ make help
To run this makefile, run:
   make <DIST>-<CLOUD>-<ARCH>
  WHERE <DIST> is bullseye, buster, stretch, sid or testing
    And <CLOUD> is azure, ec2, gce, generic, genericcloud, nocloud, vagrant, vagrantcontrib
    And <ARCH> is amd64, arm64, ppc64el
Set DESTDIR= to write images to given directory.
$ make trixie-vagrant-amd64
umask 022; \
./bin/debian-cloud-images build \
  trixie vagrant amd64 \
  --build-id vagrant-cloud-images-master \
  --build-type official
usage: debian-cloud-images build
debian-cloud-images build: error: argument RELEASE: invalid value: trixie
make: *** [Makefile:22: trixie-vagrant-amd64] Error 2
As you can see, trixie is not even in the available options and it is not building as well. Before trying to look at updating the codebase, I looked at the pending MR's on Salsa and found Michael Ablassmeier's pending merge request at https://salsa.debian.org/cloud-team/debian-vagrant-images/-/merge_requests/18
So let me test that commit and see if I can build trixie locally from Michael's MR
$ git clone https://salsa.debian.org/debian/debian-vagrant-images.git
Cloning into 'debian-vagrant-images'...
remote: Enumerating objects: 5310, done.
remote: Counting objects: 100% (256/256), done.
remote: Compressing objects: 100% (96/96), done.
remote: Total 5310 (delta 141), reused 241 (delta 135), pack-reused 5054 (from 1)
Receiving objects: 100% (5310/5310), 629.81 KiB | 548.00 KiB/s, done.
Resolving deltas: 100% (2875/2875), done.
$ cd debian-vagrant-images/
$ git checkout 8975eb0 #the commit id of MR
Now let's see if we can build trixie now
$ make help
To run this makefile, run:
   make <DIST>-<CLOUD>-<ARCH>
  WHERE <DIST> is bullseye, buster, stretch, sid or testing
    And <CLOUD> is azure, ec2, gce, generic, genericcloud, nocloud, vagrant, vagrantcontrib
    And <ARCH> is amd64, arm64, ppc64el
Set DESTDIR= to write images to given directory.
$ make trixie-vagrant-amd64
umask 022; \
./bin/debian-cloud-images build \
  trixie vagrant amd64 \
  --build-id vagrant-cloud-images-master \
  --build-type official
2025-09-17 00:36:25,919 INFO Adding class DEBIAN
2025-09-17 00:36:25,919 INFO Adding class CLOUD
2025-09-17 00:36:25,919 INFO Adding class TRIXIE
2025-09-17 00:36:25,920 INFO Adding class VAGRANT
2025-09-17 00:36:25,920 INFO Adding class AMD64
2025-09-17 00:36:25,920 INFO Adding class LINUX_IMAGE_BASE
2025-09-17 00:36:25,920 INFO Adding class GRUB_PC
2025-09-17 00:36:25,920 INFO Adding class LAST
2025-09-17 00:36:25,921 INFO Running FAI: sudo env PYTHONPATH=/home/rajudev/dev/salsa/michael/debian-vagrant-images/src/debian_cloud_images/build/../.. CLOUD_BUILD_DATA=/home/rajudev/dev/salsa/michael/debian-vagrant-images/src/debian_cloud_images/data CLOUD_BUILD_INFO={"type": "official", "release": "trixie", "release_id": "13", "release_baseid": "13", "vendor": "vagrant", "arch": "amd64", "build_id": "vagrant-cloud-images-master", "version": "20250917-1"} CLOUD_BUILD_NAME=debian-trixie-vagrant-amd64-official-20250917-1 CLOUD_BUILD_OUTPUT_DIR=/home/rajudev/dev/salsa/michael/debian-vagrant-images CLOUD_RELEASE_ID=vagrant CLOUD_RELEASE_VERSION=20250917-1 fai-diskimage --verbose --hostname debian --class DEBIAN,CLOUD,TRIXIE,VAGRANT,AMD64,LINUX_IMAGE_BASE,GRUB_PC,LAST --size 100G --cspace /home/rajudev/dev/salsa/michael/debian-vagrant-images/src/debian_cloud_images/build/fai_config debian-trixie-vagrant-amd64-official-20250917-1.raw
..... continued
Although we can now build the images, we just don't see an option for it in the help text, not even for bookworm. Just the text in Makefile is outdated, but I can build and trixie Vagrant box now. Thanks to Michael for the fix.
]]>Have tried phosh and plasma-mobile on it, works nicely but slows the device down heavily (2 GB RAM and
]]>I have been using my Samsung Galaxy Tab A (2015) with PostmarketOS on and off since last year. It serves as a really good e-book reader with KOReader installed on it.
Have tried phosh and plasma-mobile on it, works nicely but slows the device down heavily (2 GB RAM and old processor) so I use MATE Desktop environment on it.
Lately I have started using this tablet along with my laptop as a second screen for work. And it has been working super nicely for that. The only issue being that I have to manually rotate the screen to landscape every time I reboot the device. It resets the screen orientation to portrait after a reboot. So I went through the pmOS wiki and a neat nice hack documented there worked very well for me.
First we will test if the auto-rotate sensor works and if we can read values from it. So we install some basic necessary packages
$ sudo apk add xrandr xinput inotify-tools iio-sensor-proxyEnable the service for iio-sensor-proxy
sudo rc-update add iio-sensor-proxyReboot the device.
Now in the device terminal start the sensor monitor-sensor
user@samsung-gt58 ~> monitor-sensor
    Waiting for iio-sensor-proxy to appear
+++ iio-sensor-proxy appeared
=== Has accelerometer (orientation: normal, tilt: vertical)
=== Has ambient light sensor (value: 5.000000, unit: lux)
=== No proximity sensor
=== No compass
    Light changed: 14.000000 (lux)
    Accelerometer orientation changed: left-up
    Tilt changed: tilted-down
    Light changed: 12.000000 (lux)
    Tilt changed: vertical
    Light changed: 13.000000 (lux)
    Light changed: 11.000000 (lux)
    Light changed: 13.000000 (lux)
    Accelerometer orientation changed: normal
    Light changed: 5.000000 (lux)
    Light changed: 6.000000 (lux)
    Light changed: 5.000000 (lux)
    Accelerometer orientation changed: right-up
    Light changed: 3.000000 (lux)
    Light changed: 4.000000 (lux)
    Light changed: 5.000000 (lux)
    Light changed: 12.000000 (lux)
    Tilt changed: tilted-down
    Light changed: 19.000000 (lux)
    Accelerometer orientation changed: bottom-up
    Tilt changed: vertical
    Light changed: 1.000000 (lux)
    Light changed: 2.000000 (lux)
    Light changed: 4.000000 (lux)
    Accelerometer orientation changed: right-up
    Tilt changed: tilted-down
    Light changed: 11.000000 (lux)
    Accelerometer orientation changed: normal
    Tilt changed: vertical
    Tilt changed: tilted-down
    Light changed: 18.000000 (lux)
    Light changed: 21.000000 (lux)
    Light changed: 22.000000 (lux)
    Light changed: 19.000000 (lux)
    Accelerometer orientation changed: left-up
    Light changed: 17.000000 (lux)
    Tilt changed: vertical
    Light changed: 14.000000 (lux)
    Tilt changed: tilted-down
    Light changed: 16.000000 (lux)
    Light changed: 18.000000 (lux)
    Light changed: 17.000000 (lux)
    Light changed: 18.000000 (lux)
    Light changed: 17.000000 (lux)
    Light changed: 18.000000 (lux)
    Light changed: 17.000000 (lux)
    Light changed: 18.000000 (lux)
    Light changed: 17.000000 (lux)
As you can see we can read the rotation values from the sensor as I am rotating the tablet in different orientations.
Now we just need to use a script which changes the screen orientation using xrandr according to the sensor value.
#!/bin/sh
killall monitor-sensor
monitor-sensor > /dev/shm/sensor.log 2>&1 &
while inotifywait -e modify /dev/shm/sensor.log; do
  ORIENTATION=$(tail /dev/shm/sensor.log | grep 'orientation' | tail -1 | grep -oE '[^ ]+$')
  case "$ORIENTATION" in
    normal)
      xrandr -o normal
      xinput set-prop "Goodix Capacitive TouchScreen" "Coordinate Transformation Matrix" 1 0 0 0 1 0 0 0 1
      ;;
    left-up)
      xrandr -o left
      xinput set-prop "Goodix Capacitive TouchScreen" "Coordinate Transformation Matrix" 0 -1 1 1 0 0 0 0 1
      ;;
    bottom-up)
      xrandr -o inverted
      xinput set-prop "Goodix Capacitive TouchScreen" "Coordinate Transformation Matrix" -1 0 1 0 -1 1 0 0 1
      ;;
    right-up)
      xrandr -o right
      xinput set-prop "Goodix Capacitive TouchScreen" "Coordinate Transformation Matrix" 0 1 0 -1 0 1 0 0 1
      ;;
  esac
done
auto-rotate-screen.sh
You need to replace the name of your touch input device in the script, you can get the name by using xinput --list , make sure to type this on the device terminal.
user@samsung-gt58 ~> xinput --list
* Virtual core pointer                    	id=2	[master pointer  (3)]
*   * Virtual core XTEST pointer              	id=4	[slave  pointer  (2)]
*   * Zinitix Capacitive TouchScreen          	id=10	[slave  pointer  (2)]
*   * Toad One Plus                           	id=12	[slave  pointer  (2)]
* Virtual core keyboard                   	id=3	[master keyboard (2)]
    * Virtual core XTEST keyboard             	id=5	[slave  keyboard (3)]
    * GPIO Buttons                            	id=6	[slave  keyboard (3)]
    * pm8941_pwrkey                           	id=7	[slave  keyboard (3)]
    * pm8941_resin                            	id=8	[slave  keyboard (3)]
    * Zinitix Capacitive TouchScreen          	id=11	[slave  keyboard (3)]
    * samsung-a2015 Headset Jack              	id=9	[slave  keyboard (3)]
In our script here we are using a Zinitix capacitive screen, it will be different for yours.
Once your script is ready with the correct touchscreen name. Save and make the script executable. chmod +x auto-rotate-screen.sh
Then test your script in your terminal ./auto-rotate.sh , stop the script using Ctrl + C
Now we need add this script to auto-start. On MATE DE you can go to System > Control Center > Startup Applications, then click on Custom Add button, browse the script location, give it a name and then click on Add button.
Now reboot the tablet/device, login and see the auto rotation working.
- Auto-Rotation wiki article on PostmarketOS Wiki https://wiki.postmarketos.org/wiki/Auto-rotation
I am doing this on sway window manager, but you can try this on
]]>I am doing this on sway window manager, but you can try this on any other Wayland based WM or DE. I have not tried this on Xorg based systems, there are several other guides for Xorg based systems online.
When we connect a physical monitor to our laptops, it creates a second display output in our display settings that we can then re-arrange in layout, set resolution, set scale etc. Since we are not connecting via a physical interface like HDMI, DP, VGA etc. We need to create a virtual display within our system and set the display properties manually.
Get a list of current display outputs. You can also just check it in display settings of your DE/WM with wdisplaysrajudev@sanganak ~> swaymsg -t get_outputs
Output LVDS-1 'Seiko Epson Corporation 0x3047 Unknown' (focused)
Current mode: 1366x768 @ 60.002 Hz
Power: on
Position: 0,0
Scale factor: 1.000000
Scale filter: nearest
Subpixel hinting: rgb
Transform: normal
Workspace: 2
Max render time: off
Adaptive sync: disabled
Allow tearing: no
Available modes:
1366x768 @ 60.002 Hz
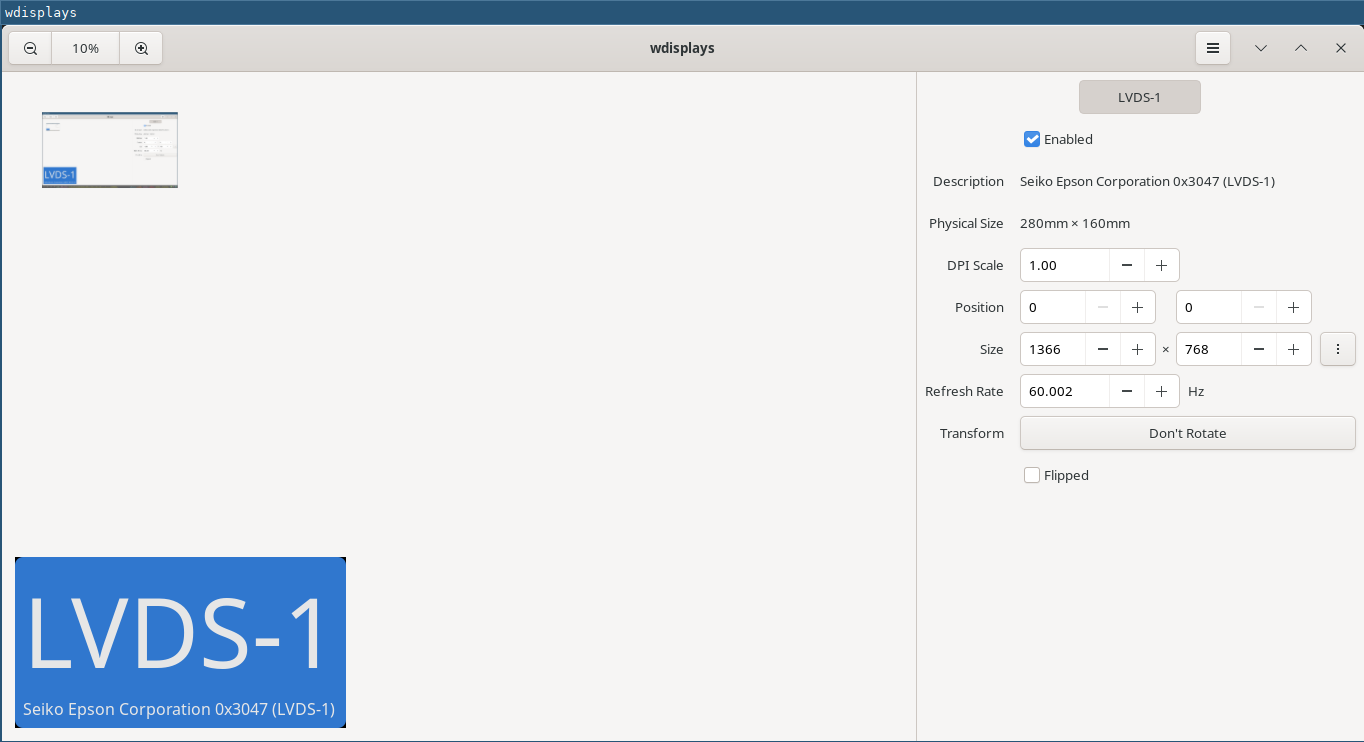
Currently we are seeing only one display output. Our goal is to create a second virtual display that we will then share on the tablet/phone.
To do this there are various tools available. We are using sway-vdctl . It is currently not available within Debian packages, so we need to install it manually.
$ git clone https://github.com/odincat/sway-vdctl.git
$ cd sway-vdctl
$ cargo build --release
This will generate the binary with the name main under target/release . We can then copy this binary to our bin folder.
$ sudo cp target/release/main /usr/local/bin/vdctlNow we have the vdctl command available.
$ vdctl --help
Usage: vdctl [OPTIONS] <ACTION> [VALUE]
Arguments:
  <ACTION>
          Possible values:
          - create:      Create new output based on a preset
          - kill:        Terminate / unplug an active preset
          - list:        List out active presets
          - next-number: Manually set the next output number, in case something breaks
          - sync-number: Sync the next output number using 'swaymsg -t get_outputs'
  [VALUE]
          Preset name to apply, alternatively a value

          [default: ]
Options:
      --novnc
          do not launch a vnc server, just create the output
  -h, --help
          Print help (see a summary with '-h')
Before creating the virtual display, we need to set it's properties at .config/vdctl/config.json . I am using Xiaomi Pad 6 tablet as my external display. You can adjust the properties according to the device you want to use as a second display.
$ (text-editor) .config/vdctl/config.json
{
    "host": "0.0.0.0",
    "presets": [
        {
            "name": "pad6",
            "scale_factor": 2,
            "port": 9901,
            "resolution": {
                "width": 2800,
                "height": 1800
            }
      }
    ]
}
In the JSON, you can set the display resolution according to your external device and other configurations. If you want to configure multiple displays, you can add another entry into the presets in the json file. You can refer to example json file into the git repository.
Now we need to actually create the virtual monitor.
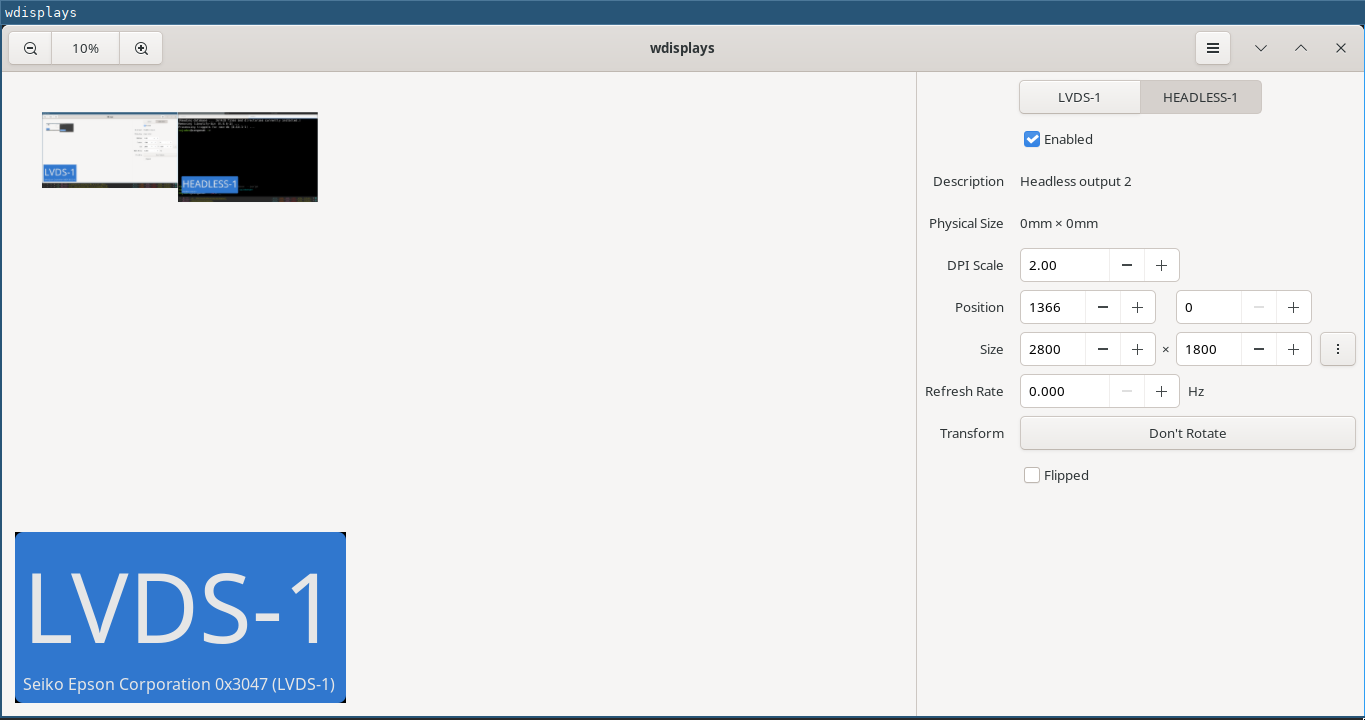
$ vdctl create pad6
Created output, presumably 'HEADLESS-1'
Set resolution of 'HEADLESS-1' to 2800x1800
Set scale factor of 'HEADLESS-1' to 2
Preset 'pad6' ('HEADLESS-1': 2800x1800) is now active on port 9901
Now if you will check the display outputs in your display settings or from command line, you will see two different displays.
$ swaymsg -t get_outputs
Output LVDS-1 'Seiko Epson Corporation 0x3047 Unknown'
  Current mode: 1366x768 @ 60.002 Hz
  Power: on
  Position: 0,0
  Scale factor: 1.000000
  Scale filter: nearest
  Subpixel hinting: rgb
  Transform: normal
  Workspace: 2
  Max render time: off
  Adaptive sync: disabled
  Allow tearing: no
  Available modes:
    1366x768 @ 60.002 Hz
Output HEADLESS-1 'Unknown Unknown Unknown' (focused)
  Current mode: 2800x1800 @ 0.000 Hz
  Power: on
  Position: 1366,0
  Scale factor: 2.000000
  Scale filter: nearest
  Subpixel hinting: unknown
  Transform: normal
  Workspace: 3
  Max render time: off
  Adaptive sync: disabled
  Allow tearing: no
Also in the display settings.
Now we need to make this virtual display available over VNC which we will access with a VNC client on the tablet. To accomplish this I am using wayvnc but you can use any VNC server package.
Install wayvnc
$ sudo apt install wayvncNow we will serve our virtual display HEADLESS-1 with wayvnc.
$ wayvnc -o HEADLESS-1 0.0.0.0 5900You can adjust the port number as per your need.
The process from laptop side is done.
Now install any VNC software on your tablet. I am using AVNC, which is available on F-Droid.
In the VNC software interface, add a new connection with the IP address of your laptop and the port started by wayvnc. Remember, both your laptop and phone need to be on the same Wi-Fi network.
Save and connect. Now you will be able to see a extended display on your tablet.
Enjoy working with multiple screens in a portable setup.
Till next time.. Have a great time.
]]>example.com has a sub domain dev.example.com , I also want to know other sub domains. Solution:
Install the package called sublist3r, written by Ahmed Aboul-Ela
$ sudo apt install sublist3rrun the command
$ sublist3r -dexample.com has a sub domain dev.example.com , I also want to know other sub domains. Solution:
Install the package called sublist3r, written by Ahmed Aboul-Ela
$ sudo apt install sublist3rrun the command
$ sublist3r -d example.com -o subdomains-example.com.txt
                 ____        _     _ _     _   _____
                / ___| _   _| |__ | (_)___| |_|___ / _ __
                \___ \| | | | '_ \| | / __| __| |_ \| '__|
                 ___) | |_| | |_) | | \__ \ |_ ___) | |
                |____/ \__,_|_.__/|_|_|___/\__|____/|_|
                # Coded By Ahmed Aboul-Ela - @aboul3la
[-] Enumerating subdomains now for example.com
[-] Searching now in Baidu..
[-] Searching now in Yahoo..
[-] Searching now in Google..
[-] Searching now in Bing..
[-] Searching now in Ask..
[-] Searching now in Netcraft..
[-] Searching now in DNSdumpster..
[-] Searching now in Virustotal..
[-] Searching now in ThreatCrowd..
[-] Searching now in SSL Certificates..
[-] Searching now in PassiveDNS..
Process DNSdumpster-8:
Traceback (most recent call last):
  File "/usr/lib/python3.12/multiprocessing/process.py", line 314, in _bootstrap
    self.run()
  File "/usr/lib/python3/dist-packages/sublist3r.py", line 269, in run
    domain_list = self.enumerate()
                  ^^^^^^^^^^^^^^^^
  File "/usr/lib/python3/dist-packages/sublist3r.py", line 649, in enumerate
    token = self.get_csrftoken(resp)
            ^^^^^^^^^^^^^^^^^^^^^^^^
  File "/usr/lib/python3/dist-packages/sublist3r.py", line 644, in get_csrftoken
    token = csrf_regex.findall(resp)[0]
            ~~~~~~~~~~~~~~~~~~~~~~~~^^^
IndexError: list index out of range
[!] Error: Google probably now is blocking our requests
[~] Finished now the Google Enumeration ...
[!] Error: Virustotal probably now is blocking our requests
[-] Saving results to file: subdomains-example.com.txt
[-] Total Unique Subdomains Found: 7
AS207960 Test Intermediate - example.com
www.example.com
dev.example.com
m.example.com
products.example.com
support.example.com
m.testexample.com
We can see the subdomains listed at the end of the command output.
enjoy, have fun, drink water!
]]>~$ mkdir moin-test
~$ cd moin-test
~/d/moin-test►python3 -m venv . 00:04
~/d/moin-test►ls 2.119s 00:04
bin/ include/ lib/ lib64@ pyvenv.cfg
~/d/moin-test►source bin/activate.fish 00:04
~/d/moin-test►pip install --pre moin moin-test 00:04
Collecting moin
Using cached moin-2.]]>~$ mkdir moin-test
~$ cd moin-test
~/d/moin-test►python3 -m venv . 00:04
~/d/moin-test►ls 2.119s 00:04
bin/ include/ lib/ lib64@ pyvenv.cfg
~/d/moin-test►source bin/activate.fish 00:04
~/d/moin-test►pip install --pre moin moin-test 00:04
Collecting moin
Using cached moin-2.0.0b1-py3-none-any.whl.metadata (4.7 kB)
Collecting Babel>=2.10.0 (from moin)
Using cached babel-2.16.0-py3-none-any.whl.metadata (1.5 kB)
Collecting blinker>=1.6.2 (from moin)
Using cached blinker-1.8.2-py3-none-any.whl.metadata (1.6 kB)
Collecting docutils>=0.18.1 (from moin)
Using cached docutils-0.21.2-py3-none-any.whl.metadata (2.8 kB)
Collecting Markdown>=3.4.1 (from moin)
Using cached Markdown-3.7-py3-none-any.whl.metadata (7.0 kB)
Collecting mdx-wikilink-plus>=1.4.1 (from moin)
Using cached mdx_wikilink_plus-1.4.1-py3-none-any.whl.metadata (6.6 kB)
Collecting Flask>=3.0.0 (from moin)
Using cached flask-3.0.3-py3-none-any.whl.metadata (3.2 kB)
Collecting Flask-Babel>=3.0.0 (from moin)
Using cached flask_babel-4.0.0-py3-none-any.whl.metadata (1.9 kB)
Collecting Flask-Caching>=1.2.0 (from moin)
Using cached Flask_Caching-2.3.0-py3-none-any.whl.metadata (2.2 kB)
Collecting Flask-Theme>=0.3.6 (from moin)
Using cached flask_theme-0.3.6-py3-none-any.whl
Collecting emeraldtree>=0.10.0 (from moin)
Using cached emeraldtree-0.11.0-py3-none-any.whl
Collecting feedgen>=0.9.0 (from moin)
Using cached feedgen-1.0.0-py2.py3-none-any.whl
Collecting flatland>=0.8 (from moin)
Using cached flatland-0.9.1-py3-none-any.whl
Collecting Jinja2>=3.1.0 (from moin)
Using cached jinja2-3.1.4-py3-none-any.whl.metadata (2.6 kB)
Collecting markupsafe<=2.2.0 (from moin)
Using cached MarkupSafe-2.1.5-cp312-cp312-manylinux_2_17_x86_64.manylinux2014_x86_64.whl.metadata (3.0 kB)
Collecting pygments>=1.4 (from moin)
Using cached pygments-2.18.0-py3-none-any.whl.metadata (2.5 kB)
Collecting Werkzeug>=3.0.0 (from moin)
Using cached werkzeug-3.0.4-py3-none-any.whl.metadata (3.7 kB)
Collecting whoosh>=2.7.0 (from moin)
Using cached Whoosh-2.7.4-py2.py3-none-any.whl.metadata (3.1 kB)
Collecting pdfminer.six (from moin)
Using cached pdfminer.six-20240706-py3-none-any.whl.metadata (4.1 kB)
Collecting passlib>=1.6.0 (from moin)
Using cached passlib-1.7.4-py2.py3-none-any.whl.metadata (1.7 kB)
Collecting sqlalchemy>=2.0 (from moin)
Using cached SQLAlchemy-2.0.34-cp312-cp312-manylinux_2_17_x86_64.manylinux2014_x86_64.whl.metadata (9.6 kB)
Collecting XStatic>=0.0.2 (from moin)
Using cached XStatic-1.0.3-py3-none-any.whl.metadata (1.4 kB)
Collecting XStatic-Bootstrap==3.1.1.2 (from moin)
Using cached XStatic_Bootstrap-3.1.1.2-py3-none-any.whl
Collecting XStatic-Font-Awesome>=6.2.1.0 (from moin)
Using cached XStatic_Font_Awesome-6.2.1.1-py3-none-any.whl.metadata (851 bytes)
Collecting XStatic-CKEditor>=3.6.1.2 (from moin)
Using cached XStatic_CKEditor-3.6.4.0-py3-none-any.whl
Collecting XStatic-autosize (from moin)
Using cached XStatic_autosize-1.17.2.1-py3-none-any.whl
Collecting XStatic-jQuery>=1.8.2 (from moin)
Using cached XStatic_jQuery-3.5.1.1-py3-none-any.whl
Collecting XStatic-jQuery-File-Upload>=10.31.0 (from moin)
Using cached XStatic_jQuery_File_Upload-10.31.0.1-py3-none-any.whl
Collecting XStatic-svg-edit-moin>=2012.11.15.1 (from moin)
Using cached XStatic_svg_edit_moin-2012.11.27.1-py3-none-any.whl
Collecting XStatic-JQuery.TableSorter>=2.14.5.1 (from moin)
Using cached XStatic_JQuery.TableSorter-2.14.5.2-py3-none-any.whl.metadata (846 bytes)
Collecting XStatic-Pygments>=1.6.0.1 (from moin)
Using cached XStatic_Pygments-2.9.0.1-py3-none-any.whl
Collecting lxml (from feedgen>=0.9.0->moin)
Using cached lxml-5.3.0-cp312-cp312-manylinux_2_28_x86_64.whl.metadata (3.8 kB)
Collecting python-dateutil (from feedgen>=0.9.0->moin)
Using cached python_dateutil-2.9.0.post0-py2.py3-none-any.whl.metadata (8.4 kB)
Collecting itsdangerous>=2.1.2 (from Flask>=3.0.0->moin)
Using cached itsdangerous-2.2.0-py3-none-any.whl.metadata (1.9 kB)
Collecting click>=8.1.3 (from Flask>=3.0.0->moin)
Using cached click-8.1.7-py3-none-any.whl.metadata (3.0 kB)
Collecting pytz>=2022.7 (from Flask-Babel>=3.0.0->moin)
Using cached pytz-2024.2-py2.py3-none-any.whl.metadata (22 kB)
Collecting cachelib<0.10.0,>=0.9.0 (from Flask-Caching>=1.2.0->moin)
Using cached cachelib-0.9.0-py3-none-any.whl.metadata (1.9 kB)
Collecting typing-extensions>=4.6.0 (from sqlalchemy>=2.0->moin)
Using cached typing_extensions-4.12.2-py3-none-any.whl.metadata (3.0 kB)
Collecting greenlet!=0.4.17 (from sqlalchemy>=2.0->moin)
Using cached greenlet-3.1.0-cp312-cp312-manylinux_2_24_x86_64.manylinux_2_28_x86_64.whl.metadata (3.8 kB)
Collecting charset-normalizer>=2.0.0 (from pdfminer.six->moin)
Using cached charset_normalizer-3.3.2-cp312-cp312-manylinux_2_17_x86_64.manylinux2014_x86_64.whl.metadata (33 kB)
Collecting cryptography>=36.0.0 (from pdfminer.six->moin)
Using cached cryptography-43.0.1-cp39-abi3-manylinux_2_28_x86_64.whl.metadata (5.4 kB)
Collecting cffi>=1.12 (from cryptography>=36.0.0->pdfminer.six->moin)
Using cached cffi-1.17.1-cp312-cp312-manylinux_2_17_x86_64.manylinux2014_x86_64.whl.metadata (1.5 kB)
Collecting six>=1.5 (from python-dateutil->feedgen>=0.9.0->moin)
Using cached six-1.16.0-py2.py3-none-any.whl.metadata (1.8 kB)
Collecting pycparser (from cffi>=1.12->cryptography>=36.0.0->pdfminer.six->moin)
Using cached pycparser-2.22-py3-none-any.whl.metadata (943 bytes)
Using cached moin-2.0.0b1-py3-none-any.whl (1.7 MB)
Using cached babel-2.16.0-py3-none-any.whl (9.6 MB)
Using cached blinker-1.8.2-py3-none-any.whl (9.5 kB)
Using cached docutils-0.21.2-py3-none-any.whl (587 kB)
Using cached flask-3.0.3-py3-none-any.whl (101 kB)
Using cached flask_babel-4.0.0-py3-none-any.whl (9.6 kB)
Using cached Flask_Caching-2.3.0-py3-none-any.whl (28 kB)
Using cached jinja2-3.1.4-py3-none-any.whl (133 kB)
Using cached Markdown-3.7-py3-none-any.whl (106 kB)
Using cached MarkupSafe-2.1.5-cp312-cp312-manylinux_2_17_x86_64.manylinux2014_x86_64.whl (28 kB)
Using cached mdx_wikilink_plus-1.4.1-py3-none-any.whl (8.9 kB)
Using cached passlib-1.7.4-py2.py3-none-any.whl (525 kB)
Using cached pygments-2.18.0-py3-none-any.whl (1.2 MB)
Using cached SQLAlchemy-2.0.34-cp312-cp312-manylinux_2_17_x86_64.manylinux2014_x86_64.whl (3.2 MB)
Using cached werkzeug-3.0.4-py3-none-any.whl (227 kB)
Using cached Whoosh-2.7.4-py2.py3-none-any.whl (468 kB)
Using cached XStatic-1.0.3-py3-none-any.whl (4.4 kB)
Using cached XStatic_Font_Awesome-6.2.1.1-py3-none-any.whl (6.5 MB)
Using cached XStatic_JQuery.TableSorter-2.14.5.2-py3-none-any.whl (20 kB)
Using cached pdfminer.six-20240706-py3-none-any.whl (5.6 MB)
Using cached cachelib-0.9.0-py3-none-any.whl (15 kB)
Using cached charset_normalizer-3.3.2-cp312-cp312-manylinux_2_17_x86_64.manylinux2014_x86_64.whl (141 kB)
Using cached click-8.1.7-py3-none-any.whl (97 kB)
Using cached cryptography-43.0.1-cp39-abi3-manylinux_2_28_x86_64.whl (4.0 MB)
Using cached greenlet-3.1.0-cp312-cp312-manylinux_2_24_x86_64.manylinux_2_28_x86_64.whl (626 kB)
Using cached itsdangerous-2.2.0-py3-none-any.whl (16 kB)
Using cached pytz-2024.2-py2.py3-none-any.whl (508 kB)
Using cached typing_extensions-4.12.2-py3-none-any.whl (37 kB)
Using cached lxml-5.3.0-cp312-cp312-manylinux_2_28_x86_64.whl (4.9 MB)
Using cached python_dateutil-2.9.0.post0-py2.py3-none-any.whl (229 kB)
Using cached cffi-1.17.1-cp312-cp312-manylinux_2_17_x86_64.manylinux2014_x86_64.whl (479 kB)
Using cached six-1.16.0-py2.py3-none-any.whl (11 kB)
Using cached pycparser-2.22-py3-none-any.whl (117 kB)
Installing collected packages: XStatic-svg-edit-moin, XStatic-Pygments, XStatic-JQuery.TableSorter, XStatic-jQuery-File-Upload, XStatic-jQuery, XStatic-Font-Awesome, XStatic-CKEditor, XStatic-Bootstrap, XStatic-autosize, XStatic, whoosh, pytz, passlib, typing-extensions, six, pygments, pycparser, markupsafe, Markdown, lxml, itsdangerous, greenlet, emeraldtree, docutils, click, charset-normalizer, cachelib, blinker, Babel, Werkzeug, sqlalchemy, python-dateutil, mdx-wikilink-plus, Jinja2, flatland, cffi, Flask, feedgen, cryptography, pdfminer.six, Flask-Theme, Flask-Caching, Flask-Babel, moin
Successfully installed Babel-2.16.0 Flask-3.0.3 Flask-Babel-4.0.0 Flask-Caching-2.3.0 Flask-Theme-0.3.6 Jinja2-3.1.4 Markdown-3.7 Werkzeug-3.0.4 XStatic-1.0.3 XStatic-Bootstrap-3.1.1.2 XStatic-CKEditor-3.6.4.0 XStatic-Font-Awesome-6.2.1.1 XStatic-JQuery.TableSorter-2.14.5.2 XStatic-Pygments-2.9.0.1 XStatic-autosize-1.17.2.1 XStatic-jQuery-3.5.1.1 XStatic-jQuery-File-Upload-10.31.0.1 XStatic-svg-edit-moin-2012.11.27.1 blinker-1.8.2 cachelib-0.9.0 cffi-1.17.1 charset-normalizer-3.3.2 click-8.1.7 cryptography-43.0.1 docutils-0.21.2 emeraldtree-0.11.0 feedgen-1.0.0 flatland-0.9.1 greenlet-3.1.0 itsdangerous-2.2.0 lxml-5.3.0 markupsafe-2.1.5 mdx-wikilink-plus-1.4.1 moin-2.0.0b1 passlib-1.7.4 pdfminer.six-20240706 pycparser-2.22 pygments-2.18.0 python-dateutil-2.9.0.post0 pytz-2024.2 six-1.16.0 sqlalchemy-2.0.34 typing-extensions-4.12.2 whoosh-2.7.4
~/d/moin-test[1]►pip install setuptools moin-test 0.241s 00:06
Collecting setuptools
Using cached setuptools-75.0.0-py3-none-any.whl.metadata (6.9 kB)
Using cached setuptools-75.0.0-py3-none-any.whl (1.2 MB)
Installing collected packages: setuptools
Successfully installed setuptools-75.0.0
~/d/moin-test►moin create-instance --full moin-test 1.457s 00:06
2024-09-16 00:06:36,812 INFO moin.cli.maint.create_instance:76 Directory /home/raj/dev/moin-test already exists, using as wikiconfig dir.
2024-09-16 00:06:36,813 INFO moin.cli.maint.create_instance:93 Instance creation finished.
2024-09-16 00:06:37,303 INFO moin.cli.maint.create_instance:107 Build Instance started.
2024-09-16 00:06:37,304 INFO moin.cli.maint.index:51 Index creation started
2024-09-16 00:06:37,308 INFO moin.cli.maint.index:55 Index creation finished
2024-09-16 00:06:37,308 INFO moin.cli.maint.modify_item:166 Load help started
Item loaded: Home
Item loaded: docbook
Item loaded: mediawiki
Item loaded: OtherTextItems/Diff
Item loaded: WikiDict
Item loaded: moin
Item loaded: moin/subitem
Item loaded: html/SubItem
Item loaded: moin/HighlighterList
Item loaded: MoinWikiMacros/Icons
Item loaded: InclusionForMoinWikiMacros
Item loaded: TemplateSample
Item loaded: MoinWikiMacros
Item loaded: rst/subitem
Item loaded: OtherTextItems/IRC
Item loaded: rst
Item loaded: creole/subitem
Item loaded: Home/subitem
Item loaded: OtherTextItems/CSV
Item loaded: images
Item loaded: Sibling
Item loaded: html
Item loaded: markdown
Item loaded: creole
Item loaded: OtherTextItems
Item loaded: OtherTextItems/Python
Item loaded: docbook/SubItem
Item loaded: OtherTextItems/PlainText
Item loaded: MoinWikiMacros/MonthCalendar
Item loaded: markdown/Subitem
Success: help namespace help-en loaded successfully with 30 items
2024-09-16 00:06:46,258 INFO moin.cli.maint.modify_item:166 Load help started
Item loaded: video.mp4
Item loaded: archive.tar.gz
Item loaded: audio.mp3
Item loaded: archive.zip
Item loaded: logo.png
Item loaded: cat.jpg
Item loaded: logo.svg
Success: help namespace help-common loaded successfully with 7 items
2024-09-16 00:06:49,685 INFO moin.cli.maint.modify_item:338 Load welcome page started
2024-09-16 00:06:49,801 INFO moin.cli.maint.modify_item:347 Load welcome finished
2024-09-16 00:06:49,801 INFO moin.cli.maint.index:124 Index optimization started
2024-09-16 00:06:51,383 INFO moin.cli.maint.index:126 Index optimization finished
2024-09-16 00:06:51,383 INFO moin.cli.maint.create_instance:114 Full instance setup finished.
2024-09-16 00:06:51,383 INFO moin.cli.maint.create_instance:115 You can now use "moin run" to start the builtin server.
~/d/moin-test►ls moin-test 15.295s 00:06
bin/ intermap.txt lib64@ wiki/ wikiconfig.py
include/ lib/ pyvenv.cfg wiki_local/
~/d/moin-test►MOINCFG=wikiconfig.py moin-test 00:07
fish: Unsupported use of '='. In fish, please use 'set MOINCFG wikiconfig.py'.
~/d/moin-test[123]►set MOINCFG wikiconfig.py moin-test 00:07
~/d/moin-test[123]►moin account-create --name test --email test@test.tld --password test123
Password not acceptable: For a password a minimum length of 8 characters is required.
2024-09-16 00:08:19,106 WARNING moin.utils.clock:53 These timers have not been stopped: total
~/d/moin-test►moin account-create --name test --email test@test.tld --password this-is-a-password
2024-09-16 00:08:43,798 INFO moin.cli.account.create:49 User c3608cafec184bd6a7a1d69d83109ad0 ['test'] test@test.tld - created.
2024-09-16 00:08:43,798 WARNING moin.utils.clock:53 These timers have not been stopped: total
~/d/moin-test►moin run --host 0.0.0.0 --port 5000 --no-debugger --no-reload
* Debug mode: off
2024-09-16 00:09:26,146 INFO werkzeug:97 WARNING: This is a development server. Do not use it in a production deployment. Use a production WSGI server instead.
* Running on all addresses (0.0.0.0)
* Running on https://127.0.0.1:5000
* Running on https://192.168.1.2:5000
2024-09-16 00:09:26,146 INFO werkzeug:97 Press CTRL+C to quit
]]>This blog post would not be possible without immense help
]]>Nextcloud is a popular self-hosted solution for file sync and share as well as cloud apps such as document editing, chat and talk, calendar, photo gallery etc. This guide will walk you through setting up Nextcloud AIO using Docker Compose.
This blog post would not be possible without immense help from Sahil Dhiman a.k.a. sahilister
There are various ways in which the installation could be done, in our setup here are the pre-requisites.
- A server with docker-compose installed
- An existing setup of nginx reverse proxy
- A domain name pointing to your server.
Step 1 : The docker-compose file for nextcloud AIO
The original compose.yml file is present in nextcloud AIO's git repo here . By taking a reference of that file, we have own compose.yml here.
services:
  nextcloud-aio-mastercontainer:
    image: nextcloud/all-in-one:latest
    init: true
    restart: always
    container_name: nextcloud-aio-mastercontainer # This line is not allowed to be changed as otherwise AIO will not work correctly
    volumes:
      - nextcloud_aio_mastercontainer:/mnt/docker-aio-config # This line is not allowed to be changed as otherwise the built-in backup solution will not work
      - /var/run/docker.sock:/var/run/docker.sock:ro # May be changed on macOS, Windows or docker rootless. See the applicable documentation. If adjusting, don't forget to also set 'WATCHTOWER_DOCKER_SOCKET_PATH'!
    ports:
      - 8080:8080
    environment: # Is needed when using any of the options below
      # - AIO_DISABLE_BACKUP_SECTION=false # Setting this to true allows to hide the backup section in the AIO interface. See https://github.com/nextcloud/all-in-one#how-to-disable-the-backup-section
      - APACHE_PORT=32323 # Is needed when running behind a web server or reverse proxy (like Apache, Nginx, Cloudflare Tunnel and else). See https://github.com/nextcloud/all-in-one/blob/main/reverse-proxy.md
      - APACHE_IP_BINDING=127.0.0.1 # Should be set when running behind a web server or reverse proxy (like Apache, Nginx, Cloudflare Tunnel and else) that is running on the same host. See https://github.com/nextcloud/all-in-one/blob/main/reverse-proxy.md
      # - BORG_RETENTION_POLICY=--keep-within=7d --keep-weekly=4 --keep-monthly=6 # Allows to adjust borgs retention policy. See https://github.com/nextcloud/all-in-one#how-to-adjust-borgs-retention-policy
      # - COLLABORA_SECCOMP_DISABLED=false # Setting this to true allows to disable Collabora's Seccomp feature. See https://github.com/nextcloud/all-in-one#how-to-disable-collaboras-seccomp-feature
      - NEXTCLOUD_DATADIR=/opt/docker/cloud.raju.dev/nextcloud # Allows to set the host directory for Nextcloud's datadir. ⚠️⚠️⚠️ Warning: do not set or adjust this value after the initial Nextcloud installation is done! See https://github.com/nextcloud/all-in-one#how-to-change-the-default-location-of-nextclouds-datadir
      # - NEXTCLOUD_MOUNT=/mnt/ # Allows the Nextcloud container to access the chosen directory on the host. See https://github.com/nextcloud/all-in-one#how-to-allow-the-nextcloud-container-to-access-directories-on-the-host
      # - NEXTCLOUD_UPLOAD_LIMIT=10G # Can be adjusted if you need more. See https://github.com/nextcloud/all-in-one#how-to-adjust-the-upload-limit-for-nextcloud
      # - NEXTCLOUD_MAX_TIME=3600 # Can be adjusted if you need more. See https://github.com/nextcloud/all-in-one#how-to-adjust-the-max-execution-time-for-nextcloud
      # - NEXTCLOUD_MEMORY_LIMIT=512M # Can be adjusted if you need more. See https://github.com/nextcloud/all-in-one#how-to-adjust-the-php-memory-limit-for-nextcloud
      # - NEXTCLOUD_TRUSTED_CACERTS_DIR=/path/to/my/cacerts # CA certificates in this directory will be trusted by the OS of the nexcloud container (Useful e.g. for LDAPS) See See https://github.com/nextcloud/all-in-one#how-to-trust-user-defined-certification-authorities-ca
      # - NEXTCLOUD_STARTUP_APPS=deck twofactor_totp tasks calendar contacts notes # Allows to modify the Nextcloud apps that are installed on starting AIO the first time. See https://github.com/nextcloud/all-in-one#how-to-change-the-nextcloud-apps-that-are-installed-on-the-first-startup
      # - NEXTCLOUD_ADDITIONAL_APKS=imagemagick # This allows to add additional packages to the Nextcloud container permanently. Default is imagemagick but can be overwritten by modifying this value. See https://github.com/nextcloud/all-in-one#how-to-add-os-packages-permanently-to-the-nextcloud-container
      # - NEXTCLOUD_ADDITIONAL_PHP_EXTENSIONS=imagick # This allows to add additional php extensions to the Nextcloud container permanently. Default is imagick but can be overwritten by modifying this value. See https://github.com/nextcloud/all-in-one#how-to-add-php-extensions-permanently-to-the-nextcloud-container
      # - NEXTCLOUD_ENABLE_DRI_DEVICE=true # This allows to enable the /dev/dri device in the Nextcloud container. ⚠️⚠️⚠️ Warning: this only works if the '/dev/dri' device is present on the host! If it should not exist on your host, don't set this to true as otherwise the Nextcloud container will fail to start! See https://github.com/nextcloud/all-in-one#how-to-enable-hardware-transcoding-for-nextcloud
      # - NEXTCLOUD_KEEP_DISABLED_APPS=false # Setting this to true will keep Nextcloud apps that are disabled in the AIO interface and not uninstall them if they should be installed. See https://github.com/nextcloud/all-in-one#how-to-keep-disabled-apps
      # - TALK_PORT=3478 # This allows to adjust the port that the talk container is using. See https://github.com/nextcloud/all-in-one#how-to-adjust-the-talk-port
      # - WATCHTOWER_DOCKER_SOCKET_PATH=/var/run/docker.sock # Needs to be specified if the docker socket on the host is not located in the default '/var/run/docker.sock'. Otherwise mastercontainer updates will fail. For macos it needs to be '/var/run/docker.sock'
    # networks: # Is needed when you want to create the nextcloud-aio network with ipv6-support using this file, see the network config at the bottom of the file
      # - nextcloud-aio # Is needed when you want to create the nextcloud-aio network with ipv6-support using this file, see the network config at the bottom of the file
      # - SKIP_DOMAIN_VALIDATION=true
    # # Uncomment the following line when using SELinux
    # security_opt: ["label:disable"]
volumes: # If you want to store the data on a different drive, see https://github.com/nextcloud/all-in-one#how-to-store-the-filesinstallation-on-a-separate-drive
  nextcloud_aio_mastercontainer:
    name: nextcloud_aio_mastercontainer # This line is not allowed to be changed as otherwise the built-in backup solution will not work
I have not removed many of the commented options in the compose file, for a possibility of me using them in the future.
If you want a smaller cleaner compose with the extra options, you can refer to
services:
  nextcloud-aio-mastercontainer:
    image: nextcloud/all-in-one:latest
    init: true
    restart: always
    container_name: nextcloud-aio-mastercontainer
    volumes:
      - nextcloud_aio_mastercontainer:/mnt/docker-aio-config
      - /var/run/docker.sock:/var/run/docker.sock:ro
    ports:
      - 8080:8080
    environment:
      - APACHE_PORT=32323
      - APACHE_IP_BINDING=127.0.0.1
      - NEXTCLOUD_DATADIR=/opt/docker/nextcloud
volumes:
  nextcloud_aio_mastercontainer:
    name: nextcloud_aio_mastercontainer
I am using a separate directory to store nextcloud data. As per nextcloud documentation you should be using a separate partition if you want to use this feature, however I did not have that option on my server, so I used a separate directory instead.
Also we use a custom port on which nextcloud listens for operations, we have set it up as 32323 above, but you can use any in the permissible port range. The 8080 port is used the setup the AIO management interface. Both 8080 and the APACHE_PORT do not need to be open on the host machine, as we will be using reverse proxy setup with nginx to direct requests.
once you have your preferred compose.yml file, you can start the containers using
$ docker-compose -f compose.yml up -d
Creating network "clouddev_default" with the default driver
Creating volume "nextcloud_aio_mastercontainer" with default driver
Creating nextcloud-aio-mastercontainer ... done
once your container's are running, we can do the nginx setup.
Step 2: Configuring nginx reverse proxy for our domain on host.
A reference nginx configuration for nextcloud AIO is given in the nextcloud git repository here . You can modify the configuration file according to your needs and setup.
Here is configuration that we are using
map $http_upgrade $connection_upgrade {
    default upgrade;
    '' close;
}
server {
    listen 80;
    #listen [::]:80;            # comment to disable IPv6
    if ($scheme = "http") {
        return 301 https://$host$request_uri;
    }
    listen 443 ssl http2;      # for nginx versions below v1.25.1
    #listen [::]:443 ssl http2; # for nginx versions below v1.25.1 - comment to disable IPv6
    # listen 443 ssl;      # for nginx v1.25.1+
    # listen [::]:443 ssl; # for nginx v1.25.1+ - keep comment to disable IPv6
    # http2 on;                                 # uncomment to enable HTTP/2        - supported on nginx v1.25.1+
    # http3 on;                                 # uncomment to enable HTTP/3 / QUIC - supported on nginx v1.25.0+
    # quic_retry on;                            # uncomment to enable HTTP/3 / QUIC - supported on nginx v1.25.0+
    # add_header Alt-Svc 'h3=":443"; ma=86400'; # uncomment to enable HTTP/3 / QUIC - supported on nginx v1.25.0+
    # listen 443 quic reuseport;       # uncomment to enable HTTP/3 / QUIC - supported on nginx v1.25.0+ - please remove "reuseport" if there is already another quic listener on port 443 with enabled reuseport
    # listen [::]:443 quic reuseport;  # uncomment to enable HTTP/3 / QUIC - supported on nginx v1.25.0+ - please remove "reuseport" if there is already another quic listener on port 443 with enabled reuseport - keep comment to disable IPv6
    server_name cloud.example.com;
    location / {
        proxy_pass https://127.0.0.1:32323$request_uri;
        proxy_set_header X-Forwarded-For $proxy_add_x_forwarded_for;
        proxy_set_header X-Forwarded-Port $server_port;
        proxy_set_header X-Forwarded-Scheme $scheme;
        proxy_set_header X-Forwarded-Proto $scheme;
        proxy_set_header X-Real-IP $remote_addr;
        proxy_set_header Accept-Encoding "";
        proxy_set_header Host $host;

        client_body_buffer_size 512k;
        proxy_read_timeout 86400s;
        client_max_body_size 0;
        # Websocket
        proxy_http_version 1.1;
        proxy_set_header Upgrade $http_upgrade;
        proxy_set_header Connection $connection_upgrade;
    }
    ssl_certificate /etc/letsencrypt/live/cloud.example.com/fullchain.pem; # managed by Certbot
    ssl_certificate_key /etc/letsencrypt/live/cloud.example.com/privkey.pem; # managed by Certbot
    ssl_session_timeout 1d;
    ssl_session_cache shared:MozSSL:10m; # about 40000 sessions
    ssl_session_tickets off;
    ssl_protocols TLSv1.2 TLSv1.3;
    ssl_ciphers ECDHE-ECDSA-AES128-GCM-SHA256:ECDHE-RSA-AES128-GCM-SHA256:ECDHE-ECDSA-AES256-GCM-SHA384:ECDHE-RSA-AES256-GCM-SHA384:ECDHE-ECDSA-CHACHA20-POLY1305:ECDHE-RSA-CHACHA20-POLY1305:DHE-RSA-AES128-GCM-SHA256:DHE-RSA-AES256-GCM-SHA384:DHE-RSA-CHACHA20-POLY1305;
    ssl_prefer_server_ciphers on;
    # Optional settings:
    # OCSP stapling
    # ssl_stapling on;
    # ssl_stapling_verify on;
    # ssl_trusted_certificate /etc/letsencrypt/live/<your-nc-domain>/chain.pem;
    # replace with the IP address of your resolver
    # resolver 127.0.0.1; # needed for oscp stapling: e.g. use 94.140.15.15 for adguard / 1.1.1.1 for cloudflared or 8.8.8.8 for google - you can use the same nameserver as listed in your /etc/resolv.conf file
}
Please note that you need to have valid SSL certificates for your domain for this configuration to work. Steps on getting valid SSL certificates for your domain are beyond the scope of this article. You can give a web search on getting SSL certificates with letsencrypt and you will get several resources on that, or may write a blog post on it separately in the future.
once your configuration for nginx is done, you can test the nginx configuration using
$ sudo nginx -t
nginx: the configuration file /etc/nginx/nginx.conf syntax is ok
nginx: configuration file /etc/nginx/nginx.conf test is successful
and then reload nginx with
$ sudo nginx -s reloadStep 3: Setup of Nextcloud AIO from the browser.
To setup nextcloud AIO, we need to access it using the web browser on URL of our domain.tld:8080, however we do not want to open the 8080 port publicly to do this, so to complete the setup, here is a neat hack from sahilister
ssh -L 8080:127.0.0.1:8080 username@<server-ip>you can bind the 8080 port of your server to the 8080 of your localhost using Unix socket forwarding over SSH.
The port forwarding only last for the duration of your SSH session, if the SSH session breaks, your port forwarding will to.
So, once you have the port forwarded, you can open the nextcloud AIO instance in your web browser at 127.0.0.1:8080
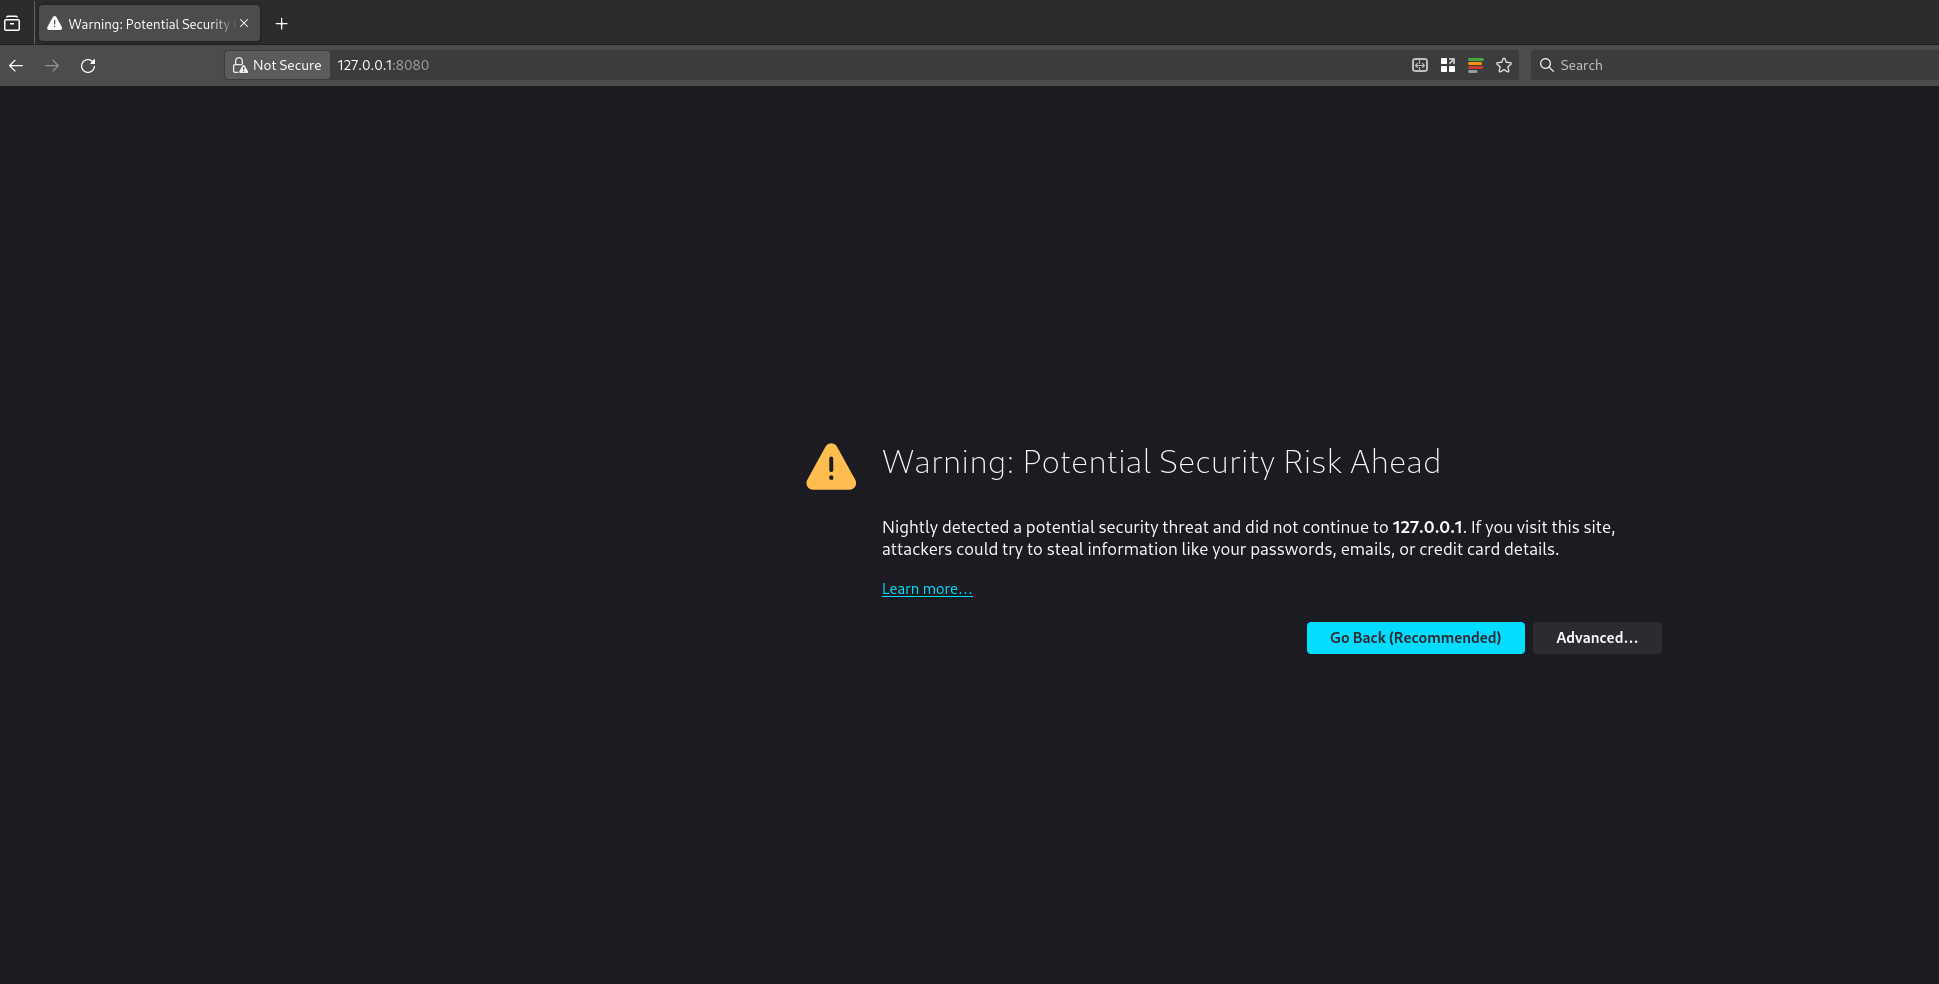
you will get this error because you are trying to access a page on localhost over HTTPS. You can click on advanced and then continue to proceed to the next page. Your data is encrypted over SSH for this session as we are binding the port over SSH.
Depending on your choice of browser, the above page might look different.
once you have proceeded, the nextcloud AIO interface will open and will look something like this.
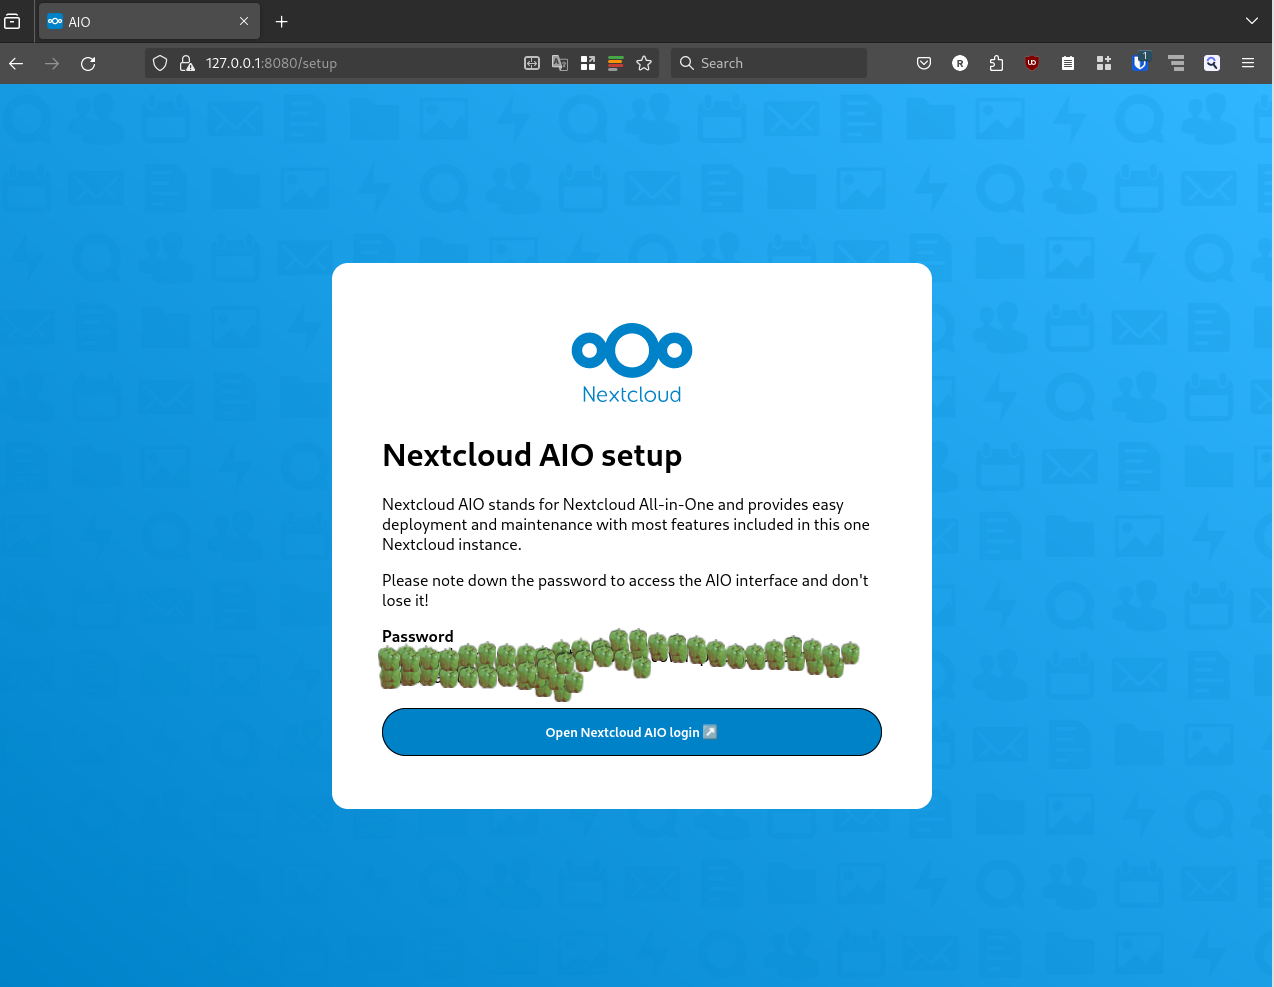
It will show an auto generated passphrase, you need to save this passphrase and make sure to not loose it. For the purposes of security, I have masked the passwords with capsicums.
once you have noted down your password, you can proceed to the Nextcloud AIO login, enter your password and then login.
If for some reasons you lose the initial password screen and did not note your password. You can get the initial password by running this on the server
sudo docker exec nextcloud-aio-mastercontainer grep password /mnt/docker-aio-config/data/configuration.jsonso now once you have the password, you can click on the open nextcloud AIO login button and enter using the password.
After login you will be greeted with a screen like this.
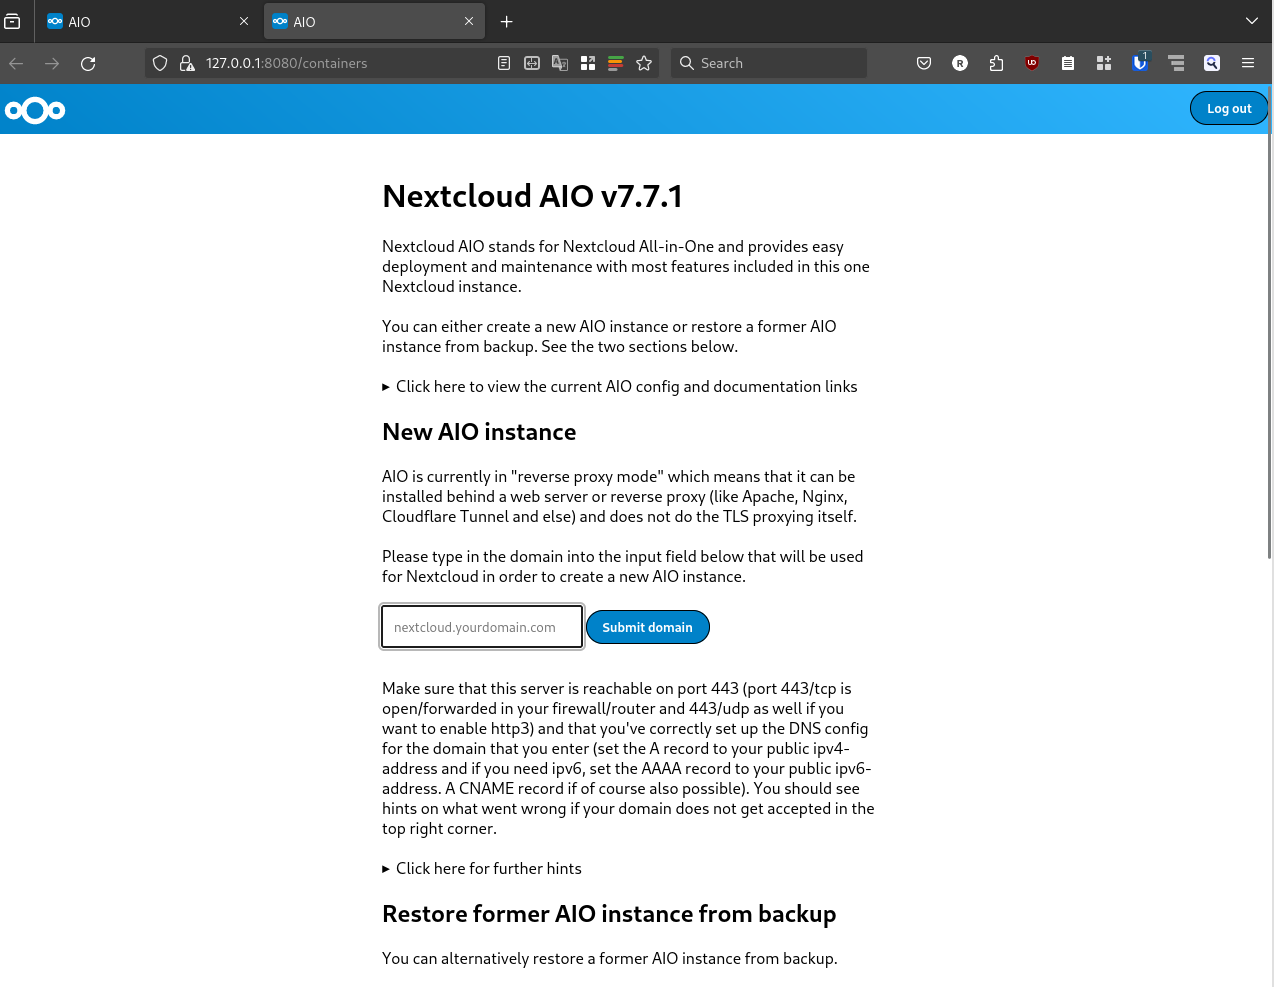
now you can put the domain that you want to use in the Submit domain field. Once the domain check is done, you will proceed to the next step and see another screen like this
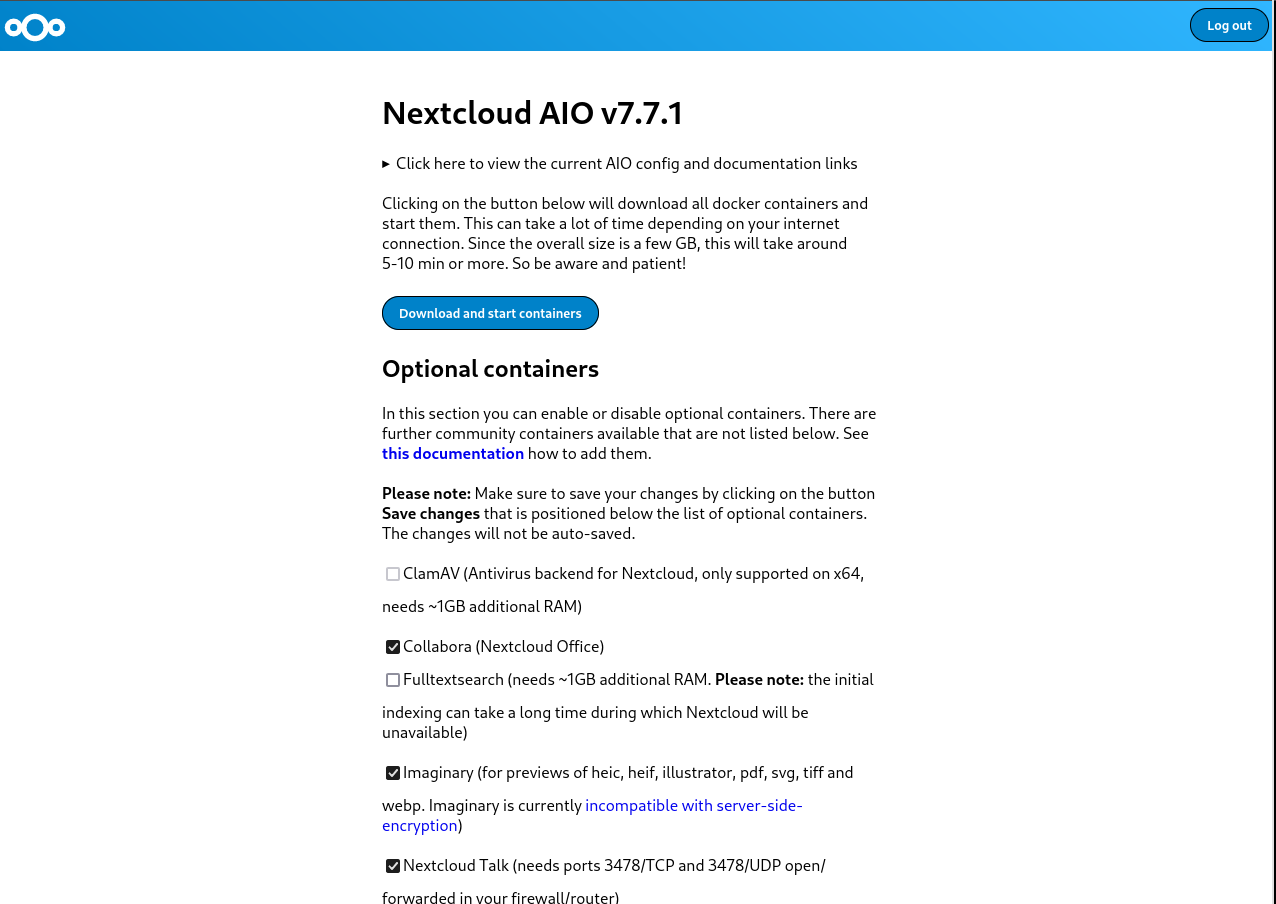
here you can select any optional containers for the features that you might want.
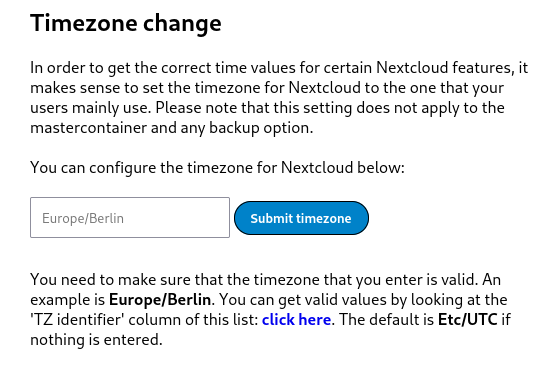
IMPORTANT: Please make sure to also change the time zone at the bottom of the page according to the time zone you wish to operate in.
The timezone setup is also important because the data base will get initialized according to the set time zone. This could result in wrong initialization of database and you ending up in a startup loop for nextcloud. I faced this issue and could only resolve it after getting help from sahilister .
Once you are done changing the timezone, and selecting any additional features you want, you can click on Download and start the containers
It will take some time for this process to finish, take a break and look at the farthest object in your room and take a sip of water. Once you are done, and the process has finished you will see a page similar to the following one.
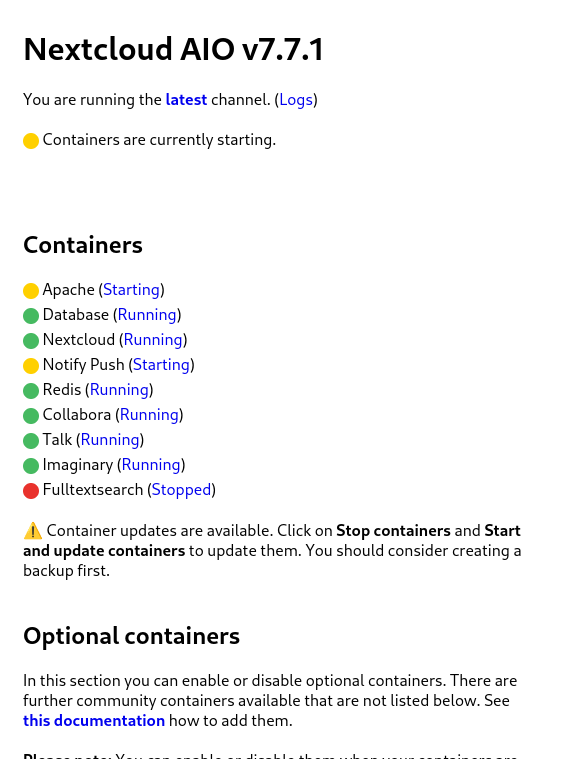
wait patiently for everything to turn green.
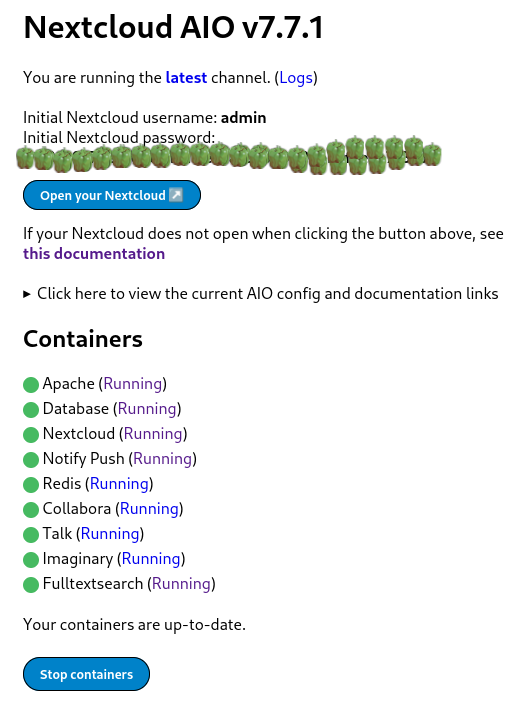
once all the containers have started properly, you can open the nextcloud login interface on your configured domain, the initial login details are auto generated as you can see from the above screenshot. Again you will see a password that you need to note down or save to enter the nextcloud interface. Capsicums will not work as passwords. I have masked the auto generated passwords using capsicums.
Now you can click on Open your Nextcloud button or go to your configured domain to access the login screen.
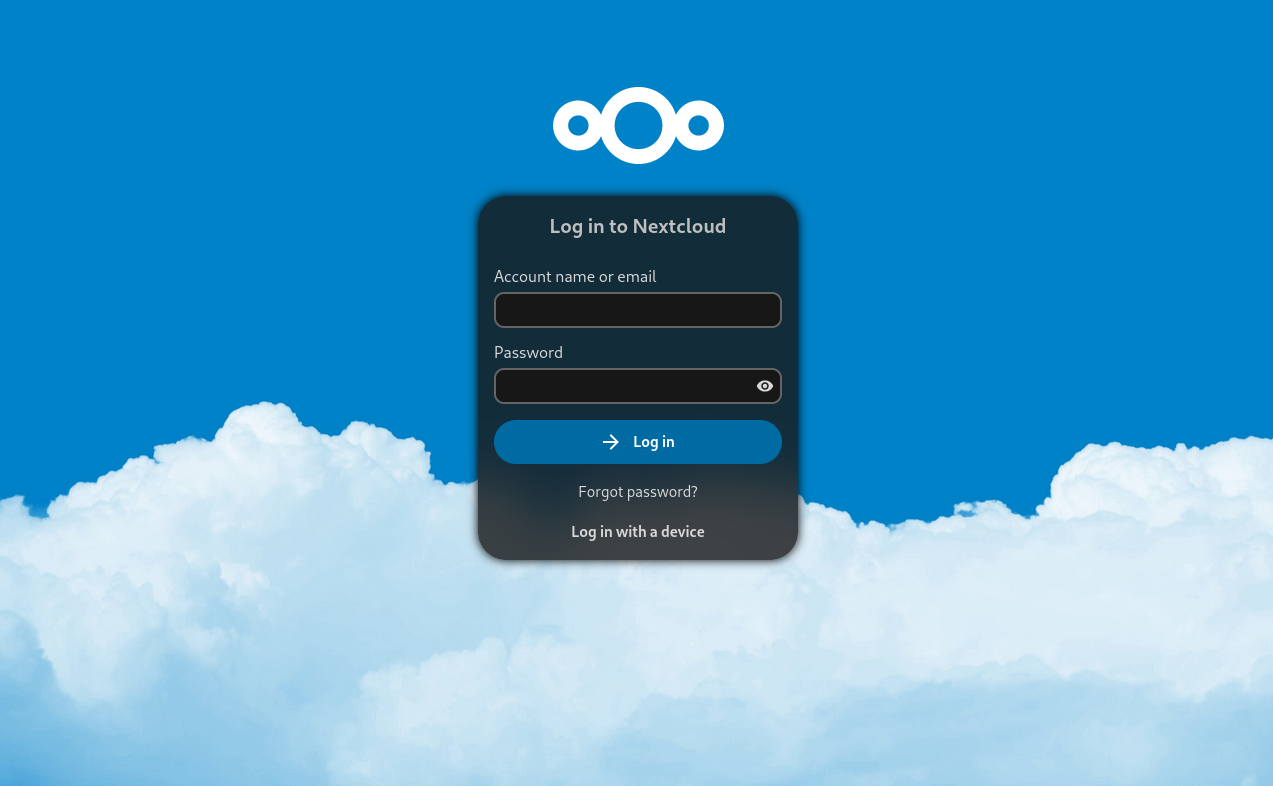
You can use the login details from the previous step to login to the administrator account of your Nextcloud instance.
There you have it, your very own cloud!
Additional Notes:
How to properly reset Nextcloud setup?
While following the above steps, or while following steps from some other tutorial, you may have made a mistake, and want to start everything again from scratch. The instructions for it are present in the Nextcloud documentation here . Here is the TLDR for a docker-compose setup. These steps will delete all data, do not use these steps on an existing nextcloud setup unless you know what you are doing.
- Stop your master container.
docker-compose -f compose.yml down -vThe above command will also remove the volume associated with the master container
- Stop all the child containers that has been started by the master container.
docker stop nextcloud-aio-apache nextcloud-aio-notify-push nextcloud-aio-nextcloud nextcloud-aio-imaginary nextcloud-aio-fulltextsearch nextcloud-aio-redis nextcloud-aio-database nextcloud-aio-talk nextcloud-aio-collabora- Remove all the child containers that has been started by the master container
docker rm nextcloud-aio-apache nextcloud-aio-notify-push nextcloud-aio-nextcloud nextcloud-aio-imaginary nextcloud-aio-fulltextsearch nextcloud-aio-redis nextcloud-aio-database nextcloud-aio-talk nextcloud-aio-collabora- If you also wish to remove all images associated with nextcloud you can do it with
docker rmi $(docker images --filter "reference=nextcloud/*" -q)- remove all volumes associated with child containers
docker volume rm <volume-name>- remove the network associated with nextcloud
docker network rm nextcloud-aioAdditional references.
]]>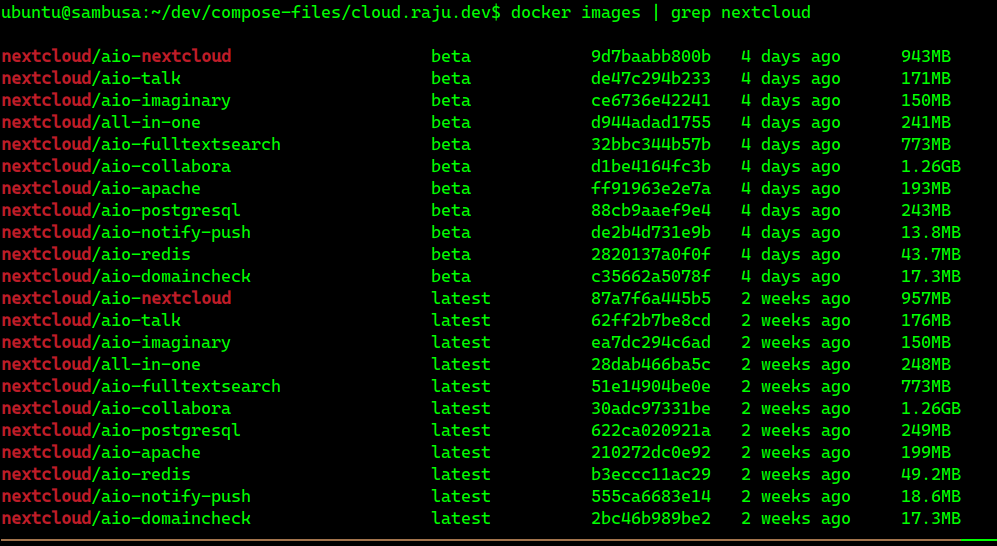
docker imagesIn my case I want to remove all images which have the beta tag. to do that
use
docker rmi $(docker images --filter "reference=nextcloud/*:beta" -q)
you can modify the reference part according to your use case.
Ciao!
]]>docker imagesIn my case I want to remove all images which have the beta tag. to do that
use
docker rmi $(docker images --filter "reference=nextcloud/*:beta" -q)
you can modify the reference part according to your use case.
Ciao!
]]>/root partition and a separate /home partition. This space never ran out for me, until I decided to start using Docker and Flatpaks. Some of the Docker images are big
]]>/root partition and a separate /home partition. This space never ran out for me, until I decided to start using Docker and Flatpaks. Some of the Docker images are big and take significantly large space. Same goes with Flatpak applications, they require big amounts of storage.
I have done some neat hacks to move the default installation path for Docker and flatpak to my /home/ partition instead of the root partition. While the Docker hack is for a different post. Here is how I did for flatpak apps.
I followed advice from this neat issue on flatpak repos. https://github.com/flatpak/flatpak/issues/2337
sudo mv /var/lib/flatpak /home/user
cd /var/lib
sudo ln -s /home/user/flatpak flatpak
Now some people will say that I can use flatpak's builtin directive of --user to install apps rather than moving the whole install path in a different direction. However using the --user directive is not supported when using gnome-software . It is only supported for command line installs. Changing the default path helps keep the compatibility with GUI frontends to flatpak stores.
Till Next time.
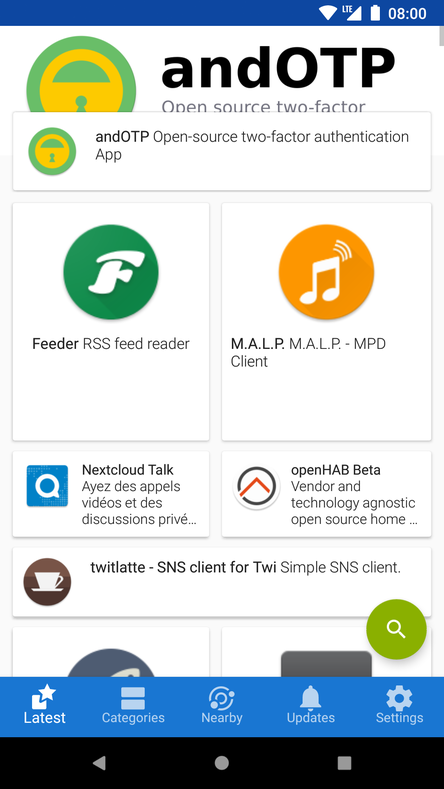
]]>It is an Android app store which only lists free and open source Android apps
In the world of mobile applications, the term "freedom" often takes a back seat to convenience. However, for those who value transparency, privacy,
]]>Today I want to introduce you all to f-droid.org
It is an Android app store which only lists free and open source Android apps
In the world of mobile applications, the term "freedom" often takes a back seat to convenience. However, for those who value transparency, privacy, and the ability to customize their digital experience, there's a hidden gem waiting to be explored: F-Droid.
What is F-Droid?
F-Droid is not just another app store; it's a hub of freedom and open-source goodness for Android users. While mainstream app stores may prioritize commercial applications, F-Droid is a haven for those who prefer software that respects user privacy, offers complete transparency, and is built on the principles of open-source development.
Why F-Droid?
- Open Source Philosophy: Every app available on F-Droid is open-source, meaning its source code is freely available to the public. This not only fosters transparency but also allows users to understand how the app works and even contribute to its development if they have the skills.
- Privacy First: F-Droid focuses on privacy-centric apps, ensuring that your personal data remains in your hands. No unnecessary permissions or hidden trackers - just apps designed with your privacy in mind.
- Community-Driven: F-Droid is a community-driven platform maintained by volunteers passionate about open-source software. The apps available are curated to meet strict criteria, guaranteeing quality and security.
Getting Started with F-Droid:
Download the F-Droid App: Begin your journey by downloading the F-Droid app from the official website f-droid.org.
- Explore the Repository: Once installed, the F-Droid app becomes your gateway to a plethora of open-source apps. Browse categories, discover new tools, and find alternatives to proprietary applications.
- Install with Confidence: Installing apps from F-Droid is a breeze. With just a few taps, you can enjoy the benefits of high-quality, open-source software on your Android device.
Conclusion:
If you're someone who values freedom, privacy, and the collaborative spirit of open-source development, F-Droid is your ticket to a world of incredible Android apps. Say goodbye to unnecessary permissions, hidden data harvesting, and closed-source mysteries. Embrace F-Droid and discover a new era of mobile app exploration.
Your device, your rules, your freedom.
]]>It is an interesting new project that caught my eye because of looking at some eye candy desktop setups on Unixporn
I have tried multiple window managers and desktop environments, but I keep falling back to i3wm because of my muscle
]]>Hyprland is dynamic tiling Wayland compositor based on wlroots.
It is an interesting new project that caught my eye because of looking at some eye candy desktop setups on Unixporn
I have tried multiple window managers and desktop environments, but I keep falling back to i3wm because of my muscle memory fixed to its key bindings and anything else feels limiting.
However I met Vysakh at DebConf23 and he asked me to give another try to Hyprland.
Vysakh sent me an easy setup script for setting up Hyprland on Debian
It's located at https://github.com/Senshi111/debian-hyprland-hyprdots
using the script did not go smoothly because the during the compilation pkgconfig was getting the wrong version of wayland-protocols package.
While debian has version 1.32, the build was taking 1.24 and my builds were failing because of an older version number.
Some of my issues and there solution are also mentioned in the issue here.
Vysakh debugged the issue along with me for over 3 hours and we finally found that the issue was gnome-core used by some of the apps that I used with snaps. For some reason value of version of wayland-protocols was being supplied by the snap instead of my locally installed native package.
After removing the snap packages, the builds went fine and I had a running hyprland desktop.
And it is awesome!
probably I will switch from i3wm this time.


Install apt-cacher-ng on the host machine
sudo apt install apt-cacher-ng
Check if your apt-cacher-ng service is running by visiting localhost:3142 in your web browser
Check the ip your local docker0 interface
> ip a
....
5: docker0: <BROADCAST,MULTICAST,UP,LOWER_UP> mtu 1500 qdisc noqueue state UPInstall apt-cacher-ng on the host machine
sudo apt install apt-cacher-ng
Check if your apt-cacher-ng service is running by visiting localhost:3142 in your web browser
Check the ip your local docker0 interface
> ip a
....
5: docker0: <BROADCAST,MULTICAST,UP,LOWER_UP> mtu 1500 qdisc noqueue state UP group default
    link/ether 02:42:60:c7:b6:6b brd ff:ff:ff:ff:ff:ff
    inet 172.17.0.1/16 brd 172.17.255.255 scope global docker0
       valid_lft forever preferred_lft forever
    inet6 fe80::42:60ff:fec7:b66b/64 scope link
       valid_lft forever preferred_lft forever
...
Provide the apt-cacher-ng service URL to your apt-based Dockerfile builds
In your Dockerfile builds use the proxy url for apt-cacher-ng by inserting this additional line

RUN echo 'Acquire::http { Proxy "https://172.17.0.1:3142"; };' >> /etc/apt/apt.conf.d/01proxy
This will work with any operating system base images whose repository system is supported by apt-cacher-ng. More details on apt-cacher-ng website
]]>This is <site/>, a brand new site by rajudev that's just getting started. Things will be up and running here shortly, but you can subscribe in the meantime if you'd like to stay up to date and receive emails when new content is published!
]]>JBOSS Cluster Setup
As per the documentation available for JBOSS on Red Hat’s website
"Red Hat JBoss Enterprise Application Platform 7 (JBoss EAP) is a middleware platform built on open standards and compliant with the Java Enterprise Edition 7 specification."
Think of it as the the
]]>JBOSS Cluster Setup
As per the documentation available for JBOSS on Red Hat’s website
"Red Hat JBoss Enterprise Application Platform 7 (JBoss EAP) is a middleware platform built on open standards and compliant with the Java Enterprise Edition 7 specification."
Think of it as the the plumbing between your application and the server on which it is hosted.
"JBoss EAP provides two operating modes for JBoss EAP instances: standalone server or managed domain. The standalone server operating mode represents running JBoss EAP as a single server instance. The managed domain operating mode allows for the management of multiple JBoss EAP instances from a single control point. "
"In addition, JBoss EAP includes APIs and development frameworks for quickly developing secure and scalable Java EE applications. "
In other words, you deploy a website on a web server, similarly, you deploy a Java Web application on a application server such as JBOSS.
In this blog post, we will setup the application server JBOSS cluster with 2 nodes and deploy a demo application on top of it. For the two nodes of JBOSS you can use any of the machines available to you. I have done this using Vagrant as well as Docker. For the scope of this blog post I will be using Docker. If you have a powerful machine, Vagrant will be easy to use as well.
Here is a simple architecture diagram of a 2 node cluster setup.

In the architecture diagram above I am using the terms Leader for the main node and follower for the sub domain node. Consider this similar to master and slave terminologies, I am avoiding those terminologies because of this
Step I : Prepare the Machines/Containers

We are starting two Docker containers as you can see in the terminal. In the terminal on top we are creating the container for the leader node. And in the second container we are starting the container for the follower node. Break down of the commands entered are as follows.
docker run -it --name="leader" -p 9990:9990 -p 8000:80 centos
docker run Run a docker container
-it In interactive mode and allocate a psedo tty to it.
–name=”leader” assign the name leader to it.
-p 9990:9990 -p 8000:80 expose the external host machines port 9990 to the containers internal 9990 port, similarly for the 8000 port number of the host to the 80 port number of the container.
centos the image name that we have to make the container of, in our case centos.
docker run -it --name="follower" -p 9991:9990 -p 8001:80 centos
In case of the second prompt we are creating the container for the follower that is slave node. Hence the name is different.
Notice that we have incremented the host port numbers, as the port numbers will get used by the leader container, we will need different port numbers for the follower node. So in my case I have incremented the port numbers by 1.
after executing the above commands you will have two containers one above another, ready for our implementation.

For the duration of the tutorial, I will be executing commands for leader in the top terminal and the commands for the follower in the bottom terminal.
Lets move to step II
Step II - Preparing the machines, installing prerequisites
JBOSS requires a few softwares to work such as java. also we would require some softwares to work properly on the container such as a text editor, a network management tool etc. Let install all these dependencies and required software.
Also note that, although CentOS uses yum as the package manager, as a personal preference I use dnf as the package manager. So lets first install dnf.
ppWe execute the following commands on both the leader and follower containers.
yum install dnf -y
After installing the dnf package manager, lets install other packages using dnf.
dnf install java nano emacs sudo java unzip java-1.8.0-openjdk java-1.8.0-openjdk-devel openssh-clients -y
Although we can do most stuff being a root user. I prefer not using the root user at all times. So lets add another user to the containers, make them administrators, set a password for them, and switch to that user.
**On leader **
adduser leader
usermod -aG wheel leader
passwd leader
su leader
**On follower **
adduser follower
usermod -aG wheel follower
passwd follower
su follower
Step III - Download JBOSS
Now lets download JBOSS setup on both of our containers.
The JBoss EAP ZIP file is available from the Red Hat Customer Portal.
Downloading the JBoss EAP ZIP File
- Open a browser and log in to the Red Hat Customer Portal at https://access.redhat.com.
- Click Downloads.
- Click Red Hat JBoss Enterprise Application Platform in the Product Downloads list.
- Select the correct JBoss EAP version from the Version drop-down menu.
- Find Red Hat JBoss Enterprise Application Platform 7.x.x in the list and click the Download link.
You might be required to sign up to the portal or do the provide us some information shenanigans before you could get access to the download. But you will reach to it anyways. Once you get the zip transfer them to the container using scp, or else once you get the link, download it directly inside the container using wget.
Installing the Downloaded zipfile.
Unzip the JBOSS zip
unzip jboss-eap-7.2.0.zip
cd jboss-eap-7.2.0
after doing this my leader and follower terminals look like this.

Step V - Run JBOSS
Step VI - JBOSS Management Interface overview
]]>I have been using git for a while now in my workflow. I find my self proficient enough with git to perform most of the usual tasks involved in the version control management systems.
But recently I decided to dive deep and finish one of the tasks in my
]]>
I have been using git for a while now in my workflow. I find my self proficient enough with git to perform most of the usual tasks involved in the version control management systems.
But recently I decided to dive deep and finish one of the tasks in my bucket list, i.e. mastering git in depth. I planned to do this by reading the Pro Git book written by Scott Chacon & Ben Straub. The book is available to read online at git-scm.com
In this blog post I will be writing the facts and tricks I learned from the book. Following are my take aways from the book.
1. The checksum that we see in git commits is 40 hexadecimal characters
The mechanism that Git uses for this check summing is called a SHA-1 hash. This is a 40-character string composed of hexadecimal characters (0–9 and a–f) and calculated based on the contents of a file or directory structure in Git. A SHA-1 hash looks something like this:
24b9da6552252987aa493b52f8696cd6d3b00373
You will see these hash values all over the place in Git because it uses them so much. In fact, Git stores everything in its database not by file name but by the hash value of its contents.
2. You can clone a git repository under a different folder name
If you want to clone the git repository into a directory named something other than what the repository name uses, you can specify the new directory name as an additional argument:
Syntax
$ git clone <base-URL/repository-name> new-folder-name
Example
$ git clone https://github.com/libgit2/libgit2 mylibgit
3. Apart from the usual git:// and https:// protocols git can also clone a repo from another computer.
Git has a number of different transfer protocols you can use. Most people use https:// or git:// , but you can also clone repos from another machine.
$ git clone user@server:path/to/repo.git
This uses the SSH transfer protocol.
4. Short Git status
While the git status output is pretty comprehensive, it’s also quite wordy. Git also has a short status flag so you can see your changes in a more compact way. If you run git status -s or git status –short you get a far more simplified output from the command:
$ git status -s
 M README
MM Rakefile
A  lib/git.rb
M  lib/simplegit.rb
?? LICENSE.txt
New files that aren’t tracked have a ?? next to them, new files that have been added to the staging area have an A, modified files have an M and so on.
5. Awesome git log
By default, with no arguments, git log lists the commits made in that repository in reverse chronological order. A huge number and variety of options to the git log command are available to show you exactly what you’re looking for. Here, I’ll show some of the most useful ones.
1 . git log --patch or git log -p
Shows the difference (the patch output) introduced in each commit. You can also limit the number of log entries to be displayed by supplying the number in front of the command, such as git log –patch -2
  $ git log -p -2
  commit ca82a6dff817ec66f44342007202690a93763949
  Author: Scott Chacon <schacon@gee-mail.com>
  Date:   Mon Mar 17 21:52:11 2008 -0700
      changed the version number
p
  diff --git a/Rakefile b/Rakefile
  index a874b73..8f94139 100644
  --- a/Rakefile
  +++ b/Rakefile
  @@ -5,7 +5,7 @@ require 'rake/gempackagetask'
  spec = Gem::Specification.new do |s|
      s.platform  =   Gem::Platform::RUBY
      s.name      =   "simplegit"
  -    s.version   =   "0.1.0"
  +    s.version   =   "0.1.1"
      s.author    =   "Scott Chacon"
      s.email     =   "schacon@gee-mail.com"
      s.summary   =   "A simple gem for using Git in Ruby code."
  commit 085bb3bcb608e1e8451d4b2432f8ecbe6306e7e7
  Author: Scott Chacon <schacon@gee-mail.com>
  Date:   Sat Mar 15 16:40:33 2008 -0700
      removed unnecessary test
  diff --git a/lib/simplegit.rb b/lib/simplegit.rb
  index a0a60ae..47c6340 100644
  --- a/lib/simplegit.rb
  +++ b/lib/simplegit.rb
  @@ -18,8 +18,3 @@ class SimpleGit
      end
  end
  -
  -if $0 == __FILE__
  -  git = SimpleGit.new
  -  puts git.show
  -end
2 . git log --stat
If you want to see some abbreviated stats for each commit, you can use the --stat option:
   $ git log --stat
   commit ca82a6dff817ec66f44342007202690a93763949
   Author: Scott Chacon <schacon@gee-mail.com>
   Date:   Mon Mar 17 21:52:11 2008 -0700
       changed the version number
   Rakefile | 2 +-
   1 file changed, 1 insertion(+), 1 deletion(-)
   commit 085bb3bcb608e1e8451d4b2432f8ecbe6306e7e7
   Author: Scott Chacon <schacon@gee-mail.com>
   Date:   Sat Mar 15 16:40:33 2008 -0700
       removed unnecessary test
   lib/simplegit.rb | 5 -----
   1 file changed, 5 deletions(-)
   commit a11bef06a3f659402fe7563abf99ad00de2209e6
   Author: Scott Chacon <schacon@gee-mail.com>
   Date:   Sat Mar 15 10:31:28 2008 -0700
       first commit
   README           |  6 ++++++
   Rakefile         | 23 +++++++++++++++++++++++
   lib/simplegit.rb | 25 +++++++++++++++++++++++++
   3 files changed, 54 insertions(+)
3 . git log --pretty=oneline
This option changes the log output to formats other than the default. A few prebuilt options are available for you to use. The oneline option prints each commit on a single line, which is useful if you’re looking at a lot of commits. In addition, the short, full, and fuller options show the output in roughly the same format but with less or more information, respectively:
   $ git log --pretty=oneline
   ca82a6dff817ec66f44342007202690a93763949 changed the version number
   085bb3bcb608e1e8451d4b2432f8ecbe6306e7e7 removed unnecessary test
   a11bef06a3f659402fe7563abf99ad00de2209e6 first commit
This would be a series of blog posts as I keep reading and discovering more about git through the Pro Git Book more awesome git tricks would be coming soon in the next part of this blog.
Till then, ciao!
]]>Often at times you want to know the passwords of a particular WiFi connection that you are connected to or of one that you connected in the past.
Where the wifi network details are saved?
The instructions that I am going to write apply to most distributions and the
]]>
Often at times you want to know the passwords of a particular WiFi connection that you are connected to or of one that you connected in the past.
Where the wifi network details are saved?
The instructions that I am going to write apply to most distributions and the ones which use the network-manager package for managing the networks.
The Wifi networks you have ever connected to are stored in /etc/NetworkManager/system-connections
root@sanganak:/etc/NetworkManager/system-connections# pwd
/etc/NetworkManager/system-connections
This is where all the wifi network details are stored. Lets see some saved networks from my computer.
root@sanganak:/etc/NetworkManager/system-connections# ls -la
total 36
drwxr-xr-x 2 root root 4096 Aug 23 16:51  .
drwxr-xr-x 7 root root 4096 Aug 15 02:57  ..
-rw------- 1 root root  335 Aug 22 00:45  Aryan
-rw------- 1 root root  338 Aug 18 13:07  GUEST-N
-rw------- 1 root root  345 Aug 23 16:51  TBSWPRO
-rw------- 1 root root  343 Aug 23 10:16  TP-LINK
-rw------- 1 root root  343 Aug 19 22:54  Tenda_3563
-rw------- 1 root root  341 Aug 19 14:25  hotspot2
-rw------- 1 root root  384 Aug 19 22:41 ''$'\340\244\270\340\245\207\340\244\265\340\244\276'
When we connect to any wifi network using the GUI of Network Manager or any command line interface. The network details are stored in this particular path with a new file each time corresponding to the SSID of the network.
You can open any of these files and the network details would be right there.
Lets take a look at the network details of GUEST-N
root@sanganak:/etc/NetworkManager/system-connections# cat GUEST-N
[connection]
id=GUEST-N
uuid=ed2a8866-7a0b-4cb1-96f9-0518ae77806d
type=wifi
permissions=
[wifi]
mac-address=A0:88:B4:E4:C5:64
mac-address-blacklist=
mode=infrastructure
ssid=GUEST-N
[wifi-security]
auth-alg=open
key-mgmt=wpa-psk
psk=esya@2018
[ipv4]
dns-search=
method=auto
[ipv6]
addr-gen-mode=stable-privacy
dns-search=
method=auto
You can see that the security key is listed in front of the field psk
Lets take a look at more details of another network named Tenda_3563
root@sanganak:/etc/NetworkManager/system-connections# cat Tenda_3563
[connection]
id=Tenda_3563
uuid=6e3fcf66-1a04-4f7b-a931-90881d9ea132
type=wifi
permissions=
[wifi]
mac-address=A0:88:B4:E4:C5:64
mac-address-blacklist=
mode=infrastructure
ssid=Tenda_3563
[wifi-security]
auth-alg=open
key-mgmt=wpa-psk
psk=12345678
[ipv4]
dns-search=
method=auto
[ipv6]
addr-gen-mode=stable-privacy
dns-search=
method=auto
For the network Tenda_3563 the password listed above is 12345678
So now we know the wifi network connection details and where they are stored.
]]>