|
|
|
| CARVIEW |


 Just click the picture to go to the site to order.
")
Few ideas


Cant wait to get started.. i have until April for the shower…. SO FUN sewing for a baby again!
]]>It is amazing how much stuff had worked its way into my room over the last year or so.
Here are some before/after pics:

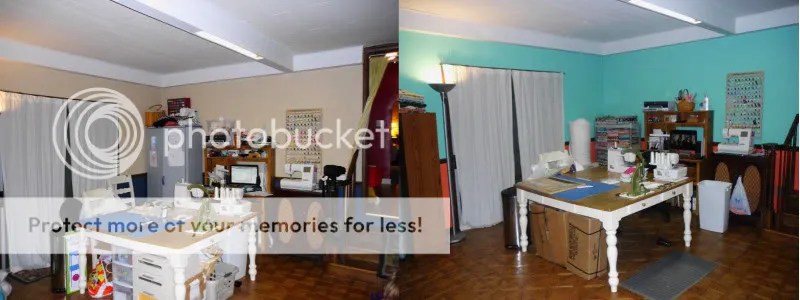


I still want to upcycle an old chalkboard for wall art over the fabric in the corner, replace the rug on the stairs and recover my ironing board.

The top was a beige color and the bottom will be painted eventually, just need to get the time.. I only did this ONE wall so far, which was by the far the easiest to get to, but the most trimming/brush work. Phew- I am going to sleep well tonight.
 I have had visions of repainting the walls to a lighter, brighter more inspiring color for awhile. So I am jumping in! I had dark wood beams along the ceiling walls and down the center of the room and had painted those a long time ago. However, I never got around to rolling the main part of the ceiling. So I rolled it tonight. It needs one more coat and as much as I would like to call it “good enough”, I am doing it right this time.
So here is the before picture of the room in all its messy glory. It is way messier then usual here so pardon the piles that arent usually there.
I am going to leave my trim/stairs all the brown wood. But will be painting the top and the bottom 2 separate colors. Here are the before pics (keep in mind it needs tidied, lol)


Here are the colors I picked out. The top will be this pretty aqua green color called “Freshy Fresh” lol. Bottom is “Paprika”. The brown is just in the middle to show the contrast with the trim.
")
So feel free to follow along as I move onto a new brighter space. I hope to replace the blue cabinet in the corner too and I would love to paint the embroidery cabinet and put some cool funky fabric in the front openings.
]]>
A fake button ruffle placket.
")

So gather the following and jump in with me:
- onesie
- small scrap of a fusible (soft preferrably) interfacing to iron to the back of the area to stabilize the knit to sew the placket one
- 18″ x 3″ strip of ruffle material
- 6.5″ piece of extra wide bias trim *I used a patterned Michael Miller Cotton Bias Trim*
- 3 buttons (and needle/thread)
- iron
Step #1
After collecting all your supplies, mark the middle of your onesie. I used a watersoluble blue pen. I marked the middle down 3″ from neckline then 1/2″ on both sides. Then iron on the fusible featherweight interfacing on the back side of that area.
Also iron open your bias tape. so it is 1″ wide.
")
Step #2
Open up the folds on your bias tape and sew the 2 raw edges together then fold it all back up to make a loop out of your bias tape
")
Step #3
Take your 18″ x 3″ piece and fold it in half to make it 18 x 1.5″ with wrong sides together so the print shows on the outside. Then IRON.
Then fold the ends right sides together and sew it closed and flip back with the right sides out:
")
Step #4
We are going to ruffle your strip. I do this easily with setting my machine to its LONGEST STITCH LENGTH and HIGHEST TENSION SETTING *which is length 5.0 and tension9 on my machine*
Start right along the raw edges of the strip. I put my finger behind the foot to help it gather like so:
")
Step #5
Then match the ends and raw edges together as pictured below and set your machine to a WIDE zig zag stitch. *DONT FORGET TO TURN your tension setting back*
")
When I get to the end, I gather a little more and square the end slightly so it will lay flat when sewn onto the shirt
")
Step #6
Iron your bias trim and hide your seam on the back side of the “loop”. Line the top up with the top of your ruffle you created and sew down the middle. Gather the ruffle slightly more if you notice the ruffle is longer then your bias tape.
")
Step #7
Line up your ruffle placket with the markings on your onesie. Sew along all edges of your bias trim. Then mark button placement and sew them on!!
")
")
You are done!
]]>


If you are looking to make your own here are a few free online tutorials:
- House on Hill Road Coffee Cozy Tutorial
- Sew Simply Creative Coffee Cozy Tutorial
- Lime & Aqua Studio Coffee Cozy Tutorial upcycling a mens necktie
- Terris Notebook Coffee Cozy Tutorial with a scrappy quilted look like mine!
Enjoy!
]]>So we just made one real quick. This was so simple to do. We took yardage of a cotton knit material I had on hand, but you could easily use a t- shirt that your child grew out of or that has a stain/rip in a place that wont show once you cut this out.
Just take your book and lay the front, back and the ream of the book completely flat. We rotary cut right next to the top/bottom edges with no seam allowances. Then add 4″ onto both ends and trim the ends. Fold the end over the front flap and mark the crease and do the same for the back but pull just slightly to stretch the material every so much to make the cover fit snug. Match the right sides together and serge or zigzag stitch along the top and bottom edges with the ends folded in at the creases. Reverse the ends to be right side out and install the book.
Here is ours:
")
BEFORE being covered
")
After Being Covered
")
Cover open
My Daughter really wanted a T embroidered on it- so While it was here and the embroidery machine was available I did as was requested 

With T Embroidered on it!
So there ya have it- A book cover that took about 50 cents and 5 minutes to make.. She was one happy camper!!
]]>I had a good friend ask me to custom make a few things for some gifts and I wanted to share. First is a coffee cup cozie thingy- ya know one of those things, lol. I think it turned out really cute!

Next she asked me to make some “Sleeves” for an Ipod and Blackberry. Here is what I came up with:


I do have to admit both projects gave me a run for my money for some reason- but if i did them again it would be a breeze I imagine!
]]>