HTTP/2 301
server: nginx/1.27.4
date: Thu, 29 Jan 2026 01:58:23 GMT
content-type: application/rss+xml; charset=UTF-8
location: https://myedtech.opened.ca/feed/
last-modified: Tue, 03 Dec 2019 21:26:50 GMT
etag: "61449a533445f6569cce3bd0623efe2b"
x-redirect-by: WordPress
fastcgi-cache: MISS
strict-transport-security: max-age=31536000; includeSubdomains;
HTTP/2 200
server: nginx/1.27.4
date: Thu, 29 Jan 2026 01:58:23 GMT
content-type: application/rss+xml; charset=UTF-8
vary: Accept-Encoding
last-modified: Tue, 03 Dec 2019 21:26:50 GMT
etag: W/"61449a533445f6569cce3bd0623efe2b"
link: ; rel="https://api.w.org/"
fastcgi-cache: BYPASS
strict-transport-security: max-age=31536000; includeSubdomains;
content-encoding: gzip
My EdTech Blog
https://myedtech.opened.ca
This blog will have you in stitchesTue, 03 Dec 2019 21:26:50 +0000en-CA
hourly
1 The Final Product
https://myedtech.opened.ca/2019/12/03/the-final-product/
https://myedtech.opened.ca/2019/12/03/the-final-product/#respondTue, 03 Dec 2019 21:26:50 +0000https://myedtech.opened.ca/?p=150While I wasn’t able to post the process of my edtech discovery, I thought it would be cool to post the end result. My group looked into podcasting as a cross-curricular resource in a variety of different topics—enjoy!
]]>https://myedtech.opened.ca/2019/12/03/the-final-product/feed/0Entering a Virtual Reality
https://myedtech.opened.ca/2019/12/03/entering-a-virtual-reality/
https://myedtech.opened.ca/2019/12/03/entering-a-virtual-reality/#respondTue, 03 Dec 2019 21:23:20 +0000https://myedtech.opened.ca/?p=146I experienced something completely different for me–Virtual Reality. We had the opportunity as a class to head over the the Digital Scholarship Commons and try out the VR headset there. I watched as my peers explored google earth through virtual reality, and I myself went for a rollercoaster ride! While the experience left me slightly nauseas, it was a worthwhile experience. I think there is a lot of really cool stuff happening with virtual reality right now, and I have friends who have virtual reality headsets for gaming purposes. It is a very unique time in technological development, but like many things that are up and coming, virtual reality is expensive. If I am lucky enough to work at a school that has a VR headset, I look forward to the opportunity to find a way to incorporate it into my lessons.
]]>https://myedtech.opened.ca/2019/12/03/entering-a-virtual-reality/feed/0Coding through Grasshopper
https://myedtech.opened.ca/2019/11/22/coding-through-grasshopper/
https://myedtech.opened.ca/2019/11/22/coding-through-grasshopper/#respondFri, 22 Nov 2019 21:51:15 +0000https://myedtech.opened.ca/?p=144Today in class we had the opportunity to explore a few different coding games and applications. I spent my time on grasshopper, a text-based coding app geared towards high school students. It is very well structured, and takes you through the different elements of coding. I took a computer science course in my undergrad, focused on javascript. Grasshopper was, then, pretty straight forward to me. I found it a little frustrating at times because I wanted to type things for myself, rather than just click the blocks for the code that I was working on. Having only spent 20 minutes on this platform, I’m sure I don’t know the full extent of it’s capabilities. I hope that once you progress past the basic buildup, there are opportunities for a little more creativity and exploration.
As a pre-service math teacher, I am excited by the online resources available for coding as I know this might fall under my domain. I look forward to exploring more of these resources and implementing them in my classroom and beyond.
]]>https://myedtech.opened.ca/2019/11/22/coding-through-grasshopper/feed/0Podcast Problems
https://myedtech.opened.ca/2019/11/22/podcast-problems/
https://myedtech.opened.ca/2019/11/22/podcast-problems/#respondFri, 22 Nov 2019 21:37:03 +0000https://myedtech.opened.ca/?p=125For my English Methodologies class, we were asked to create a Podcast encompassing one major literary event, a summary of a core text we might use in a classroom, and then connect the core text to the curriculum and classroom resources. I was really excited for this project, as I had never before made a podcast. I decided to record on Garageband as it was already downloaded on my laptop and seemed pretty easy to maneuver.
I didn’t realize how long it would take to record my voice, let alone edit and configure the audio files. Once all of that was done, I prepared to export the file. Unfortunately, the dinosaur that is my laptop had some problems with this process. It took 24 hours of me waiting for it to export before I had to force quit, at risk of losing all my work, and shut my laptop down. I tried once again, and the same thing happened. I didn’t wait as long this time before forcing it to quit, and then tried a third time. Third time really was the charm, and my podcast successfully exported and I was able to submit it. Man was that stressful though!
While I think that podcasting is a super amazing way to communicate information, I don’t know that I would be too keen to assign this as a project for my students. It took me a really long time to make the podcast, and unless you’re very familiar with the technology, it can be a major barrier. I enjoyed this assignment, but I don’t think it is an alternative to essay/paragraph responses. Many of my classmates, including myself, simply ended up writing out what we were going to say before we said it. This resulted in nearly double the amount of work. For now, I think I’ll stick to listening to podcasts!
]]>https://myedtech.opened.ca/2019/11/22/podcast-problems/feed/0A New Strategy
https://myedtech.opened.ca/2019/11/06/133/
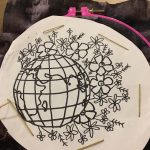
https://myedtech.opened.ca/2019/11/06/133/#respondWed, 06 Nov 2019 21:42:42 +0000https://myedtech.opened.ca/?p=133I tried something a little new this week. I had a pattern that I wanted to try to embroider on some dark fabric, but unfortunately, my water soluble marker didn’t show up on the dark fabric. I had to adapt and come up with some new ways to make this work. I also really didn’t want to spend any more money on this as that is currently pretty hard to come by. I was talking to a friend who has had success with straight up sewing through some paper. That’s what I ended up doing, and honestly, it was super frustrating. I traced the pattern onto the paper, and then loosely sewed the paper onto the fabric. The actual act of sewing through the paper is not what was frustrating for me; it was honestly not that different, especially once the paper was firmly attached to the fabric. I decided to just do the outline of the pattern with the paper still attached because I didn’t want to have to get rid of the paper once it was all filled in–it was difficult enough with just the outline!
I finished tracing the pattern, and so began the process of removing the paper. This definitely did not have a positive effect on my mental health–it was so frustrating! It probably took twice as long to remove the paper as it did to originally outline the pattern. Ultimately, I was able to get it done but I don’t think I’ll be using that strategy again.
I made this piece of embroidery with the intention of giving it as a thank you present at the end of November. While the process might have been frustrating, my motivation for doing it really benefitted my mental health. Each time, I left my embroidery in a better mood than I came to it.
I’ve also begun to find that embroidery is a really good way for me to prepare for sleep. It allows my brain to shut down, and makes my eyes nice and tired so that by the time I want to go to sleep, I am both mentally and physically ready. This is not an outcome I expected from picking up this hobby, it I have to say I’m not mad about it.
]]>https://myedtech.opened.ca/2019/11/06/133/feed/0A Beary Needed Break
https://myedtech.opened.ca/2019/10/25/a-beary-needed-break/
https://myedtech.opened.ca/2019/10/25/a-beary-needed-break/#respondFri, 25 Oct 2019 21:23:27 +0000https://myedtech.opened.ca/?p=127This Wednesday we had a half day at Lambrick Park due to parent/teacher interviews. It was exactly what I needed to balance my mental health, and honestly do some very basic chores that I had fallen way behind on. I got back to my room, took out my mountain of garbage, did my laundry, and vacuumed my floor–it was a good day. I decided to take the rest of the day to continue with some self care, and so instead of doing
homework, or watching Netflix, I embroidered. My friends birthday is coming up so I decided to embroider her a present, a very very cute bear with bees flying over its head. Going into this embroidery, I was feeling slightly overwhelmed, stressed, and in need of some me time. I turned on my favourite podcast and started a new embroidery project.
I got the design idea from, you guessed it, Pinterest! I actually ended up spending several hours doing this. It was a pretty simple design that didn’t really challenge me very much but it was exactly what I needed in order to disengage from my very busy life. After approximately four hours, I had created a great present for my friend while allowing my body to relax and my mind to calm down. One thing I havenoticed is that, unfortunately, I sometimes get carried away by my enthusiasm for embroidery. I’ll start, and four hours later I’ll realize there were a million other things I was supposed to do during that time, which honestly often adds stress to my life.
The process of creating something was an amazing way to develop my own self-efficacy. This program has been very busy, and with all the projects and assignments that we have to do I’ve often found myself feeling incapable of completing this program to a level that I’m proud of. While embroidery doesn’t have much to do with teaching, it’s allowed me the opportunity to feel confident in my ability to complete a project, and do it well. In the future, I think I need to set time limits for myself, or maybe just make sure that I have everything else done before I start sewing. I’m going to continue to make note of how I’m feeling both before, and after, each session of embroidery in order to document the (hopefully) positive affect it has on my mental health.
]]>https://myedtech.opened.ca/2019/10/25/a-beary-needed-break/feed/0A Busy Bee
https://myedtech.opened.ca/2019/10/08/a-busy-bee/
https://myedtech.opened.ca/2019/10/08/a-busy-bee/#respondTue, 08 Oct 2019 06:15:39 +0000https://myedtech.opened.ca/?p=102So, for my next project, I decided to try something a little more difficult. It had several stitches that I didn’t know how to do and were, quite frankly, rather difficult. The long and short stitch, for example, was rather challenging for me to wrap my head around. I looked up a variety of tutorials on Pinterest and decided to try it out. Once again, here’s my Pinterest board, where I get a crazy amount of inspiration.
I downloaded this pattern from the DMC website here.
Long and Short Stitch
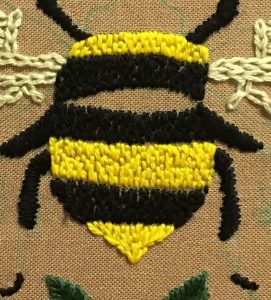
Essentially, the long and short stitch is exactly what it sounds like; an alternation of long stitches and short stitches. In practice, I found the various kind of difficult to work with, as I wasn’t sure how to work through angled stitches. I figured it out, and as you can see I think it went pretty well!
As I continued to work with long and short stitch, I got a lot better. This stitch was used a lot in this pattern to
An example of texture
show texture, and once I got the hang of it, it was quite successful. The clearest example of this can be seen in the body of the bee. The variation in stitch length adds a really nice texture to the body of the bee–it looks fuzzy!
Another stitch that I struggled with in this pattern was the chain stitch. While I have used it before, this pattern called for its use in a very intricate manner. Not only did it require my full concentration, but I also needed to maintain that concentration for a long time–the entire outline of the bees wings. Ultimately, this was a great way for me to stay engaged in this project. On the advanced side of my own personal Zone of Proximal Development, the intricacies of the pattern challenged me and engaged my interest.
Another challenging aspect of this pattern was that there was a lot going on. This is definitely the first pattern I’ve tried that has more than three elements. This one had nearly a dozen different aspects to the design, which was plenty to keep me interested. In the end, all of these elements created a cohesive and, dare I say, beautiful piece of embroidery. Pictured below is the final product.
]]>https://myedtech.opened.ca/2019/10/08/a-busy-bee/feed/0My Embroidery Begins to Bloom
https://myedtech.opened.ca/2019/09/27/my-embroidery-begins-to-bloom/
https://myedtech.opened.ca/2019/09/27/my-embroidery-begins-to-bloom/#respondFri, 27 Sep 2019 05:17:52 +0000https://myedtech.opened.ca/?p=73As I mentioned in my earlier post, I really struggled with some of my initial stitches because the fabric that came in my embroidery kit was really firm. To add to that, it had really large holes in it, almost like the point was to go through the holes and not the fabric. I found out, pretty quickly honestly, that the fabric that came in the kit was meant specifically for cross stitch. There was a moment where I wondered what the differences were between cross stitch and embroidery, I mean, both are putting a needle through fabric to make a design, right? There are some major differences. My friend Allison described Cross stitch as “the paint by numbers of the needlepoint world,” and that is, essentially, what it is. Allison was also the one who confirmed that my fabric was not meant for embroidery, and let me know that I was using the wrong needle.
I went on a mission to get some actual embroidery fabric, and of course turned to Pinterest to tell me what that was. If you’re curious, the best fabric for embroidery is 100% cotton. I headed into Fabricland, a place that my friend was very intimidated by, but lucky for me my mom always loved Fabricland so it was a pretty comfortable place for me to be. I found a couple of colours of fabric that I liked, neither of which was white (which was probably a mistake) and went to get it cut. I only asked for 0.3 of a meter of each fabric because I know my mom has a closet full of fabric that I can steal when I’m home for Thanksgiving. The 0.6 of a meter of fabric cost me a whopping $13 and absolutely changed my life—and my embroidery skills. I quickly got to work practicing on the new fabric, and once I was confident in my abilities I decided to trace a pattern and get started.
As it was my first real design, I decided to go with something pretty simple. I found a website through Pinterest that offers a variety of different and original patterns for free, all you have to do is subscribe to the newsletter. Seriously there are so many options, I was a little bit in heaven. Here’s the link to the website I got this pattern from.
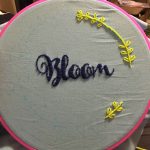
The Beginning
The Middle
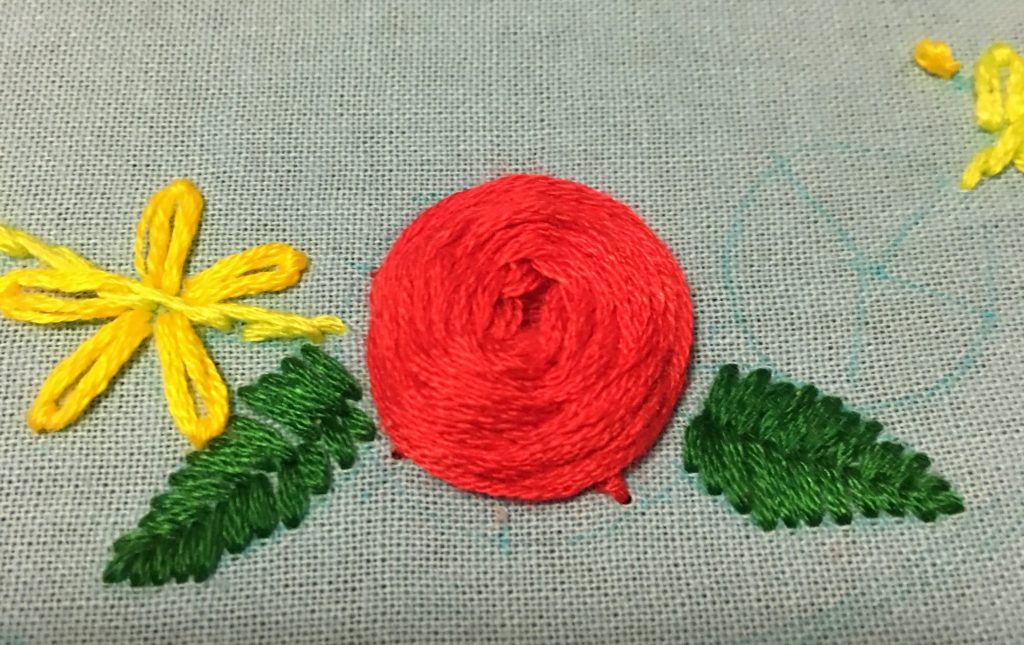
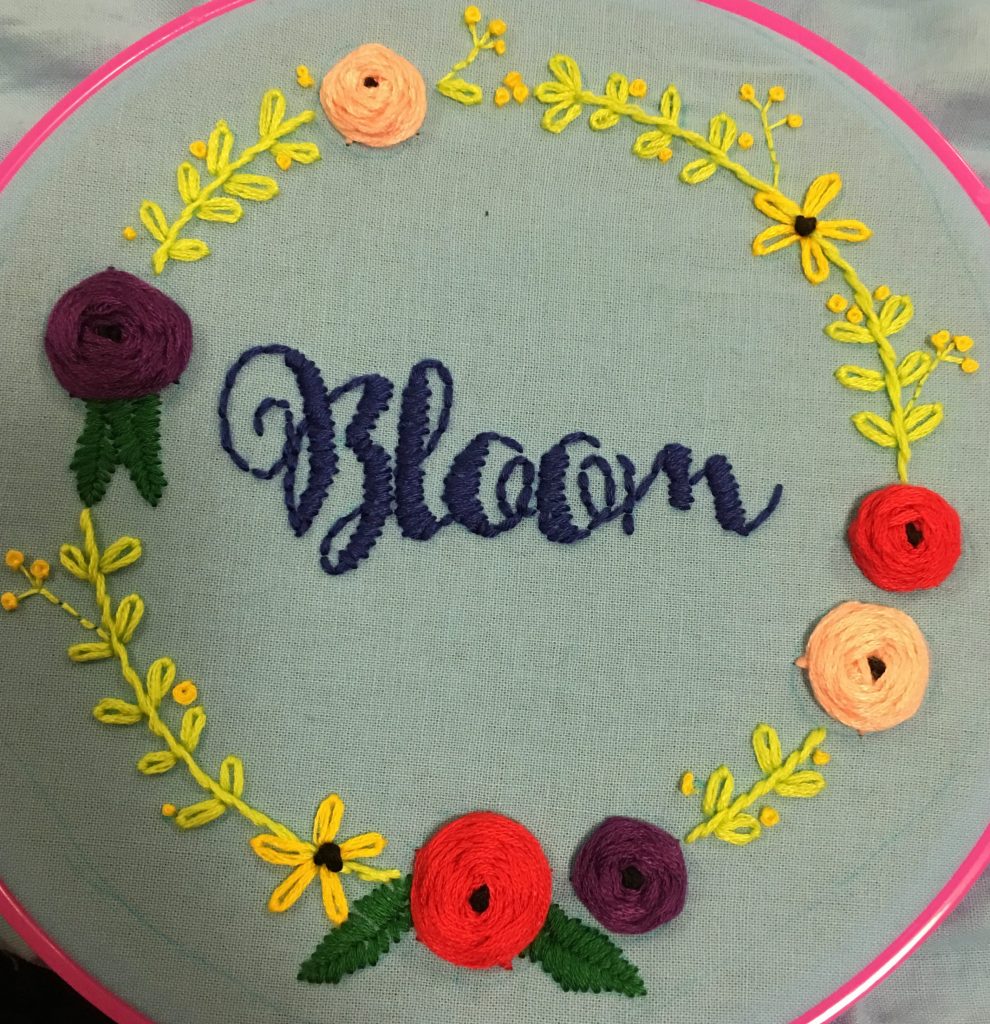
The pattern I chose didn’t have any stitches that I wasn’t comfortable with and didn’t have that much detail to it. I started with the writing in the middle and then worked on the wreath around the outside.
I’m a little spacey
I made the mistake of working on the leaves around the flowers before making the actual flowers. As you can see, there ended up being a gap between the flower and the leaf that was next to it. It was an easy enough problem to fix but was definitely a good learning moment for me. The finished product was, if you ask me, quite well done. I’m pretty proud of the progress I’ve made so far, and can’t wait to see how I continue to improve my embroidery skills.
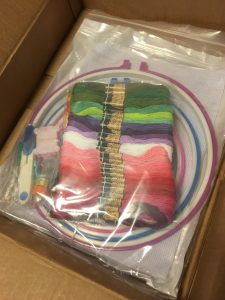
Like any good crafter, I started out my free inquiry project by doing a lot of Pinterest surfing. There, I found “starter kits” that listed everything you might need to begin embroidery. There were also a lot of really awesome free patterns to try, a few of which I’m sure you’ll all get to see me attempt over the course of this semester. Pinterest also gave me a bunch of tips on what stitches were most vital for a complete beginner to learn. There are so many tutorials and explanations on there that I felt like I already knew what I was doing. The online resources took me through some of the common tips and tricks, as well as what mistakes to avoid the first time around. After my deep dive into Pinterest, I was feeling pretty prepared to start embroidery.
I used amazon to scope out the best embroidery kit, and bought one for only $21. I was pretty excited when it came, and opened it up right away. Inside, there were five plastic embroidery hoops, fifty colours of embroidery floss, some needles, a stitch ripper, some tools to help thread the needle, some precision scissors, and one large piece of fabric. Finally, I was ready to get started!
The mess that I created after only three stitches
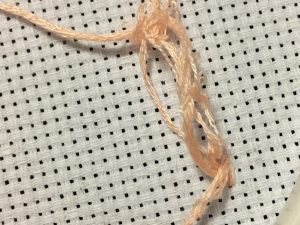
Almost immediately, I struggled. I seriously did not anticipate how long it would take me to set up the embroidery hoop with the fabric. Twenty minutes later I finally had the hoop set up and was ready to get to it. I put needle to fabric and failed almost immediately. I have no idea what happened, but the back of my embroidery was the biggest mess I have ever seen in my life, and that was after only three stitches. I had to cut the embroidery floss to separate it from my fabric–it gave me some serious flashbacks to getting a hairbrush stuck in my hair when I was twelve.
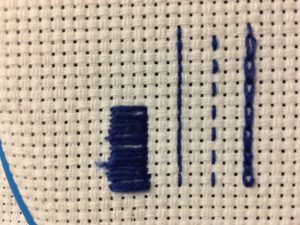
Did I give up? Absolutely not (although maybe I should have). I started
My more successful practice
trying some of the stitches that my Pinterest research had told me were essential. My first attempt was at a straight stitch, or a running stitch, which went relatively well. I moved on to try backstitch, chain stitch, and satin stitch, all of which were successful.
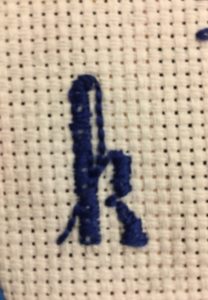
My main motivation for teaching myself to do this is calligraphy. I
Calligraphy!
love fancy writing and wanted to try another medium with which to experiment. So of course, I had to try out some lettering using embroidery. I used backstitch to trace the outline of the letter ‘k’, and then used satin stitch to fill in the thicker lines. As you might be able to tell, my satin stitch is not perfect yet. The spots of white showing through the blue are the result of wide and inexperienced stitches in
combination with a really firm fabric that made it difficult to control exact placements of the needle. I found out later that this fabric was not actually meant for embroidery, but for cross stitch. That realization is, however, a topic for a later blog post.
Here’s the link to my Pinterest board. It has all the resources I’ve used to help me get started.
]]>
https://myedtech.opened.ca/2019/09/20/from-no-sew-to-pro-sew-hopefully/feed/0Welcome and Introduction
https://myedtech.opened.ca/2019/09/11/welcome-and-introduction/
https://myedtech.opened.ca/2019/09/11/welcome-and-introduction/#respondWed, 11 Sep 2019 16:35:47 +0000https://myedtech.opened.ca/?p=16Before proceeding with this first blog post, we expect you to consider your privacy preferences carefully and that you have considered the following options:
Do you want to be online vs. offline?
Do you want to use your name (or part thereof) vs. a pseudonym (e.g., West Coast Teacher)?
Do you want to have your blog public vs. private? (Note, you can set individual blog posts private or password protected or have an entire blog set to private)
Have you considered whether you are posting within or outside of Canada? This blog on opened.ca is hosted within Canada. That said, any public blog posts can have its content aggregated/curated onto social networks outside of Canada.
First tasks you might explore with your new blog:
Go into its admin panel found by adding /wp-admin at the end of your blog’s URL
Add new category or tags to organize your blog posts – found under “Posts” (but do not remove the pre-existing “EdTech” category or sub-categories, Free Inquiry and EdTech Inquiry). We have also pre-loaded the Teacher Education competencies as categories should you wish to use them to document your learning. If you would like to add more course categories, please do so (e.g., add EDCI 306A with no space for Music Ed, etc.)
See if your blog posts are appearing on the course website (you must have the course categories assigned to a post first and have provided your instructor with your blog URL)
Add pages
Embed images or set featured images and embed video in blog posts and pages (can be your own media or that found on the internet, but consider free or creative commons licensed works)
Under Appearance,
Select your preferred website theme and customize to your preferences (New title, etc.)
Customize menus & navigation
Use widgets to customize blog content and features
Delete this starter post (or switch it to draft status if you want to keep for reference)
Do consider creating categories for each course that you take should you wish to document your learning (or from professional learning activities outside of formal courses). Keep note, however, that you may wish to use the course topic as the category as opposed to the course number as those outside of your program would not be familiar with the number (e.g., we use “EdTech” instead of “edci336).
Lastly, as always, be aware of the FIPPA as it relates to privacy and share only those names/images that you have consent to use or are otherwise public figures. When in doubt, ask us.
 success with straight up sewing through some paper. That’s what I ended up doing, and honestly, it was super frustrating. I traced the pattern onto the paper, and then loosely sewed the paper onto the fabric. The actual act of sewing through the paper is not what was frustrating for me; it was honestly not that different, especially once the paper was firmly attached to the fabric. I decided to just do the outline of the pattern with the paper still attached because I didn’t want to have to get rid of the paper once it was all filled in–it was difficult enough with just the outline!
 process of removing the paper. This definitely did not have a positive effect on my mental health–it was so frustrating! It probably took twice as long to remove the paper as it did to originally outline the pattern. Ultimately, I was able to get it done but I don’t think I’ll be using that strategy again.
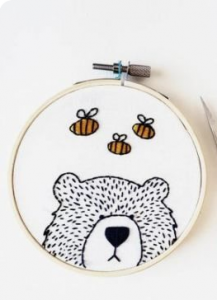 I got the design idea from, you guessed it,