The .htaccess file is a text file that allows you to configure aspects of your WordPress website behavior. As you might have guessed by the name, it mainly allows you to configure access control; that is to say what can be accessed and by whom. It is extremely flexible and offers granular control over your WordPress files and folders.
In this tutorial, you will learn the basics of the .htaccess file, its WordPress security implications, and its practical applications. We will also provide you with some code snippets that you can use on your own websites.
Table of contents
What is a WordPress .htaccess file?
A WordPress htaccess fie is simply an htaccess file used within a WordPress website. As mentioned in the introduction, it enables you to set certain directives related to access and, thus, security. Think of directives as rules that computers can understand and implement.
Since .htaccess files operate at the web server level, they are independent of WordPress itself. There are no special WordPress directives, and it works the same way on WordPress as it would for any other website.
Because WordPress websites are ultimately made up of folders and files, WordPress htaccess files can be used to control how our websites are accessed.
One other thing worth noting is that htaccess files are an Apache web server feature. As such, they can only be configured on web servers running Apache.
How to use the .htaccess file to improve WordPress security
You can utilize a WordPress htaccess file to do a lot of things. For example, you can add some directives to implement caching or improve security. Our focus will be on improving website security.
Restrict access to the WordPress dashboard
Different directories in your WordPress installation can have their own .htaccess file. Therefore, if you want to restrict access to the WordPress dashboard, you first need to create a .htaccess file inside the wp-admin directory.
Let’s say you want to restrict access to the WordPress dashboard to a single IP address. You can do so by simply adding the following lines to your file:
order deny,allow
#Replace the below 192.168.5.1 with your IP address
deny from all
allow from 192.168.5.1- The first line tells the server the order of precedence it needs to follow for the upcoming directives.
- The second line is simply a comment that tells you to replace the given IP address with your own. Make sure that you replace the IP address.
- The third line denies access to all IP addresses by default. Using this line by itself will restrict everyone from accessing the WordPress dashboard.
- The fourth line tells the server to only allow access to requests originating from the specified IP address.
In the above example, we are allowing only IP address 192.168.5.1 to access the WordPress admin dashboard (wp-admin directory). Remember to change the IP address (192.168.5.1) to your public IP address if you only want the admin dashboard to be accessed from your IP. If you are not sure what your IP address is, Google “What is my IP address?” Also, make sure that the IP address that your ISP provides you is static and not dynamic. If you’re using a mobile hotspot or similar with dynamic IPs, you will lose access to the admin dashboard yourself.
What if you want to whitelist multiple IP addresses? You simply add a new line with the allow directive.
order deny,allow
#Replace the below 192.168.5.1 with your IP address
deny from all
allow from 192.168.5.1
allow from 10.130.130.7
You can follow the same strategy to restrict visitor access to other directories.
Considerations to keep in mind
Restricting access using this method isn’t feasible if you have a dynamic IP address. If you work with developers or have third-party administrators, this method can also be challenging since you’d have to manage many IPs, which could change often.
In this case, you should consider using a plugin like our MelaPress Login Security plugin to block malicious users with too many failed login attempts automatically. It also has many other useful features, like custom login pages and strong password enforcement.
Prevent image hotlinking
Hotlinking is the direct linking to your website’s files from another website. Typically, media content, such as images and videos, is hot-linked. Therefore, when someone visits the website that is hotlinking to your website, the images shown on this website are retrieved from your website using your bandwidth.
This will result in an extra load on your website and bandwidth theft. Also, hotlinking could directly result in another website intruding on your copyright. Therefore, preventing hotlinking can be an important step to take.
You can use the following directives in your .htaccess file to prevent image hotlinking.
#Switch on rewrite engine
RewriteEngine on
#Allow empty referrals, in case visitors are using personal firewalls
RewriteCond %{HTTP_REFERER} !^$
#Match request URL. Replace www.yourwebsite.com with your website URL
RewriteCond %{HTTP_REFERER} !^http(s)?://(www.)?www.yourwebsite.com [NC]
#Match all files with the below list of extensions
RewriteRule .(jpg|jpeg|png|gif)$ – [NC,F,L]
As usual, all the lines that start with ‘#’ are comments so won’t be explained below. We will now explain what all the other lines do.
- The first line enables the Apache rewrite engine to allow URL rewriting and redirection.
- The second line is for visitors whose privacy settings strip the referer information. Also, no referer information will be present if any visitor tries to access the image directly. This directive allows those visitors to see the image.
- The third line allows the loading of images if the referer is your website.
- The last line allows you to specify the extensions whose hotlinking you want to prevent. It also uses three different flags. The NC flag makes the match case insensitive. The F flag returns a 403 forbidden status code to deny access to these files. The L flag means that this is the last rule the server has to process.
If you would like to block hotlinking to other file types, such as videos with avi or mp4 extensions, add their file extension to the last line of the sample .htaccess in the above example, next to the gif extension.
Add these directives to the .htaccess file in the root folder of your WordPress or website if you would like to prevent hotlinking to all media files on your website.
Block bad actors from accessing your WordPress website
If you want to ban a bad user from accessing your WordPress website or blog and you have the user’s IP address or hostname, you can block the user’s IP address by using a .htaccess file.
If you want to ban the IP address from accessing any part of the website, then place the .htaccess file in the root of your WordPress or website. On the other hand, if you would like to block access only to a specific directory on your website, then upload the .htaccess file to that particular directory.
If you already have a .htaccess file in the root of your WordPress, download the existing one and add the below directives at the end of the .htaccess file.
You can use the following directives to block bad users based on their IP address.
Require all granted
Require not IP 192.168.1.2
Require not IP 10.130.130.6
Require not IP 172.16.130.106
The Require directive specifies the requirements that have to be met in order to allow access to resources.
The first line grants access to all IP addresses. The next three lines restrict access by specific IP addresses.
You can also use the following rules to ban a whole IP range, such as from 192.168.1.1 to 192.168.1.254.
Require all granted
Require not IP 192.168.1
It is also possible to ban a user, a group of users, or an ISP by using hostnames. For example, if an ISP’s hostname is badisp.com, you can use the below example to block such an ISP.
Require all granted
Require not host badisp.com
Considerations to keep in mind
One important thing to keep in mind here is that bad actors will most certainly spoof their IP or use a VPN or proxy to hide their true identity. As such, you may end up in an endless game of cat-and-mouse blocking new IPs as they appear.
As such, a more sustainable option is to whitelist IPs, especially for the WordPress admin URL. A plugin like Melapress Login Security makes the process of whitelisting IPs very easy and offers additional security measures such as password policies, place login attempt limits, and other policies to secure your WordPress login processes.
Block bad bots from accessing your WordPress site
Bots are computer programs that browse (surf) websites all over the internet and automatically perform specific tasks. Like almost everything else on the internet, there are good bots and bad bots.
Good bots are used by search engines such as Google and Yahoo to crawl your website, learn about it, and use such information so your website can rank in the search engine results.
Bad bots are typically used to harvest email addresses from websites, which are later used by spammers. Bad bots are also used to find security vulnerabilities in websites or to leave spam comments. When vulnerabilities are found by these bad bots, they are later exploited by hackers.
The primary reasons for blocking bad bots are that they result in spam and consume bandwidth that could be used elsewhere. Banning the bots will save money for both you and your visitors.
You can block a single bad bot from accessing your WordPress by using an .htaccess file. For example, the directives below will block a bad bot with the user-agent string evilbot.
RewriteEngine on
RewriteCond %{HTTP_USER_AGENT} ^evil
RewriteRule ^(.)$ https://no.access/
The user-agent string is an identifier that is sent by web browsers or client applications when they make an HTTP request to the server. This string contains basic information about the visitor’s software. For example, here is the user-agent for my browser:
Mozilla/5.0 (Windows NT 10.0; Win64; x64; rv:109.0) Gecko/20100101 Firefox/114.0
We are using this user-agent string to block the bad bots. Let’s see how it works.
- The first line enables the rewrite engine.
- The second line specifies the conditions that the visiting client has to meet in order to be matched. In this case, it specifies that the user-agent string has to start with the word evil.
- The third line defines the rewrite rule, which tells the server to replace the entire URL with https://no.access if there is a match with the previous condition.
How to block multiple bad bots
You can also block multiple bad bots at once by using the following directives:
RewriteEngine on
RewriteCond %{HTTP_USER_AGENT} ^evilbot [OR]
RewriteCond %{HTTP_USER_AGENT} ^spambot [OR]
RewriteCond %{HTTP_USER_AGENT} ^virusbot
RewriteRule ^(.)$ https://no.access/
Considerations to keep in mind
There are two things that we want to highlight here.
First, bad bots are like pests. It is impossible to get rid of them all. You can have the most extensive list of bad bots, but new ones will appear every day. The above directive is meant to help you effectively block bad bots that are affecting your WordPress site and not block all the bad bots on the internet.
Second, it is easy for visiting clients to spoof the user-agent string. For example, a bad bot might use the user-agent string of Mozilla to disguise itself. You should consider using additional security measures such as authentication or IP-based restrictions along with this method.
An easier and more straightforward way to block bots is to use a CAPTCHA plugin like our CAPTCHA 4WP. While CAPTCHA will not block bad bots from harvesting data or scanning for vulnerabilities, it is very effective at stopping spam. CAPTCHA 4WP, in particular, offers different CAPTCHA service providers to choose from and features such as ReCAPTCHA V3 failover to minimize the risk of false positives.
Use HTTP Authentication to secure your WordPress website
Protecting your wp-admin directory and WordPress dashboard with a .htaccess file is a vital procedure when locking down your WordPress blog or website. As a blogger and webmaster you know that once a malicious user gains access to your WordPress dashboard, it is game over.
By adding an extra layer of server-side security, you are also hardening your WordPress installation against zero-day vulnerabilities that might be discovered in WordPress wp-admin scripts.
To password-protect your WordPress admin area, you have to create a .htpasswd file. This file is like a database of usernames and passwords, which the web server will use to authenticate users.
You can create such a file by using an online password file generator or by referring to the How to create an Apache password file htpasswd tutorial.
Add the following code to the .htaccess file in your wp-admin directory.
#Enable basic authentication
AuthType Basic
#This text is displayed in the login dialog
AuthName “Restricted Area”
#The absolute path of the Apache htpasswd file. You should edit this
AuthUserFile /path/to/.htpasswd
#Allows any user in the .htpasswd file to access the directory
require valid-user
- The first line directs the server to use basic authentication.
- The second line specifies the message that should appear when people try to access the WordPress dashboard.
- The third line contains the absolute path to the .htpasswd file. It is important to place this file outside the public_html or www directory for better security.
- The last line adds the requirement that any visitor trying to open the dashboard is listed in the .htpasswd file and is using valid credentials.
Some files, such as the admin-ajax.php file, have to be accessible to different WordPress plugins so that they can function properly. This file is also present under the wp-admin directory. Using the above directives will make the plugins non-functional, as they won’t be able to access the file.
How to grant anonymous access
You can use the .htaccess file to grant anonymous access to this specific file, while all other files still require authentication. Simply add the following lines below the directives you added earlier.
<Files admin-ajax.php
Order allow,deny
Allow from all
Satisfy any
</Files>
- The first line specifies that the upcoming directives will only apply to the file listed on this line.
- The second line specifies the order to follow for evaluating the access control rules.
- The third line tells the server to grant access to the specific file, i.e., admin-ajax.php to all the requesting IP addresses. This means that everyone will be able to access this file.
- The fourth line states that anyone who either meets the authentication criteria or the IP address criteria should get access to the specified file.
We should clarify that not all WordPress plugins require access to this file. Therefore, you can simply password-protect the wp-admin directory and confirm that the website is still fully functional. If not, allow access to the admin-ajax.php file as suggested above.
HTTP authentication alternatives
If you have a large number of users requiring access to wp-admin, HTTP authentication might not be practical. However, there are steps you can take to ensure wp-admin remains protected.
WordPress login security policies, including:
- Password policies
- Limiting login attempts
- IP address and geo-blocking restrictions
- Restricting login times
go a long way in keeping your WordPress login secure. Fortunately, all of these policies can be implemented with our Melapress Login Security plugin.
Aside from the policies mentioned above, the plugin includes several others to ensure you retain full control over the security of your WordPress login. Furthermore, it also includes different settings for hardening your login page such as changing the URL.

Set login & user security policies such as limit login attempts, login page hardening, and much more.
For an even more secure login, add WordPress two-factor authentication. 2FA provides peace of mind, knowing that even if passwords get leaked, accounts will remain inaccessible to everyone but their true owners.
Restrict access to WordPress files
If you would like to restrict access to one or more WordPress core files, or several files on your website from being accessed from an external source, you can do so by using a .htaccess file.
Restricting access to files with .htaccess is ideal for files that have to be accessible under the hood by your WordPress site but never accessed directly by your website visitors. One such example would be the WordPress configuration file wp-config.php found in the root of your WordPress site.
<Files wp-config.php>
order allow,deny
deny from all
</Files>
Place the above directives in the .htaccess file that shares the same directory with the file whose access you want to restrict. In this case, this would be the WordPress root directory.
If you would like to restrict access to any other individual file on your website, change the file name in the first line and upload the .htaccess file to the directory where the file resides. Keep in mind that if you already have an .htaccess file in that directory, simply add the above directives at the end of the .htaccess file.
What if you want to restrict access to multiple files with the same extension? You can do so with the following directive:
<FilesMatch “\.(htaccess|htpasswd|log|ini)$”>
Order Allow,Deny
Deny from all
</FilesMatch>
The first line uses regular expressions to restrict access to all files which have the listed extensions. In this case, it restricts access to the .htaccess, .htpasswd, .log, and .ini files. These files usually contain sensitive information so it makes sense to restrict access to them.
If you would like to restrict access to more file extensions than the ones specified above, add the extension to the first line between the brackets next to the ini extension.
How to create and edit .htaccess files (FTP method)
The .htaccess file is typically located in your website’s root directory; however, additional access files may be found within subfolders. It is worth noting that a .htaccess file in a subfolder will overwrite any directives set in the parent folder.
Depending on your hosting provider, the main directory can have many names. Favorites include public_html and www; however, it may be named differently by some hosting providers.
If you have a shared hosting account you can usually find the .htaccess file inside the public_html directory. You can access this directory either using the FTP application of your choice or through the file manager in your web host’s backend

If you are hosting two or more websites on the same shared hosting account, you should be able to find the .htaccess file inside the directory for the respective domain.
Sometimes, you won’t see a .htaccess file when you access your root directory through an FTP client. This is because some of these clients have settings to hide some files by default. You simply need to turn on the toggle to show hidden files in these applicationsion.
In cPanel, you can do this by clicking on the Settings button in the top-right corner of the screen and then clicking on the Show Hidden Files option in the Preferences window

How to create a .htaccess file
Creating a .htaccess file of your own is easy. If you are using Microsoft Windows locally, open File Explorer and go to the directory of your choice. Right-click in any empty space and then select New > Text Document as shown in the image below.

This will create a new file named New Text Document.txt. Select the file and rename it .htaccess. You will get a warning popup that says changing the file name will make the file unusable. Don’t worry about it; just select Yes.
You should now have a .htaccess file in your desired directory. You can now upload the file to the server either by using an FTP client or through the cPanel File Manager.

A single WordPress site can have more than one .htaccess file located in different directories. A .htaccess file that you place in a particular directory will affect that directory as well as all its sub-directories.
Editing the WordPress .htaccess file
A .htaccess file is a text file with a changed extension. This means that you can simply edit them using some capable text editors that support syntax highlighting to make editing easier. You can also use cPanel’s in-built editor by first selecting the file, then clicking on the Edit button located at the top of the File Manager page.

If you’re running Windows, you can use the built-in Notepad application to edit the file. However, you should download and install a proper editor like Visual Studio Code or Notepad++ since these offer syntax highlighting.
The file we created in the previous section is empty. However, you can also download the .htaccess file on your website either through cPanel or through an FTP client to edit locally.
What to keep in mind
There are some important points that you should remember while editing any .htaccess file to suit your needs:
- Always back up your original .htaccess file. This is important because you will always have the option to go back to the original configuration if anything goes wrong. In fact, it is a good idea to regularly back up your whole WordPress site.
- Make sure that you are using a plain text editor like Notepad, Notepad++, or VS Code to edit the .htaccess file. This prevents any formatting or encoding issues that might arise with editors like MS Word.
- You can add comments into a .htaccess file by starting a line with the character ‘#’. Use comments to explain how different directives that you have added to the file work. This will help you later when you come back to the file.
- Don’t make a lot of changes to your file at once. It is a good idea to make incremental updates and save changes to the file and then see if everything is working as expected. This way, you will know exactly which of the directives that you added to the file caused any unexpected behavior.
- It is also a good idea to thoroughly test your website after you make any changes. This ensures that the directives you added to the file are working as expected and there are no unintended consequences resulting in errors.
Be careful with the order of directives and familiarize yourself with the required syntax. You also need to be careful with whitespace because it can affect how the server interprets different rules.
How to create and edit .htaccess files (Plugin method)
You can also choose to edit the .htaccess file using an htaccess file editor plugin. However, this option has limited capabilities compared to FTP access and a good text editor. One other very important thing to note here is that FTP access is still required in case you misconfigure the file and lose access to your website. Believe me, we have all been there.
First, download and install the WordPress plugin. Two popular options are WP htaccess editor and HTACCESS File editor.

Available features and procedures will vary from one WordPress plugin to the next. However, both plugins we tested are straightforward and easy to use.
Keep in mind that the plugin does not come with a file manager, and as such, you will not be able to create multiple .htaccess files in different directories. However, you do get access to the default WordPress .htaccess file located in the website’s root folder.
You’ll be able to see the default code in the text editor, where you can also add any directives you want.
Troubleshooting .htaccess file issues
If your WordPress htaccess file is not working as intended, you can take steps to troubleshoot and fix any present issues. In this section, we will look a troubleshooting methods you can use to identify problems.
Check for syntax errors
It’s easy to make syntax mistakes if you’re not very used to editing .htaccess files. Using a .htaccess validator can help you quickly find any syntax issues and highlight them for you, making them super easy to fix.
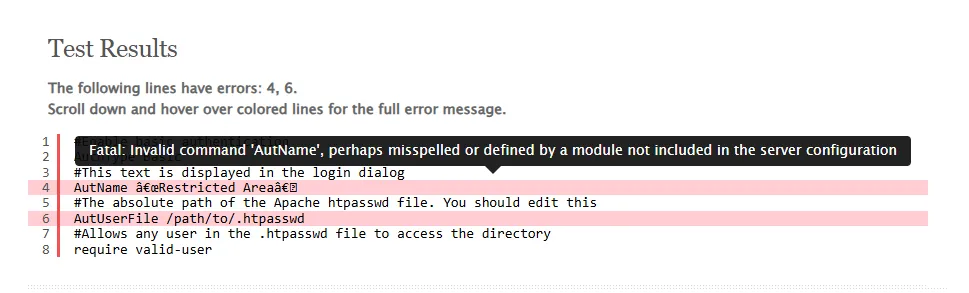
One such tool is .htaccess check. Think of it like a smart .htaccess file editor that can help you identify any issues with your file. You can upload the file directly or copy and paste the code.
Check for conflicts
If you are using multiple .htaccess files, conflicts can arise between files in the parent and sub-directories. To troubleshoot the issue, try disabling each WordPress htaccess file one by one, starting from the sub-folders and moving to any files in the root directory.
Check the Apache error log
If .htaccess files cause Apache to throw an error, enabling the error log will give you a good indication of what might be going wrong. You can access the error log file using an FTP client or through SSH if you have the option.
Important things to keep in mind
If you have been following the article up to this point, you should have a good understanding of the WordPress htaccess file in. There are a few more important points that you should need to know about them.
- For .htaccess files to work, the main configuration option AllowOverride must be enabled. If the AllowOverride option is not switched on, then the .htaccess file configurations will not work and the main web server configuration will be applied. So before applying any configuration changes using .htaccess files, always check that the AllowOverride option is enabled.
- When .htaccess files are used, each time someone visits your website, the web server must search through each and every directory within the domain and load all .htaccess file configurations. Such operation will not affect the performance of low-traffic websites, though the webmaster might notice performance degradation in high-traffic websites.
Therefore .htaccess files should only be used when the main web server configuration is not accessible, as in a web hosting environment. If the Apache web server configuration is accessible, all the configuration directives should be specified at the server level. - When you enable Permalinks in WordPress, a .htaccess file is created in the root directory of your WordPress installation. When WordPress writes to a .htaccess file, it always writes the data between the BEGIN WordPress and END WordPress .htaccess file comments. As seen in the example below, these two lines start with a hash ‘#’ character. As such, these lines are considered comments and will not affect the configuration.
#BEGIN WordPress
WORDPRESS DATA
#END WordPress
When updating the default WordPress .htaccess file it is important to NEVER add any configuration directives between those two comment lines. Any configuration directives between these two comments might be overwritten by WordPress.
Conclusion
The WordPress htaccess file plays an important role in controlling the behavior of a website. You can use it to override server-level configuration settings for specific directories or files within a website.
In this tutorial, you learned how to create your own .htaccess file or modify an existing .htaccess file. You also learned about different rules and directives that you can place in these files to make your website more secure.
Keep tabs on WordPress file changes with Website File Changes Monitor Plugin for WordPress. This free plugin helps you track changes to your WordPress site’s code. It also identifies leftover files that can lead to sensitive data leaks, as well as malicious code and malware injected during successful hacks.