What are the options for open-source or nonprofit EdTech tools hosted in Canada or locally installed, how viable are they and what can be done to increase access and viability of open-source or non-profitEdTech tools in secondary education?
Why did we choose this inquiry?:
Image by Nathana Rebouças, via Unsplash
With our sudden shift to online school, we have been doing a lot of learning about educational technologies, especially those being used for virtual learning. Since the pandemic shifted a lot of learning online, everyone seems to be talking about Google Classroom, which has been offered for free to educators. Despite using Google in our personal lives, we both had some alarm over the the widespread use of Google in public schools. The realization that this was a manifestation of the privatization of public education pushed us to start learning more about alternatives to corporate, for-profit technologies.
Goals:
Learn about open-source software: What is it & why does it matter?
Identify open-source alternatives to proprietary software used in education
Test out open-source alternatives and provide screencast introductions and reviews based on our experiences
Compile a resource list of open-source alternatives along with features and reviews
What we did:
For this inquiry project we looked for open-source or not-for-profit alternatives to corporate, proprietary software that is being used in public education. We tested out some of the apps that we found so that we could provide some reviews about our experiences using the apps, for anyone who might be interested in using them in their classroom.
Some of these apps are direct replacements for the apps that are commonly used in schools, and some offer new and unique functions.
What we learned:
What are the risks of proprietary & corporate software in education?
In 2016 the Canadian Teachers’ Federation put out a report (https://download.ei-ie.org/Docs/WebDepot/PublicEducationAPublicGood.PDF) on the privatization of public education in which they raised concerns about growing corporate involvement in education, including by Google. These tools allow teachers to bridge a technological and economic gap, but they pose ethical issues and other risks (Froese-Germain, 2016). Should teachers be complicit in Google’s marketing strategy to brand consumers early? What are the ethical implications of persistent exposure to branding on our students? These partnerships also bring up concerns around privacy, surveillance, and the shaping of education by corporate monopolies.
What is open-source?
Open source technologies, with publicly accessible design that people can modify and share, offer an alternative.
Does open-source have more security risks because the code is publicly accessible?
It turns out hackers don’t need to actually look at the source code to break software (makes sense, I guess, given that proprietary software has been hacked). Rather than increasing the risk, having more eyes on open source code allows bugs that are discovered to be addressed very quickly. Also, open source software gives you an opportunity to take precautions such as disabling functions that you think might be insecure. Closed source software requires trusting and relying on the developer to address security vulnerabilities. This is not to say that open source is always safer than proprietary. Any code, open source or proprietary will likely have security vulnerabilities, but there are differences in the risks. The best thing to do is to evaluate each piece of software (open-source & proprietary) on an individual basis (read reviews about security history etc. and base it on your specific security needs). Many articles suggest using mix of open source and proprietary software. It is also important to take personal steps to reduce security threats – the most important of which is staying up to date!
Open source technologies can be intimidating to many people, including both of us. However, it is not just for hackers and coders – there is a lot out there that doesn’t require a great deal of tech-competency. It’s true that it isn’t as easy to find (or being shoved in our face constantly) and may not have as shiny of a user-interface, but there are plenty of resources to help you out when you get lost or overwhelmed, and it is worth the effort for all the benefits that open-source educational technologies can offer in the classroom.
Privacy
Open-source software must be either hosted on a server or hosted locally. Being locally hosted means that the software is downloaded and run on your computer. Privacy laws are different depending on which country the server is located, which is where data is stored. Before the pandemic, educators had to get the consent of students, teachers and others to use tools that store personal information outside of Canada. Since the pandemic, the BC government issued Ministerial Order 085 (MO85) allowing public bodies to store information outside of Canada without consent under specific conditions set out in the order.
Regardless of where the software stores information, products used by public bodies must comply with the FIPPA requirement to protect personal information from unauthorized access and other risks. For this reason, research any product that you intend to use to ensure it complies with the security requirements of FIPPA. Read about the product and privacy on the product website. Search for the product along with the words “privacy” or “security” and read articles from reputable sources about the product. Reach out to IT staff to ask about the product.
Offers students and educators 70+ open-source web apps, all pre-approved, security audited, and hosted within British Columbia on the OpenETC Sandstorm server at https://apps.opened.ca
The OpenETC is a community of educators, technologists, and designers sharing their expertise to foster and support open infrastructure for the BC post-secondary sector. No contracts or agreements are required to join us, just a willingness and ability to actively participate in our collective endeavor to:
encourage technological autonomy and provide ways for students, faculty and institutions to own and control their own data.
lower the barrier to participation on the open web for BC faculty and students.
provide a more sustainable EdTech infrastructure to BC higher education that gives institutions more control over their tools. Institutions are currently at the mercy of vendor pricing, upgrade cycles, and exit strategies. This puts institutions at a certain degree of risk when there are changes to any of the variables beyond their control. Open-source approaches reduce the risk to institutions in this regard.
assist BC faculty in evaluating and making informed pedagogical decisions around open-source teaching and learning applications. (from ETC website)
What is it?: Sandstorm is open source server software that makes it easy to install web apps.
What is the proprietary equivalent?: Not sure
What does it cost?: Free
Privacy: FIPPA compliant and data is stored securely in Canada
Features: 70+ open-source web apps, all pre-approved, security audited, and hosted within British Columbia on the OpenETC, sync and share files, edit documents, organize projects, publish online
What is it?: Mattermost is an open-source, self-hosted team communication platform
What is the proprietary equivalent?: Slack, Google teams
What does it cost?: Free
Privacy: FIPPA compliant and data is stored securely in Canada
Features: Team chat can be used on any device, ability to set your availability and customize your own notification preferences, threaded discussions, real-time chat, file-sharing, emojis, search capability, facilitates synchronous interactions even if high speed internet is not available (low-bandwidth)
Is there anything I should know?: Nothing in particular.
Did you try it?: Yes!
What did you think?: It is wonderful! Had no issues with using it. The only problem I found was that it is an additional platform that people can be reluctant to add to their roster.
What did you make?: This was the main platform that Rena & I used for communication. It would be a great place for students and teachers to communicate in ways that foster collaboration.
What is it?: An open-source content management system that can be used as a private or public website for information sharing or creative expression (originally used for blogging). OpenETC offers WordPress-powered sites with a curated collection of plugins, widgets, and themes and also allows you to create a new site from WordPress templates.
What is the proprietary equivalent?: Google sites, Google classroom and other Learning Management Systems, any proprietary website builder.
What does it cost?: Free
Privacy: FIPPA compliant and data is stored securely in Canada
Is there anything I should know?: Errors can happen sometimes and cause frustration…
Did you try it?: Yes!
What did you think?: Awesome! It makes so many different things possible! I set up a virtual learning experience, I used it for my 780 Inquiry Project, and I have been using it for blogging for 336. There are frustrations that arise and some basic problem-solving is sometimes required, but there are work-arounds and it’s good practice!
Privacy: FIPPA compliant and data is stored securely in Canada
Features: real-time user interface, cards comments, member assignations, customizable labels, filtered views. Wekan allows to create Boards, on which Cards can be moved around between a number of Columns. Boards can have many members, allowing for easy collaboration, just add everyone that should be able to work with you on the board to it, and you are good to go! You can assign colored Labels to cards to facilitate grouping and filtering, additionally you can add members to a card, for example to assign a task to someone
What did you think?: very customizable, small glitches – can’t add multiple ppl to second board editors can’t edit label titles/colours , but overall a good tool that does the same work as Trello.
What is it?: cloud-hosted real-time collaboration documents
What is the proprietary equivalent?: Googledocs
What does it cost?: Free
Privacy: FIPPA compliant and data is stored securely in Canada
Features: synchronous document editing, chat, comments, formatting options (– text styling, list formatting, headings, font styles and sizing, etc.), ability to export as different file types, visible authorship option, notifications. Sharing a document is as easy as sending an email invite or copying a shareable link, and new document collaborators automatically join anonymously and can choose a pseudonym to work under if privacy is a concern.
Asynchronous participation is also supported as users can access shared documents at any time, regardless as to whether the host is currently editing.
Is there anything I should know?: By default, etherpads are 100% public and open. Anyone can read them. Also the etherpad database is not suitable for any long-term storage. It is possible to place a password on Etherpad when it is installed. This may be something you could ask an Internet administrator to do for your project.
Did you try it?: Yes
What did you think?: can export as different file types,
Doesn’t allow some functions – tables, for example, but it is a very usable program.
What did you make?: We used it to collaborate on our draft blog post for this project, and to take notes along the way.
Check out our screencast:
Hackerslides
Where do I get it?: Sandstorm App
What is it?: Open-source presentation program
What is the proprietary equivalent?: Powerpoint, Google Slides
What does it cost?: Free
Privacy: FIPPA compliant and data is stored securely in Canada
Features: Allows the creation of HTML5 presentations using the reveal.js framework. It has a built-in markdown editor (using github flavoured markdown) and a preview. Images, iframes, backgrounds, transitions, colours, speakers notes.
Is there anything I should know?: Many of the transitions and background effects don’t render in the preview. you may need to open the presentation and refresh to see the effects.
Did you try it?: Yes!
What did you think?: Intimidating at first, but actually simple to use. Can be used in very simple format or be made fancier by using html. I just searched some simple html codes and was able to figure out how to add pictures, borders, and colours! The website shows how to add transitions and more!
What is it?: open-source tool for telling non-linear interactive stories
What is the proprietary equivalent?: Dialogue Designer, Inform
What does it cost?: Free
Privacy: locally hosted!
Features: You don’t need to write any code to create a simple story with Twine, but you can extend your stories with variables, conditional logic, images, CSS, and JavaScript when you’re ready. Twine publishes directly to HTML, so you can post your work nearly anywhere. Anything you create with it is completely free to use any way you like, including for commercial purposes.
What if I have a problem?: open-sourcewikidiscordcommunity forumcookbook; plenty of tutorials
Is there anything I should know?: Mild coding may be slightly intimidating, but the standard coding needed to do the basics are very straight forward, and for those who want to “go deeper” can easily find resources to help
Did you try it?: Yes
What did you think?: Twine is a super fun program that can be used for a lot of different projects. It is easy to use alongside a tutorial, and can be made simple or complicated depending on your preference. I like that it allows a non-linear way of sharing information, which reflects how my brain works.
What did you make?: I used Twine for an introduction project and for a self-assessment of the PDPP competencies.
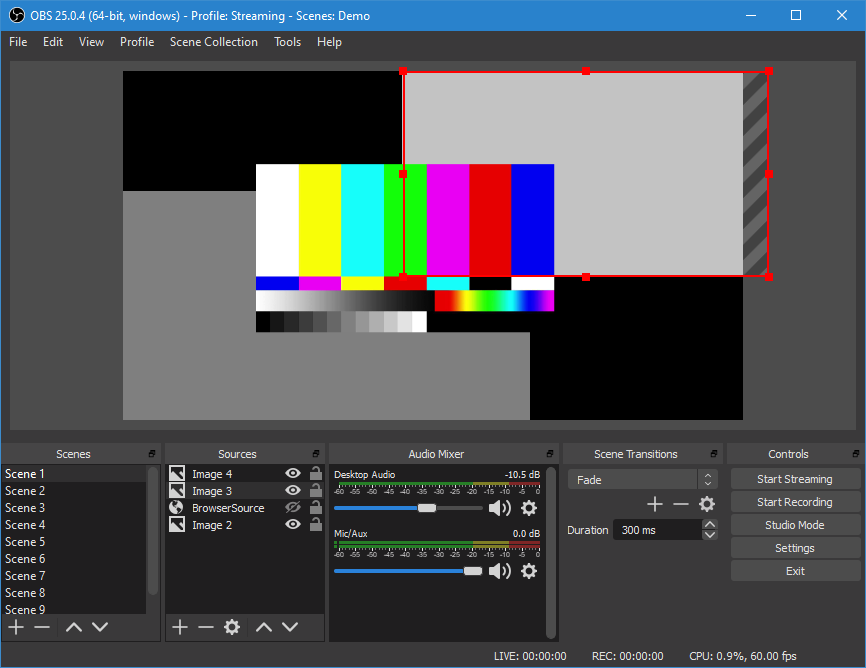
What is it?:Open-source software for video recording and live streaming
What is the proprietary equivalent?: Screencastify
What does it cost?:Free
Features:High performance real time video/audio capturing and mixing. Unlimited number of screens that you can switch between seamlessly via custom transitions. Intuitive audio mixer with per-source filters. Easy to use configuration options. The ability to rearrange the layout to how YOU like it.
What if I have a problem?:While OBS Studios provides help to many of their common problems here https://obsproject.com/help there seems to be a lack of activity on their forums. Some users who ask for help do not receive prompt responses, which can be problematic.
Is there anything I should know?: Available for Linux, Windows and iOS
Did you try it?:Yes
What did you think?:This software isn’t super intuitive to use right away, especially if you’re not familiar with video streaming and editing. They do provide resources and tutorials online to help with this. If you are determined to use this software, and work around the learning curve, I think it would be very useful.
What did you make?: I was able to make a small screen cast video that included audio and webcam footage, similar to what you’d see Twitch gamers do.
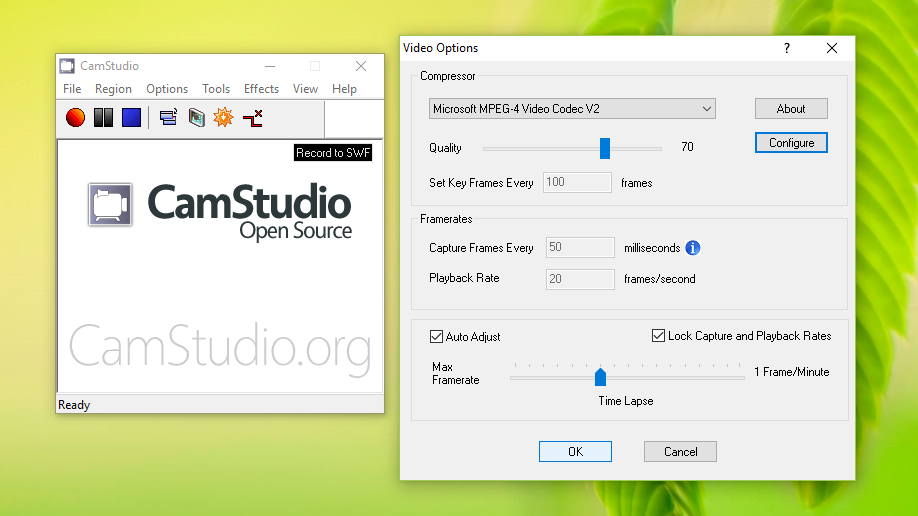
What is it?: Open-source desktop recorder/ streaming video software
What is the proprietary equivalent?: Screencastify
What does it cost?: Free
Features:screen and audio recording. High-quality, anti-aliased screen recordings features and webcam “picture in picture” capabilities.
What if I have a problem?: There is a known problem where you cannot view these videos on Netscape or Firefox, but there is a patch for this in the next update. Also their Help forum seems pretty active, and replies look to be quick.
Is there anything I should know?: Only available for Windows.
Did you try it?: NO
What did you think?: While the software looks promising, my internet security software didn’t like the looks of it, and I was unable to download it. Reviews for this software are excellent, and it is personally recommended by Rich McCue, so I’d like to think it is safe to use. Perhaps I will try it again, but I suggest doing your own research before downloading and deciding for yourself if you feel safe using it.
We have made it my final free inquiry blog post. As I reflect on my learning journey, allow me to spin you a yarn:
At the beginning of this semester I set out to answer the inquiry question:
How do I dye wool with local mushrooms?
After deciding on the inquiry question, I realized that it could be broken down into a bunch of smaller questions that would determine my process.
How do I identify the mushrooms I want to harvest?
What qualities do these different mushrooms have?
What kind of habitat do these mushrooms grow in?
Which areas on southern Vancouver Island are Crown lands?
What protocol do I need to follow to harvest mushrooms as a settler on Indigenous land?
What does the dyeing process look like?
Photo by Live 2 Learn
I learned where mushroom picking is legally permitted (private property with permission and Crown land), and I found a map of Crown land. I learned about 8 species of local mushrooms that can be used for dyeing, including how to identify them, where they like to grow, and what colours they produce. Before getting started, I wanted to learn about mushroom harvesting protocols. What does respectful harvest practice look like for fungi? To answer my question, I learned how fungi reproduce, which turns out to be via mycelium AND spores. This means that fungi can reproduce without their fruit (the mushroom). Research and opinions on harvesting protocols did not come to any agreed upon conclusions, but to follow the more conservative approach I decided to leave the smallest 50% of any mushrooms that I found.
Photo by live 2 learn
I could not find information about settler protocols for harvesting on W̱SÁNEĆ territory (including Crown land), but I did learn that the Tŝilhqot’in Nation and Secwepemc Nation have established a permit system to regulate mushroom picking on their territories. I sent an email to the W̱SÁNEĆ Leadership Council, seeking permission to harvest mushrooms on W̱SÁNEĆ territory located within “Crown” land. While I waited for a response, I went out with a friend to practice mushroom identification! It was great to have reasons to go outside during busy school times, and it was so great to admire all the mushrooms we found! I successfully identified a number of mushrooms, and I was able to have the ones that I wasn’t sure of confirmed on a mycology social media group! I did not hear back from the W̱SÁNEĆ Leadership Council, so I sought out some private property where I could get permission. My mushroom hunt was very successful, and I found three different types of dyeing mushrooms that I was able to harvest and bring home.
photo by live 2 learn
Now that I had my mushrooms, I needed to learn how to prepare wool for dyeing. The simple thing would have been to buy some undyed yarn from a store, but I decided to learn about preparing fleeces instead. I had some wool roving that I had been carting around for years, and I learned that I would have to scour my wool before dyeing, to remove the natural oils that prevent the dye from taking. I also learned about mordanting, which is a process by which a chemical is added to the wool to facilitate the binding of dye molecules to fibre in order to make it lightfast and colourfast. Different mordants can alter the colour of a dye and can be added before, during or after dyeing. I decided to use an alum mordant and a diy iron pre-mordant. I learned about the pre-mordanting process and was ready to get going when I realized that I wasn’t sure if I should spin my wool BEFORE or AFTER dyeing it. I called my Mum to consult with her about it, and she confirmed that it would be better to spin the wool first to reduce the risk of felting the raw wool in the dyeing process. This was important to learn, but it put a bit of a wrench in my plans, as the semester was nearly complete and I would not have time to re-learn to spin, spin my wool, scour it, mordant it, AND dye it! However, this project was never about the destination, but the journey all along the way.
So, I learned how to spin wool into yarn using my spinning wheel. My Granny taught me to spin wool using a spinning wheel when I was a kid, and she gave me this spinning wheel as a gift. Despite moving across the country with it a couple of times, I haven’t actually spun wool in over a decade! I was intimidated to try, but happy to have the external motivation of this inquiry project to make me do it.
I used the photocopied informational package about my Ashford Spinning Wheel to learn the parts of my spinning wheel, then I referred to a book on handspinning to read about the process and technique. I practiced treadling (making the wheel go around) and tested out different tension settings. I then practiced what I had learned, looking up a couple of online videos to see the technique in action. I was surprised to find that the memory of spinning still lives in my body, and that re-learning how to spin was like remembering how to ride a bike or open a locker without remembering the code. My spinning was tight and lumpy at first, but got looser and smoother with practice. Once I became comfortable in the rhythm of spinning, I found it to be very hypnotic and relaxing. In total, I spun three balls of yarn that I will scour, pre-mordant, and dye with my mushrooms this week! It is quite exciting to enter into our winter break with this exciting project to look forward to, and a new hobby as well! I have a feeling I am going to be doing a lot of spinning over the holidays. It’s a wonderful winter quarantine activity.
This project was a great learning experience because it was something that I was very interested in and it gave me the motivation to try something new. The planning process was useful in breaking down an intimidating task into smaller parts, and the blog posting kept my momentum going throughout the semester. I was able to diversify the forms that my learning took, with a mix of reading, watching, listening, asking, discussing, and doing (inside and outside!). I appreciated having a mix of resources and I found that they complemented each other. The books and websites provided foundational information that was supplemented by videos and pictures, the online forums were useful for asking questions and confirming identification, and being able to talk to my Mum was very helpful and was a nice reason to be in touch. I would like to thank my Mum and my late Granny for passing down knowledge and keeping alive our family history of fibre crafts.
I am sad about not getting to the dyeing stage in time to share it with you but I feel okay about where I have come to and what I have learned. And, as mentioned, I am excited to be a yarn-spinning, mushroom-dyeing fun-guy as I keep this project going through the winter break.
To be honest, I am weary of all the adventuring I have been doing lately. I have been learning lots, which is awesome, but my brain is beginning to short circuit and I am finding anything on the computer (even fun and interesting things) to be arduous these days. Reading break was a welcome couple of days without classes, but now it’s crunch time and we have a gazillion assignments due. So, with that in mind, I will be keeping this short.
This week in class we learned about assistive and adaptive technologies. I have had some experience with using assistive technologies in recent years support me with my AD/HD and dysgraphia. Here are some assistive technologies that I find very helpful:
Subtitles – I love to watch movies and videos with subtitles! As part of my AD/HD, I have auditory processing issues which can make it hard to understand audio all the time. My brain can be slow to interpret audio or misinterpret what I am hearing as nonsense. Using subtitles helps me stay focused on what I am watching and means that I miss a lot less of what is going on and I don’t have to skip back in whatever I am watching to decipher what I missed! Check out this Medium article to learn more about the importance of subtitles for people with auditory processing disorders (APD), and how auto-generated youtube subtitles actually serves as a sort of simulation of an APD!
Being both old-fashioned and very stubborn, I insisted on using a pen/pencil and paper to take all of my notes until last year, despite my dysgraphia. After years of illegible notes, hand cramping, and other issues, I had a meeting with an AD/HD specialist at the Centre for Accessible Learning who offered me the opportunity to try writing my exams on a computer. I was resistant but decided to try, and it was amazing! For the first time ever, I finished my exam before the time limit (even with my 1.5X time extension, I have never finished an exam early)!!! My hands weren’t aching, my paper wasn’t full of crossed-out or erased sections, I wasn’t stressed about illegibility, and best of all, I could get my thoughts out in a much more organized and linear fashion. Plus, even when they came out a bit jumbled, I could jump back in my text and add a late-coming addendum. After this experience, I gave in and started taking notes on my laptop (I gave that up, however, because my laptop was so huge that it was hurting my body to carry it around, and it was so old that it took the first 15-20 minutes of class to start up, but that’s a story for another blog post about tech disparity…)
Audio messages in lieu of texting – This has been my most recent use of adaptive tech! I hate texting so much. I find it tedious, it makes my hands cramp up, my hands move too slowly for my thoughts, and I make so many typos that it can become difficult to read. For this reason, texts often go unanswered, even though I have thought about what I want to say and want to respond. I already have some executive function issues, and the frustration I associate with texting means that I am a notoriously terrible texter. This year, however, a lot of my friends and I started using signal. One of the great features is that you can record audio messages and send them. I started doing this about a month ago, and I love it! Translating my thoughts from being in my head to being in written form is often a painful process and takes a long time, but communicating by audio recording is so quick and easy! I also love receiving them, as they benefit from capturing tone of voice and laughter and all the details that are lost in writing.
Well, so much for keeping it short! I will try harder next time. 🙂
Today I am going to follow up with Part II of my last post on how to prepare wool for dyeing. This post will contain information about how to mordant wool, and which mordants to use with the mushrooms that I harvested for dyeing.
In my last post, we learned what mordanting is. In this post, we will learn how to do it!
Mordanting can happen before (pre-mordant), during (simultaneous mordant), or after (post-mordant) dyeing. I will be pre-mordanting my wool.
There are a number of different types of mordants that we can use with wool. The two that are least toxic and most recommended for dyeing with Dyer’s Polypore are Alum & Iron.
Alum is the compound hydrated potassium aluminium sulfate. It can be found in the spice section of a supermarket for use in canning and preserving. It can also be bought online or from fibrecraft stores at a much better price. Alum can be added directly to the dye bath and is considered to be the safest of the mordants.
Cream of Tartar is used to assist an alum mordant, by increasing the amount of alum the wool absorbs. It is important to use proper Cream of Tartar (Potassium Bitartrate) rather than the Cream of Tartar used for cooking (Sodium Pyrophosphate).
For the mordant bath, use no more than 10g of wool/ 1 litre of water. Using a ratio of 8-12% alum and 6-7% cream of tartar to the dry weight of the wool is recommended. Too much alum can make the wool feel sticky.
Using an alum mordant with Dyer’s Polypore should produce a bright gold colour.
Iron
Iron (Ferrous Sulphate) is a mordant that often darkens a dye colour. It can be bought in a powder form, or home-made as an iron liquor.
DIY iron liquor
Place rusty nails or other rusty iron objects in a jar.
Add 2 parts water to 1 part vinegar, filling the jar to cover the iron objects.
Put the lid on the jar and seal tightly.
Leave for 1-2 weeks (or longer)
image by Miguel Á. Padriñán from Pexels
I haven’t ben able to find a ratio for using iron liquor, but my mum suggested using a couple of tsp to begin with and adding more with a post-mordant if necessary.
For the mordant bath, use no more than 10g of wool/ 1 litre of water. For 100g wool, it is recommended to use 2 tsp Ferrous sulfate, ½ tsp Cream of tartar and 1 Tbsp Glauber’s salt (sodium sulfate)
Using an iron mordant with Dyer’s Polypore should produce a moss green colour.
Pre-Mordanting Process
Weigh the wool and leave it to soak in water for at least an hour or even overnight.
Fill a saucepan ¾ full of cold water.
Put on safety equipment (rubber gloves, mask, etc).
Pour boiling water into a small heatproof container and add the cream of tartar and any salt, stirring it well until it has dissolved then add it to the saucepan.
Add the mordant to the saucepan and cover with enough lukewarm water to completely cover the fibre and allow it to move freely.
Gently squeeze excess moisture from the pre-soaked scoured wool and add it to the saucepan.
Raise the temperature of the saucepan slowly to a simmer (87 C to 93 C) for most wools. Fine wools may need a lower temperature. Simmer gently for an hour. Make sure the fibres are submerged, and stir very gently and occasionally.
Leave the wool to cool in the saucepan (it is OK to leave it overnight).
Drain the wool. Use a large colander and gently squeeze the mordant solution out.
Rinse the fibre very well in tepid water.
Put the wool on a towel and let it dry. Letting it dry completely increases colour and light fastness
For this week’s blog post I will be reflecting on the topic of gaming in education.
This topic has come up a lot in our cohort, particularly among students who are curious about applying this concept in the classroom.
In class we actually got to take some time to play a few games, which was a very fun example of experiential learning. We played Bad News, a game designed to help kids recognize fake news through a method called inoculation theory. In this game, players are situated as fake news creators so that they can become familiar with the techniques used to spread fake news and gain insider knowledge of how it works.
While this game had a great user interface and was very fun to play, it brought up a basic issue for me around using games in education – which is the issue of trusting the game to teach with accuracy and nuance. For example, I agree with the creators of Bad News that “the most effective method of combating disinformation is to foster critical and well-informed news consumers,” but I take issue with the binary notion of fake/real news. Lots of news that is classified as “real” is extremely biased and lacking essential perspectives and details. These biases are just more accepted when they align with hegemonic power structures. It is important to be able to identify when news is not based in any reality, but equally important to approach reporting on real events with critical analysis. It’s not that they have no value or application, but it takes previewing the game to ensure that it aligns with what you want students to learn. In any case, it would be important for teachers to take time with students to reflect on and elaborate on any game-based learning that takes place.
Additionally, I also wonder about the consequences of placing students in the position of fake news creator, and them awarding them for the harmful behaviour of creating fake news. While this makes the game more fun, I fear it could encourage kids to realize their own power to manipulate information and the lucrative potential of fake news. After all, haven’t we seen this before?
The minecraft model of gaming in education appeals to me more for a wider application because it is more of an opportunity for the student to become an experimenter or designer – the open ended element of it makes it more of a widely applicable tool that engages students as active participants in their learning. Minecraft is can be used to teach many different subjects, as shown in the screenshot from Minecraft: Education Edition, a website which offers Minecraft lesson plans.
screenshot by Live2Learn
I think that making educational activities into games is a very effective way to motivate students to learn by making learning fun! I liked Rich’s use of Google classroom to create an escape room. I think this is a great, simple example of how a basic assignment can be gameified to improve student engagement. As an accountability measure, I found that answering questions about the prep materials in game form was effective because it felt like a fun challenge rather than a form of testing or surveillance based on mistrust.
Overall, I think it is very important that teachers are weighing the true educational benefits of a game before introducing it into the classroom. Like anything that we introduce into our pedagogy, it is important to be critical, to avoid overuse of didactic teaching methods, to interrogate our own motivations, to look into the research, and to engage in the tool ourselves.
Today we are going to learn how to prepare wool for dyeing!
We will be discussing how to process wool on a small scale. For an overview on Industrial wool processing, check out this fact sheep. I mean sheet. fact sheet.
Before we begin, a few definitions:
Fleece: The shorn wool coat of a sheep. It requires processing to remove debris and lanolin before being turned into wool yarn.
Wool:The hair of a sheep comprised of a protein fibre.
Lanolin: A waxy ester produced by the sebaceous glands of sheep that allow their fleece to shed water and prevent it from felting on their body! It is a greasy substance used in cosmetics, skin care products, and industrial lubricants.
On a side note, lanolin has a very distinctive smell which brings up two very strong associations for me. The first is of my Granny’s weaving workshop, and the second is of using lanolin to treat my rabbit’s “sore hocks” when I was a kid in 4-H.
Before we dye our wool, we need to engage in 2 important processes: scouring & mordanting.
A mordant is a chemical compound that allows dye molecules to bind to fibre, making it brighter, darker, or colourfast. Natural dyes require the use of a mordant or fixative so that they don’t wash out or fade away. It is recommended to use a mineral mordant for natural dyes on protein fibres like silk and wool.
The fibre must be very clean to ensure that the mordant and dye will penetrate it properly. Cleaning the fibre for dyeing is called scouring. This process removes the grease, oils, and dirt from the fibres.
Mary Harry scouring wool. Photo by Margaret Miekle licensed CC 3.0
*NOTE: If you are mordanting the wool immediately after scouring, weigh the wool while it is still dry*
How to scour wool:
Fill a bowl with warm water (between 50-60 C)
Add some pH neutral soap or washing liquid
Leave the wool to soak for 2 hours or overnight
Rinse very carefully – agitation or changes in temperature can felt the wool
How to scour fleece:
Outside, fill a bucket 2/3 full with cold water
Put fleece in the bucket without packing it tight
Leave the fleece to soak for 2 hours or overnight
Wool, before and after scouring process. Photo by CSIRO, CC BY 3.0
Drain the fleece using a colander and dispose of dirty water in compost
Repeat steps 1-4 until water runs clean
Fill up a large bowl 2/3 full of warm water (between 50-60 C)
Add some pH neutral soap or washing liquid
Gently put the fleece in the bowl and leave it for 45 – 50 minutes (before the water has cooled too much, or you risk the lanolin getting back into the fleece)
Gently remove the fleece
If the water is very dirty, repeat steps 6-9
Drain the wool and let it cool
Rinse the wool very gently in a bowl with cold water and repeat until the water runs clear – agitation or changes in temperature can felt the wool
Drain the wool in a large colander (you can use a salad spinner if you have one)
Put the wool flat on a towel and allow to dry
Tease the wool gently by pulling it apart – this will aid mordant penetration
I got overwhelmed with school and am a bit late getting this post up on my blog, but luckily a had a draft sitting around for me to revisit. In our Week 7 EDCI 336 class we discussed flipped learning and learned how to use TinkerCad to create a 3D object that could be printed using a 3D printer.
Flipped learning moves direct instruction from a group to an individual learning space so that work can take place in class. Students are expected to prepare themselves for class by reviewing the resources given to them by their teacher, and then they can apply their learning, ask questions, or have discussion together in the classroom. Flipped learning allow students to move at their own pace, rather than being rushed or slowed down by the teacher or their classmates, and it allows for a more effective use of class time. On the downside, flipped learning can increase a reliance on student access to technology that can exacerbate tech-disparity among students. It also runs the risk of allowing teachers, in their enthusiasm, to overwhelm their students with prep work.
I have heard flipped learning discussed in other classes, but only as a warning against replicating didactic forms of teaching through a flipped style. I have never actually learned about flipped learning itself. However, it is essentially the model that I have employed in my community organizing, in which we ask people to familiarize themselves with the agenda, links, and background documents before attending a meeting, so that we may use our time together most effectively. While I like this model, I have found a major drawback is that it takes a certain amount of initiative on the part of the learner, and that it seems that some people just never really engage in the prep work. This means that when we are together as a group, those who have not familiarized themselves are kind of lost and we need to spend class time catching them up if we want their participation, which ends up disincentivizing everyone from engaging in the prep work (if they know that we are likely to go over it again in class anyway). Obviously this requires some sort of accountability mechanism to encourage completion of prep work, but I would want to ensure that it doesn’t rely on shame or surveillance. Perhaps I could use partner or group work to encourage completion of prep work by creating a sense of student’s accountability to one another, or I could ask for a short reflection or questions about their prep materials for completion marks. I could also ask for their feedback about what would encourage their engagement in the prep materials and adapt my use of prep materials accordingly.
Through my experience in this class, I have found it challenging to incorporate time for both homework and prep into my schoolwork schedule. This is partly because it is a new format, but also I have found it a bit demoralizing to feel like there is no way to get ahead in my homework because it often takes working on it throughout the week to get through it. I have difficulty holding a lot of things in my brain at one time, so I like when work can be confined to a single time block, rather than requiring my attention throughout the week, alongside all of my other classwork and general life obligations. As a teacher, I could apply this point of learning by limiting homework and offering a schedule of suggested or implemented work blocks during which student can do their individualized learning. I will also try to curb my own enthusiasm for learning by minimizing the number of required prep materials but still offering additional materials for students who wish to go deeper, similar to what Rich has done.
In other news, I learned to use TinkerCad to design this personalized game piece that could be 3-D printed at UVic! It was quite fun and simple to do, especially using the step-by-step design guide.
While there are endless cool applications for 3D printing, I thought this one was particularly neat!
This week is an exciting one, as my inquiry has taken me off my computer and into the woods! Which woods? Well, in the spirit of mushroom-harvester secrecy, I am not going to tell you exactly. But after doing some research about dye mushrooms (see Contributions #2), I realized that I needed to find somewhere with some decaying Douglas Firs and Cedars. I never heard back from the W̱SÁNEĆ Leadership Council, so I decided to avoid “Crown” land, just in case.
Screenshot from Vancouver Island Mushroom Identification & Info Group
With my newfound confidence in my ability to identify Dyer’s Polypore, I headed back out with a friend to do some harvesting. Look what we found:
Dyer’s Polypore!
Phaeolus schweinitzii
Photo by Live 2 Learn
Photo by Live 2 Learn
Turkey Tail!
Trametes versicolor
photo by live 2 learn
Jumbo Gym!
Gymnopilus ventricosus
Photo by Live 2 Learn
What a success! Once I got these mushrooms home, I put the Jumbo Gyms and the Dyer’s Polypore in the fridge, and put the Turkey Tails out to dry. I am so excited to pull out the dye pot and move on to the next step!
This week my post is going to be a reflection on Edcamps. I have heard teachers at Esquimalt Secondary mention Edcamp as a type of professional development, but I hadn’t taken the time to learn about it in any depth. Rich organized a mini-Edcamp for our 336 class this week, but sadly I was unable to attend.
According to the shared google doc that we brainstormed ideas on, the top four workshops were:
Mental health and connection in a virtual world
Outdoor Education
Crossing over – having disciplines share & integrate knowledge across the curriculum
Storytelling in Education
I would have LOVED to participate in all of them! The worst part would have been having to choose (though I think I would have gone with Storytelling in Education).
I love the idea of Edcamps. I really appreciate the four core tenants:
As someone trained and experienced in facilitation, dialogue, lateral decision-making, and skill-sharing, the Edcamp model appeals to me and makes sense! I think that the non-hierarchal learning structure, self-direction, and free access foster a healthy and effective learning environment, and models the type of education that we should be aiming to offer in our classrooms.
Carpenter & Linton (2018) explain that the Edcamp model aligns with the learning theories of andragogy and heutagogy.
Andragogy is an adult-focused alternative theory to pedagogical approaches:
“Andragogy asserts that adults should be involved in the learning process, must perceive a need to learn something, are oriented towards problem-focused and immediately valuable learning, and possess reservoirs of experiences — both successes and failures — that are resources for learning. Additionally, andragogy prioritizes adults’ internal motivations to learn over external motivations” (Carpenter & Linton, 2019, p.57).
Heutagogy is an expansion of andragogy with an emphasis on environments that facilitate self-determined learning:
“While andragogy assumes that an instructor is still heavily involved in guiding the learning experience, any instructor in heutagogy plays a more limited role as a provider of advice and resources (Blaschke, 2012)…Heutagogical practices attend not just to knowledge and skill acquisition, but also to learning how to learn. Thus, heutagogy places emphasis on the development of capabilities and competencies such as teamwork, self-efficacy, reflection, and creativity (Kenyon & Hase, 2010)” (Carpenter & Linton, 2019, p.57).
Carpenter & Linton (2018) point out 3 major principles of andragogy and heutagogy that align with the Edcamp model:
Attention to the learning environment
Participants’ motivations
Autonomy
In their research, Carpenter & Linton (2018) found that Edcamps were overwhemingly impactful in changing participant teachers’ practices. In contrast to traditional professional development that treats teachers “as the mere implementers” of decisions made by non-teacher ‘experts,’ the Edcamp model respects “the participants’ motivations, autonomy, experiences, and ultimately their professionalism and capacity to engage in complex intellectual work” (Carpenter & Linton, 2018, p.64).
I would imagine that starting an Edcamp with a workshop about facilitation and respectful communication would help to make an Edcamp more fruitful. Co-creating a community agreement could also be a good idea. Additionally, I think it could be helpful to engage in the process of brainstorming and selecting workshops in advance of the Edcamp itself, to give people a sense of what the day will look like and so that they can prepare accordingly. I know that it can sometimes take me some time to come up with questions or to reflect on relevant experiences that I might want to share.
Although I loved having Pro-D days off as a kid, I was also very curious about what the teachers were getting up to. I appreciate that teaching is a job where there is a dedication to ongoing learning. I am sad that I missed this Edcamp, but I look forward to the Edcamps to come!
Last week I sent an email to the W̱SÁNEĆ Leadership Council seeking permission to harvest mushrooms on “crown” land. I haven’t heard back from them yet, so I decided to go get some practice doing mushroom identification in the mean time! Since I wouldn’t be picking any mushrooms, I headed out to East Sooke Park.
The inside cover of All That The Rain Promises, and More… by David Arora
I invited a couple friends to meet me there, each of us armed with a different mushroom identification guide. I found All That the Rain Promises, and More… by David Arora to offer the best identification guide. I like the flow chart method of identification that directs the reader to the pages of the book where they can find pictures and information on specific mushroom species.
Mushrooms are broken up into two basic groups: those with gills and those without. Identification of gilled mushrooms depends on: the colour of the spores; the presence or absence of a veil, volva, or ring; the colour and shape of the gills, and whether they are attached to the stalk; and the texture of the stalk. Mushrooms without gills are far more differentiated from one another, and this made them easier for me to identify.
We found lots of mushrooms and were able to identify quite a few! Two of them were even species that I was looking for! Here are our mushroom finds:
Dyer’s Polypore / Phaeolus schweinitzii
Found this specimen on a rotting Douglas Fir tree. I wasn’t quite certain which species of mushroom this was, so I posted it to the Vancouver Island Mushroom Identification & Info Group for confirmation. This is one of the great species for dyeing!
Admirable Bolete / Boletus mirabilisI found this solitary mushroom near a hemlock tree. The top of the cap looked like velvet. Apparently it is edible, with a lemony flavour!
Angel Wings / Pleurocybella porrigens This is the underside of what I am pretty sure is a mushroom called Angel Wings. Isn’t it beautiful?
Velvet Footed Pax / Tapinella atrotomentosa This is another good one for dyeing!
Cute mystery boleteSo cute!
Other treasures…
All photos in this blog post were taken by the author.


 I found this solitary mushroom near a hemlock tree. The top of the cap looked like velvet. Apparently it is edible, with a lemony flavour!
 This is the underside of what I am pretty sure is a mushroom called Angel Wings. Isn’t it beautiful?
 This is another good one for dyeing!
 So cute!

Recent Comments