Finishing this is what spurred me to post the other tapestries yesterday. (Well, finishing this plus the Facebook suspension. Easier to share there than here, but we are where we are, and you wouldn’t have a story time there. Are you sitting comfortably?)
I’ve been taking pictures of water and shorelines for about many years, first as memories, then as inspiration for colour palettes and colour blending: how would I combine a variety of coloured yarns to create a blend that brings a wave or ripple to life. In 2023 I enjoyed a one-day tapestry workshop weaving water with Anna Wetherell at Farfield Mill, mostly because I needed a push to start tapestry weaving again. We took pictures of the river from the mill bridge as inspiration for tiny tapestries woven with Anna’s scrap yarns, advice, and encouragement. I can’t remember which bit of which photo I used for this, but I can still see the water.
After that I tried to weave the gold birch leaves drifting in the peat-brown water at the Falls of Falloch, many years ago. It sort of worked, I liked the result even if the leaves are wonky. I took more photos of water. I don’t remember where we were in September this year but I have a photo of the water there.
I warped the little loom, this time using ‘proper’ warp (Liina 12) and started pulling yarns from the tapestry stash. An inch or so up my niggling doubts brought weaving to a halt. Look at the water, look at the tapestry. In the picture the water is alive, it’s moving. The the tapestry is flat. Pretty water colours, but it’s flat. Boring. MOST unsatisfactory. I want it to speak of movement.
I read some books, I did some googling. Mostly I remembered Linda Wallace (probably slightly exasperated by the way I kept asking how things should be done) telling me that I should do whatever I need to do, there are no rules provided the woven structure holds. So… I can build angles into the weave like the angles of the wavelets. I can add nubbly handspun silk to catch the light and make the wavelets dance.
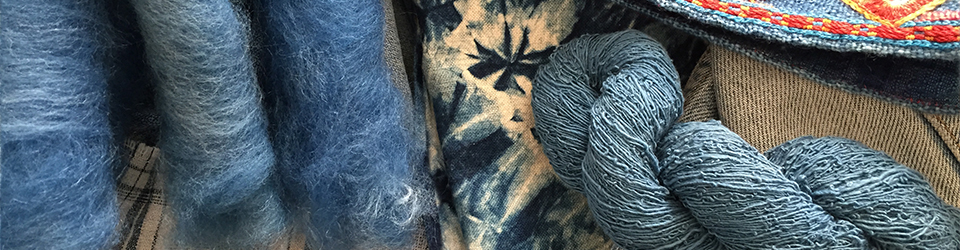
WHOA. Now it’s moving. This is exciting. But OMG the back. Every one of those patches of colour is a group of four yarns with the start and finish of the bundle hanging out the back. There are many ways to deal with the ends. I tried several, but all of them left the front of the tapestry slightly uneven, with differences in light and shadow that interfered with perception of the movement. I wanted it as near dead flat as possible.
I had an idea. This is a tiny piece to be mounted, the woven structure will not have to cope with the stress and strain of hanging free. I stitched the individual weft bundles down to the surface of the back.
I love the not-quite-random pattern of stitches and bundles. It’s a serendipitous exercise in mark-making. It looks almost like cuneiform, a language, and in a way it is. The text says “What if…”
I assume this is a known technique (it is often said there is nothing new under the sun in textile crafts). It takes forever, or feels like it: 14 bundles stitched in 37 minutes one afternoon. But it works. After blocking, steaming and mounting, the tapestry lies flat. Looking at it now I think the initial flat bit is a useful contrast to the areas of madness (it felt like madness) later on.
A recognised it as water before the halfway mark. I love it. It’s another “I can’t believe I made this” moment. I wish it was larger. Well, I know what to do about that. Use a bigger loom to wind a bigger warp. But first I’ll admire this again. I’m so much more fortunate than you, I can see it for real, not a bad photo in the bad light as Storm Chandra batters the house.
I have no memory of looking at a tapestry or a picture of a tapestry and thinking ‘I could do that’. Maybe Sara Lamb’s book Woven Treasures planted a seed. In 2015 I remember asking A to cut the centre out of a small piece of plywood to make a tiny (insanely tiny, really) portable loom, which I warped with scrap tatting cotton to needleweave a tiny 1″ square using scrap lengths of handspun silk on a flight somewhere. I don’t have a picture of it, but I remember finding throwing away that fragment and host of other small memories when packing to return to the UK.
In Canada in 2019 I was fortunate enough to be invited to join a group of tapestry weavers and fibre artists who met every Wednesday. The further I am from that time and place, the more clearly I see how much I learned about the sheer hard work of creating and the value of collaborative learning. I listened and learned as Linda Wallace and others drew cartoons, took photos, wove, unwove, offered up, blended, exchanged ideas and yarn, laughed, stopped for thought and coffee, and drew me in. Those Wednesdays were wonder-full. I miss those friends, their curiosity and drive to create, more than I can say.
In 2020 I put my sashiko to one side, bought a small Mirrix loom, found an image in my head and began. This is the only image that shows most of the cartoon (the drawing held behind the warp). It also show something of the scrap handspun yarn I used.
I look at these photos and remember the sheer frustration, every day. The cartoon was IN THE WAY when I manipulated the warp and every time the paper moves even a couple of millimetres I have to notice and move it back or the weaving will be the wrong shape. I tried drawing on the warps: the felt pen bled and blurred. I tried paired magnets to hold the cartoon (instead of tape, then stitching): if they were tight enough not to slip freely I couldn’t get them apart. Working with crochet cotton and handspun I had no established guidelines for the number of weft yarns in the bundle for the sett and size of warp yarn. I was winging it with no experience, but I had the greatest good luck in the world: I could ask someone for advice. Sometimes it was as simple as ‘keep going’.
I learned that I had to trick the eye into seeing curves. I *hated* the steps created by the structure but found they were masked by the magic of the final image if it worked. I learned that the weft I placed and beat into place will be further compressed by the beating of weft above it. If I wove exactly the shape I wanted it was squashed, stretched sideways by the additional compression by the time I’d woven another couple of centimetres. Slippery crochet cotton allows the weft to slide down even more than traditional seine twine. I lost track of the times I ripped back and rewove the head of the hare. I ran out of colours but as I had no plan for colours that was easily dealt with.
This is the only photo I have of the finished piece. The compression is annoying. The nose is still too short. The tail is still too flat. But when I look at the photo I still feel the sense of disbelief that I, *I* could make something that good. I still love it and, while I miss it, I was honoured to swap it for Linda Wallace’s postcard garden.
In 2021 I began to acknowledge the reality, that Canada was no longer where I wanted to be. Images strike more strongly than words.
My head was full of Scotland.
Now my head is full of light on moving water, leaves drifting in peat-brown water.
The next one will have a post of its own sometime in the next week or so. I could show you the new empty warp on the big Mirrix but where’s the fun in that? Wait until I find the courage to start something.
ETA: solved. One of Safari’s content blocker settings stopped the form working. WordPress won’t let me add categories or tags at the moment so I can’t create a new ‘Tapestry’ category or tag. I’ve restarted, even tried a different keyboard, but no. Technology hates me.
My Facebook page has been suspended; I honestly don’t know why. I should have heard a yay or nay from my appeal three days ago. If I don’t hear anything within 180 days the suspension becomes permanent. Apparently I’m not alone; the Forbes article linked below says many legitimate accounts are being thrown out in the continuing AI bot purge. Another reason to hate AI?
It could be worse. r/facebook is full of people who’ve lost a decade or more of personal photos and contacts; the appeal process has probably choked on the volume. I haven’t lost anything other than the ability to see what you’re doing, and learning from environmental pages. On the other hand I’m not watching the monetisation of interactions drive online culture deeper into the cesspit every day, so the world has instantly become a brighter place.
Dealing with the weft ends on the little tapestry is making slow progress (14 weft groups in 37 minutes yesterday), but I love the texture and pattern it creates.
I can’t access other Meta products (Messenger and Instagram) either so if you want to contact me please use email or the ‘Contact’ form here.
I’ll probably blog occasionally about what I’m making, but WordPress is too formal for quick ‘come for a walk and a bit of landscape history’ posts. If you miss any of that, let FB know. I’ll be here making things or walking the hills whether or not I can share the experience with you.
A poor photo (this was 2011) of he indigo vat, some chicken wire on which to drain the dyed fibre, and my rubber gauntlets.
Searching my ‘Photos’ for something else that happened near the dawn of time, I found a set of videos from 2011 featuring an indigo fermentation vat built following the instructions in J. N. Liles’ The Art and Craft of Natural Dyeing: Traditional Recipes for Modern Use.
It’s very strange to hear my voice describing something I only remember when I unearth the remnants of these dyed locks. I can’t even remember what I made from the rest of them.
Liles’ ‘Fermentation Vat No. 4: Saxon Vat’ (p.86 in my paperback copy) is based on his wife Dales’ theory that the organic matter (suint, skin flakes, manure, dust) in an unscoured fleece might be sufficient to support bacterial fermentation to reduce or eliminate oxygen in an indigo vat. Liles found confirmation of this in J M Matthews Application of Dyestuffs to Textile, Paper, Leather and Other Materials [link to archive.org copy, please donate to support them if you use it] “This is one of the earliest forms of Indigo dyeing in Europe, and is still practiced in the same primitive manner by the peasants of Saxony, where the celebrated Saxon blue is dyed.” [Note that this is not the ‘Saxon Blue’ dyed using sulphuric acid to make indigo sulfonate, which I wrote about here.]
Anyway. I was clearly so thrilled by the results (both smell and dye) of this Saxon vat that I filmed it. The sound is awful and one of the clips is short, but I’ve assembled them as a single video and put it up on Youtube. My first video upload! Liles ‘Saxon’ Indigo Vat 2011 SD 480p
I have found another video showing how I boosted the vat for another use; I hope to put that up later this week.
Some cautions: I recall at least one dismal failure of suint cleaning/ Saxon vat. Nothing happened, it just stank. Liles suggests this could be due to trace chemicals from sheep dip or anything else that the vat and its contents might have encountered. pH of the water might matter, too. If you try this, record more info than I scribbled into the margins of my copy of Liles. Also, I do remember the smell of the natural fermentation vats, especially this one and the sig aka urine vats. It’s powerful. Also, it has to be warm room temperature for fermentation to work in a useful timescale if at all. I think this vat was snuggled up against the bathroom radiator, on the hot water circuit so it was always warm or hot. When I created later vats in the garage I put a ‘brewband’ heater for beer or other brewing on the vat, and put the whole thing in a cardboard box lined with styrofoam and bubble wrap to keep it warm. I think it worked best in the house, though, and it has been agreed that I can try one this year in the master ensuite. I’ve got a bit of dirty fleece and I’m going to order another brew band because this bathroom is much smaller –– and I might have to move the vat outside if it smells as I remember.
Bog cotton aka cotton grass, Eriophorum angustifolium, is now classed not as a grass but as a sedge. It grows in damp, acidic soils across the Northern hemisphere, flowering from May through June, when a dense patch can look like fresh snow lightly scattered on a green hillside. In the hand it does look a bit like cotton (especially if you’ve never seen raw cotton in your hand) so hand spinners inevitably wonder if it could be spun like cotton: how wonderful to gather it from the hillsides to produce a lovely local yarn.
Bog cotton growing on a hillside above Scar House Reservoir, Upper Nidderdale, 16 June 2024.
Eriophorum angustifolium (Cotton Grass), with its long white tufts of hair, is very decorative on our bogs and mosses in the middle of summer. The down is used in moorland districts for stuffing pillows, and attempts have been made to employ it as a substitute for cotton, under the name of ‘Arctic Wool,’ thread having been spun from it, but the fibres are more brittle than those of cotton and do not bear twisting as well. Candles and lamp wicks have been made from the down by country people. In former days the leaves and roots had some reputation in northern countries as a medicine in diarrhoea, as like most members of the Sedge family, they possess considerable astringency. The name Eriophorum is from the Greek erion (wool) and phero (I bear).”
In ‘A Monograph on the British Grasses’ (1822) George Graves writes
‘Should our Manufacturers be able to overcome the brittle texture of its cottony heads, this plant might then answer the purpose of the grower, as the quantity of this substance is considerable. In some parts of Germany the down has been made into paper, wicks for candles, etc.; and Linneas [Carl Linnaeus aka Carl von Linné, 1707–1778, the Swedish biologist who was “the father of modern taxonomy”‘] remarks, that the Swedish peasants stuff their pillows with it in the place of feathers. This plant is of common occurrence in most of the boggy parts of Great Britain; it flowers in April and produces its downy seeds in July and August.’
Eriophorum angustifolium Common or Many-headed Cotton-Grass from Graves’ Monograph.
‘fibres are more brittle … do not bear twisting as well [as cotton]’ and ‘brittle texture’ doesn’t sound promising.
A tuft of cotton grass in my hand. The long, straight fibres are relatively coarse and stiff. The single seed below it shows why they must be stiff: when the seed is ripe the fibres attached to it open up like a dandelion seed parasol to catch the wind.
Above, dissections of the cotton grass seed heads. Left: the different lengths of fibres from different regions of the seed head, as well as the head at the centre of the seed head showing the sockets in which the seeds sit. Right: the seeds sitting at the base of their parasols of fibre.
Cotton-grass fibre without the seeds, which would have been at the tan-coloured base of the tuft.
In the above photo I’ve pulled the small dark seeds off some tufts of fibre, which was quite difficult as the seeds are firmly attached, but there would be a lot of little dark lumps in the yarn if the seeds were not removed. Look carefully and note that the fibres are significantly thicker at the base than the tips, meaning the tips will twist more easily. When I hand-twisted a couple of seeds-worth of fibre; the tips twisted but the fibres snapped before the twist could travel into the thicker bases (the bases and the twisted tips shown above). This demonstrates what is meant by ‘brittle’ in the description of the fibre: the seed fibres are both stiff and weak, completely inelastic, so they snap rather than twist.
Spinning from a cloud of de-seeded fibre lightly misted with water and allowed to sit 5 minutes.
I tried spinning from several clouds of de-seeded fibre, both fresh (so slightly damp), dry (about a month after gathering), and re-wetted with a mister. The re-wetted were easier, probably because the droplets of water help to hold the fibres together: the moisture did not soften the fibres, which remained stiff and inelastic. It spun in the sense that the twist picks up fibres to bring them into the forming yarn, but because of the stiffness and the variation in fibre thickness the yarn is excessively uneven (see the tiny thin tightly twisted yarn on the spindle hook contrasted with far less twist in the thicker area above.
I could not spin a competent [yarn that does not lengthen under tension] singles. Rotating the spindle in my hand while pulling it away from the fibre mass allowed the twist to make a soft singles; adding more twist to prevent the fibres sliding on each other invariably resulted in the singles snapping before it became competent. When I tried to suspend the 10gm spindle on the singles either a slub slid apart (because the fibres are stiff and smooth) or a thinner area snapped (because the fibres are brittle). I spun an incompetent singles to make a 2-ply; the 2-ply yarn was almost competent (it lengthened under tension, but slowly) but was easily broken.
‘Almost’ competent 2-ply yarn held between the pins. I can imagine it as candlewick, when the first wax dip would glue the fibres together. But how well would it work? Would it burn?
I put three tea lights in a cast iron pan on low heat on the hob and, when the wax was liquid, I disembowelled one to extract the metal wick holder. I put a length of the cotton grass 2-ply yarn in the holder, put the holder back in the tea light, topped up the wax level and rigged something to hold the rest of the wick upright while the wax cooled. I put another short length of 2-ply to soak up a puddle of wax.
So the fibres hold wax. I trimmed the tea light wick short, asked my husband to take pictures, then struck a match:
It works well. There was quite a lot of black smoke as the flame grew larger, but I’ve seen that from ‘real’ tea lights. In conclusion: bog cotton is indeed too stiff and brittle to be a good spinning fibre, and probably wouldn’t make a good pillow or paper for the same reasons, but it can be spun into a fragile yarn suitable for candle wicks.
Over the last few weeks several people have asked a FB spinning group about spinning cotton wool/cotton balls – the things sold for makeup removal – as a cheap, easy to find version of cotton. I said cotton balls aren’t like REAL cotton; they’re made of heavily-processed waste fibres so they won’t make a lovely even yarn but I do enjoy spinning them. I discovered I didn’t have any when I looked for the bag in the stash to take a picture. My local supermarket (this is the UK) also didn’t have any so I added a bag of 100% cotton balls to the Amazon basket.
Can you read the label? It looks like the label on the Amazon website but there are different words: ‘Vacuum packed to reduce packaging size’. Cotton isn’t elastic, it doesn’t rebound to its original shape in the way that wool does. The label claims the cotton balls will expand after the pack is opened, but that seems extremely unlikely. What to do? I can’t send the stuff back, I’ve opened the pack.
Was this decent cotton before it was abused?
No, and I didn’t expect that it would be. Cotton balls are a way of making money from waste fibre. In the photo below the top fibre is cotton sliver (technical term for the cotton version of what spinners know as wool top) opened to show fibre alignment and nepps. Fibre below it is one of the cotton balls.
At this point spinners are wondering why anyone would bother. Keep reading :-)
Rehabilitating bad cotton First thing is to encourage the cotton to rebound and expand as much as it can. Heat and moisture help, so I put the balls in a colander over a bowl of steaming water and left it overnight, mixing top to bottom a few times before I went to bed.
That helped but not much. I tried Extreme Steam at the spout of a boiling kettle; do this with real cotton sliver and you can actually see it expand; this, not so much.
Oh well.
How can I prep this for spinning? The three obvious options are shown in the photo below. Centre, one of the cotton balls and above it, a couple of the balls unfolded to show the firmly set creases, a truly awful thing to see in cotton, each compacted area will be a difficult or undraftable slub in the yarn. But I can spin this. To the right, next to the ruler, one of the balls unfolded and then carefully passed through steam from the kettle, allowed to rest, then steamed and rested again. The creases are still visible but it’s an improvement. At left, five punis. Each is 2 1/2 (3 was too much, 2 seemed ungenerous) cotton balls unrolled and carded on my small Clemes & Clemes handcards. I don’t doff all the fibre onto one card at the end; instead I use a fine knitting needle to roll the fibre off each card, then slide the rolled fibre off. Moisten the needle with just the right amount of spit to catch the fibres at the start of the roll.
There wasn’t a lot of difference between spinning the unfolded fibre and the steamed unfolded fibre. Spinning with the tahkli (a support spindle with high speed good for spinning fine fibres) yielded a finer yarn but dealing with the slubs was more fiddly than spinning on the Majacraft Rose; both methods yielded a good somewhat slubby singles that plied up nicely.
Spinning a singles from the unfolded cotton ball on the Majacraft Rose lace flyer.
Carding the cotton for the punis opens and rearranges the fibres, so I’d hoped they would draft more easily even if the yarn was still slubby. They did, but not in a good way. The cotton drafted easily into a succession of long slubs that, when double-drafted for a competent yarn tended to snap in the thin sections between the slubs. My theory is that the additional carding, even if only 2 brushes of the cards to spread the fibre evenly, did too much damage: too many of the fibres had been weakened or shortened.
Spinning a singles from a puni made from cotton balls. Note the long, large slubs.
Verdict I’d spin this from unfolded balls, steamed once or twice and allowed to rest before I spin them. Why bother? Because the end result is a good and interesting yarn. On the left, tahkli-spun; on the right, wheel-spun. Both are competent. The really fluffy bits of the wheel-spun are the puni slubs; these will probably shed fibre and pill even if a weave structure locks the fibres into place, and they might fail under warp tension. So if I was spinning this for use in knitting or weaving I’d avoid slubs this large and loose. Best way to do that is buy nicer cotton balls, avoiding ones that have been vacuum-packed. The ones I bought from Superdrug in Canada were lovely.
In March 2020, just before COVID, he and I went to New York, sharing one carry-on bag (we travel light and fast). I’ve just checked my calendar to see how long we were there; in my memory it’s both forever and no time at all, but in fact it was an intense fun- and food-filled ten days. One was spent walking from our hotel in The Bowery to see Japanese textiles at Sri Threads, with lunch at a Polish restaurant that we still remember for fabulous food and our first Żywiec beer. I’d been following Stephen @Sri for years and his collection did not disappoint. The wisteria bast fabric, the museum-grade boro were beyond my means, but I brought home some wonderful and meaningful textiles including a worn but very beautiful sakiori obi. My plan was to cut it and make a series of small bags to showcase the fabric, but I found I just could not put the scissors to it. Not just because it’s a wonderful long beautiful thing, but because it was still a thing. It wasn’t so worn that it couldn’t be used in its entirety. And also because this was made by someone’s hands as that single thing. Someone dismantled the garments for fabric, cut strips, wound that warp, warped the loom, chose or simply took strips to weave as weft. There is no repeat. When I’ve woven random yarns like this I’d sometimes pause to admire some unexpectedly beautiful progression: did the person who wove this pause, and for which colours?
Packing my workroom for the move made clear to me how many unfinished projects require my attention. They weigh me down: i am finishing some and disposing of others. This beautiful thing could become a striking if somewhat long scarf to be loved and admired into the future if I repaired it to withstand light use.
Obi? An obi is a Japanese belt, traditionally a woven fabric but modern obi may be made of many materials. There are obi (several types) for women and for men; men’s obi are narrower, longer (men wrap three times around the waist, women two) and usually more sombre in colour than those worn by women.
Left, an 1890s photo of one woman tying a complex obi knot. Right, a modern man’s kaku obi (my reading suggests this would be more stylish with the knot worn a little to the left).
My obi is roughly 15cm/6″ wide and 3m/9.8′ long, the standard dimensions of a hanhaba or ‘half width’ everyday casual woman’s obi. If that’s what it is, given the age of the obi, it would have been wound unfolded twice around the waist then tied with a simple over-and-under knot.
Sakiori: an examplar of mottanai Meaning something like ‘what a waste/shame’ in the sense of ‘don’t be wasteful’, mottanai is a Japanese philosophy born of poverty and respect for crafts and materials. There is no need (it is inappropriate and disrespectful) to buy new if the old can be repaired, re-used or recycled. Garments can be repaired and remade for further use and when repair is not possible the fabric itself still has value: it can be cut into strips for use as weft in a new woven fabric (sakiori) or even unravelled, sound weft thread by weft thread to be re-used as weft in a new zanshi (‘leftover thread’) fabric.
A burn test suggests the black warp is silk; it burned briefly and sullenly with the scent of burnt hair. The wefts are strips of at least 23 different silks ranging in colour from palest grey to various blacks with grey patterning. The narrowest weft stripe is 3 passes of a pale grey similar to that in the middle of the image above (but the strip is thinner); the widest is 26 passes of a blue and white silk similar to that near the bottom of the image. A true vivid deep purple is the least common colour, only 5 stripes. Most of the silks are rich shades of brown combined with greys and blacks.
Think for a minute about the possible age of these fabrics. Folk textiles are difficult to date, but sakiori fabric is no longer widely woven. The obi is worn beyond use, from long use. As were, probably, the garments dismantled and woven into it. If it was woven at the beginning of the 20th century, the fabrics may date from the 19th century. All those years, all those people making and wearing the garments.
The photo above shows some of the damage. The worst is the selvedges, in many areas eroded to nothing but worn ends of weft strips. Within the body of the obi the warp is worn or has disappeared entirely over bumps in the weft, creating weak points where the weft strips part. There is no central wear line, so it was not folded in use. At one end there are large open holes several cm wide. It might be that this is the result of wear due to knotting, or it could simply be moth or beetle damage.
Silk threads for stitching.Vintage Japanese silk fabric for patches.
I tried various blanket and buttonhole stitches on the damaged selvedges, then unpicked most of them leaving only two small areas to remind me that they don’t work, the pattern and texture is inappropriate. In the end I repaired the edges as I did the weak areas in the fabric, re-weaving the warp over-and-under. I worked as close to the edge of the obi as I dared before locking every second or third stitch back into previous stitches. Where the weft fabrics were too badly damaged to hold the new warp I stitched patches of vintage silk, indigo blue or zanshi multicolour and gold. I used 60/2 grey silk where I did not want my stitching to show and Sajou Fil au Chinois where I wanted the repairs to glow like kintsugi gold.
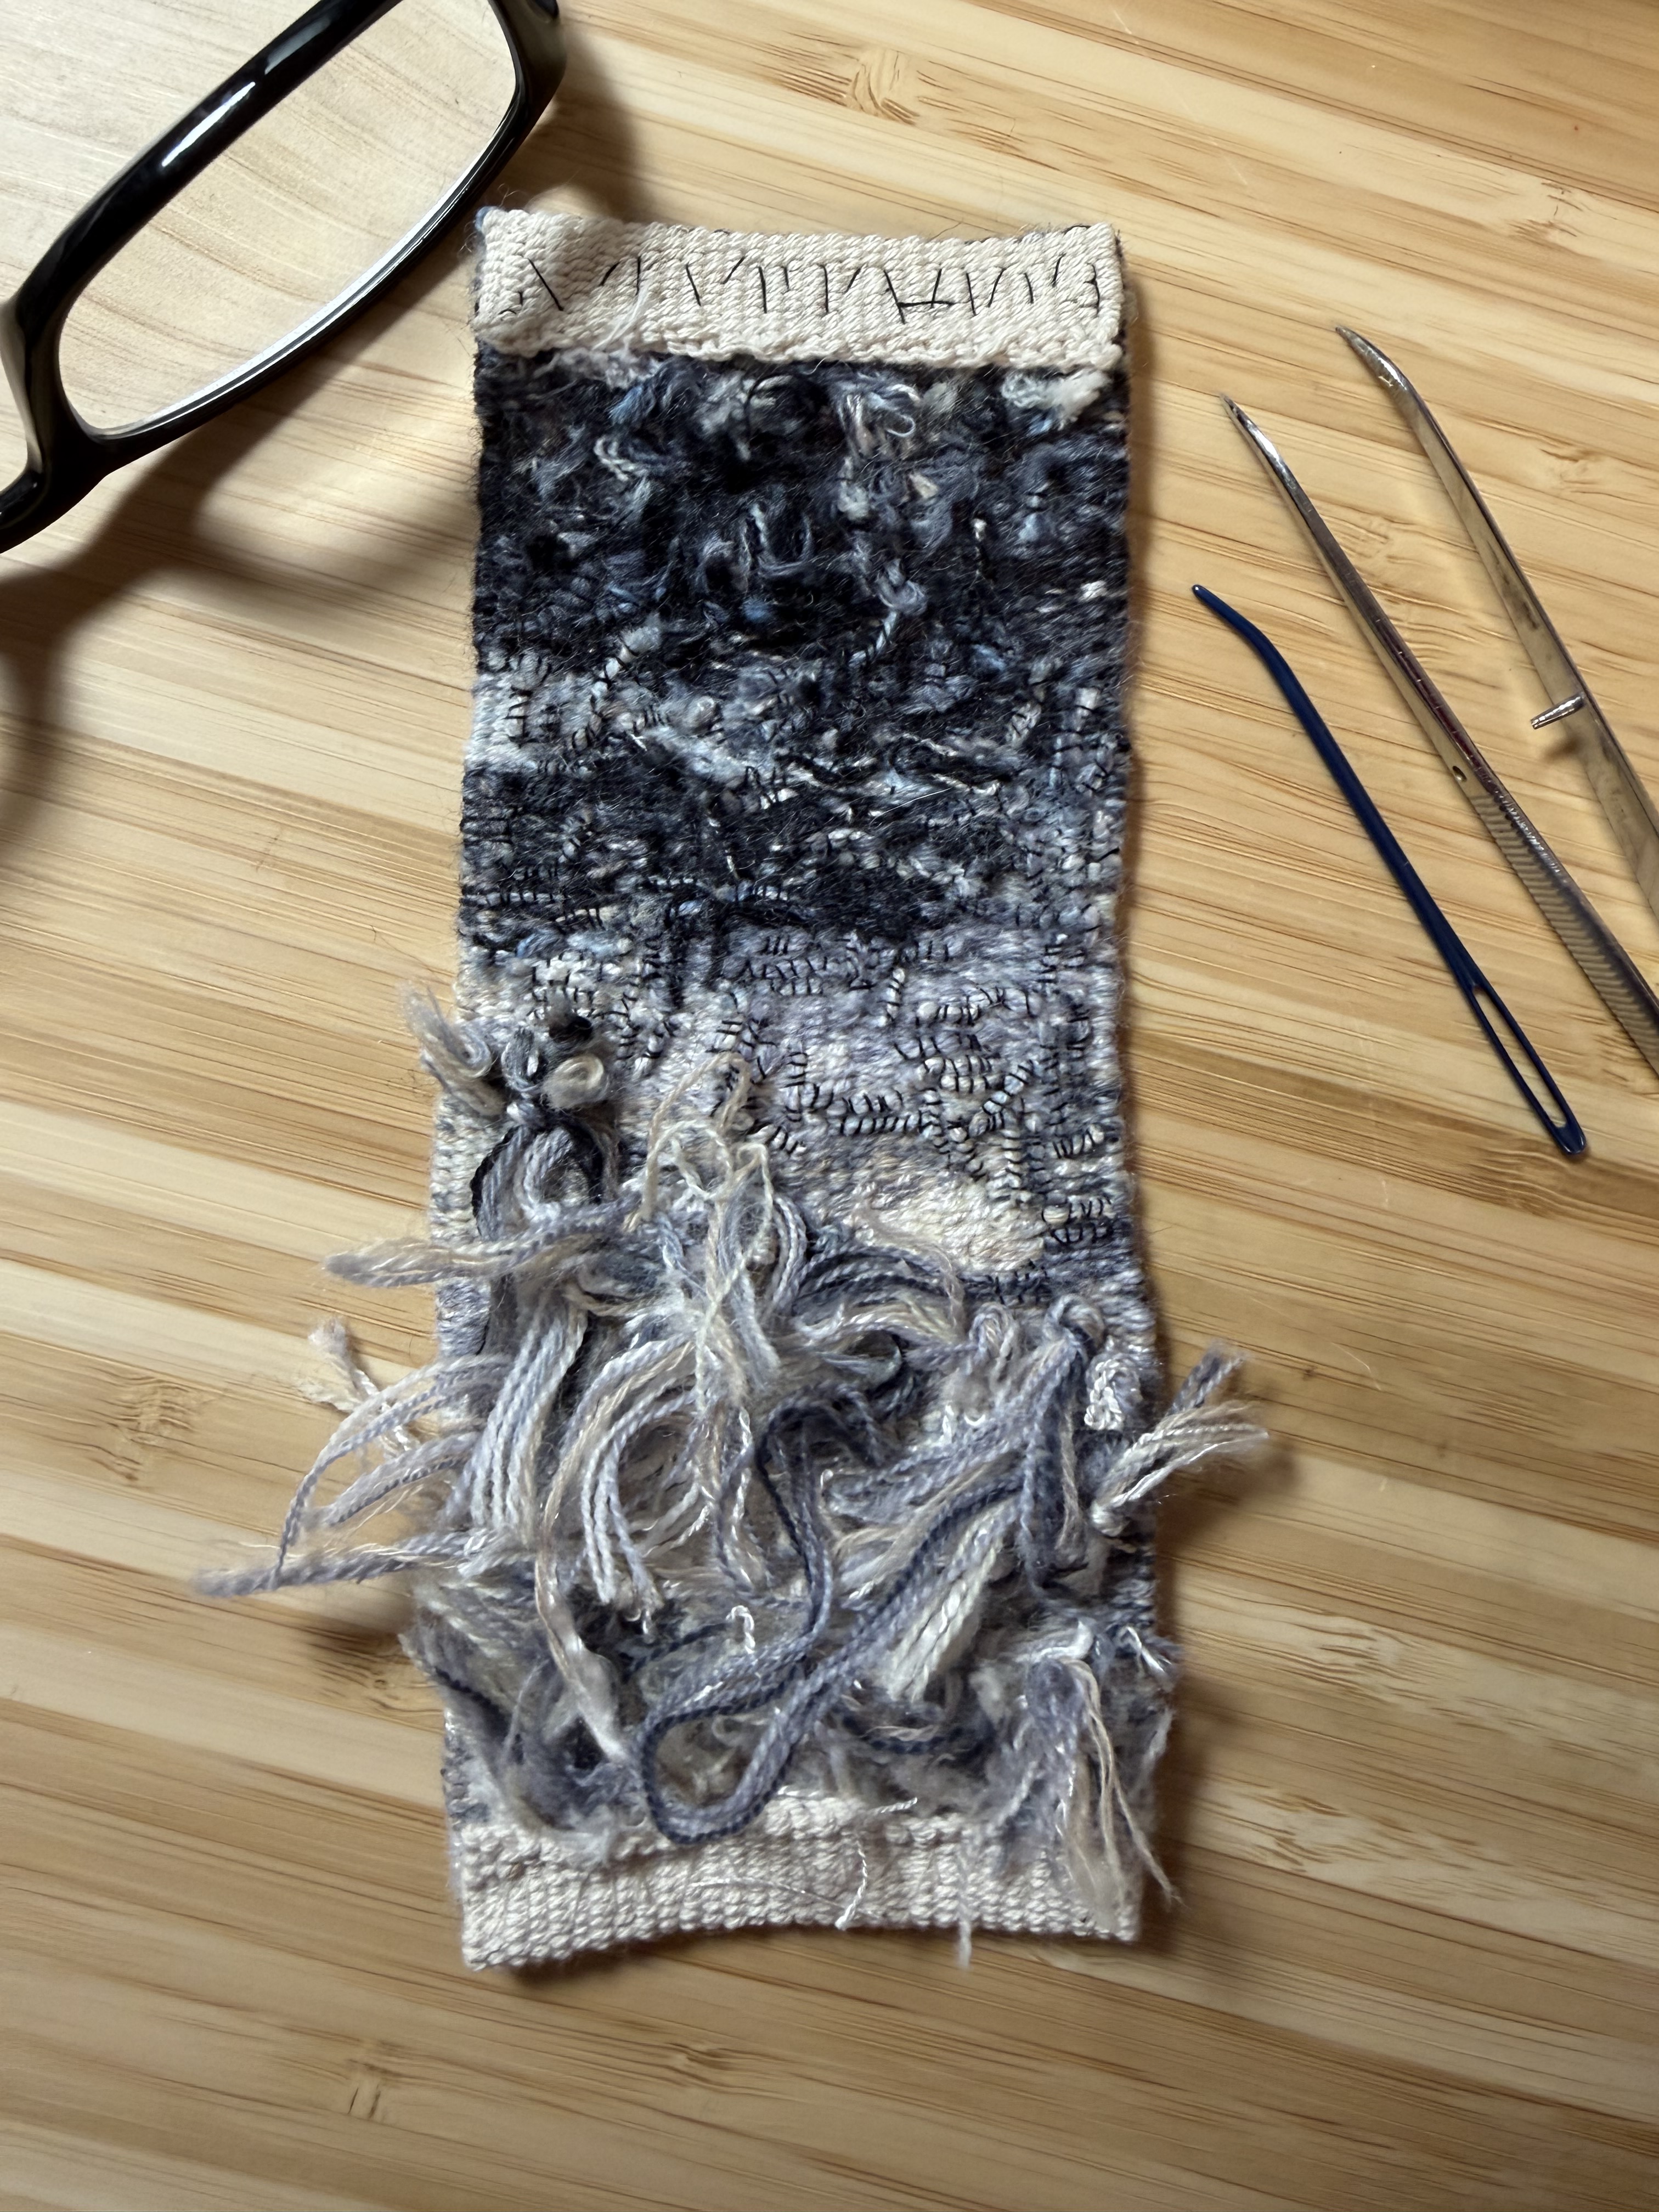
I like the end result enough that I thought of signing it but that seems disrespectful to the person or people who made the obi. Instead I stitched a yatagarasu, the three-legged lucky crow-guide that may be sent by the gods, on the largest patch. Everyone can do with luck and guidance these days.
The blue horse is finished. It had been taking shape in my head for several months while we sold the house and a lot of other things in Canada, packing to move back to the UK. Ever since September 2022, when I found the blue horse in my mother’s house.
My mother was a hoarder and had slowly slipped deeper into dementia over decades. It’s not a good combination. Now she was in hospital, unlikely to leave. I flew to Edmonton to help my brother with the initial clearance of the food and other perishables; five full days of emptying cupboards of decades-old food, filling bags with decades of recycling, sorting waist-high stacks of paper, clothing, stained or disintegrating, into ‘keep’ or ‘dispose’ to wait until he had authority to remove things other than rotting food. I will never forget the smell, the mundane horrors in every room, the repeated shocks as long-forgotten finds brought long-buried memories to the surface. Three bottles of the awful purple liqueur she bought for teenage me, now leaking crystallised sugar into Chinese lacquer cabinets. The Ernestine Tahedl that hung above the couch in St Albert, then on the stairs in the next house. A glass like the one she threw at my stepfather, scotch running down the wall. And in a kitchen drawer, battered but still familiar, the precious blue Dala horse that had lived out of reach on top of the refrigerator in St Albert. I remembered the shape so clearly, the bright colours, the blue. I wanted it so much but at the same time I wanted to possess nothing from that house, nothing to tie me to the present horror. I cleaned the horse and left it.
@@@
I thought about how to make a blue horse. It would be fabric, because that’s what I’ve taught myself to shape. What sort of fabric, how to cut the pattern pieces to make the right shape. While we hunted for a house in the UK, moving from holiday let to holiday let, I concluded it should be some sort of wool and bought a metre of remaindered blue boiled wool coating from a fabric warehouse. It’s not the blue I was looking for, but it was blue enough. I drew the shape I wanted as a side view, then imagined the pieces needed to make it three-dimensional and drew those. I cut the main pieces to start, the body sides and the back, adding a seam allowance as I cut.
The pattern pieces for the horse, drawn on notebook pages and scrap paper.
Sample stitching made clear that a ‘normal’ seam stitched along the figure outline with seam allowances turned inward was far too bulky for this, so I carefully trimmed off the seam allowance and looked for alternative stitches to secure the pieces held edge-to-edge. The one I chose from Pinterest may be a variant of ‘Open Cretan’. I had a small selection of embroidery floss brought for a different project; I chose a slightly variegated blue that mostly matches the fabric. The stitches show; it’s a slightly Frankenstein horse, but it’s honest. And it came alive in my hands as I worked. Not the stolid wooden real horse but a lively softer horse, its head tilted as it looks at something interesting.
Not the right blue, but blue enough.
Dala horses are folk art from Sweden (there are similar horses from other Scandinavian countries). The 20th-century versions are glossy, brightly-coloured with swirling painted decoration in white, green, yellow, red and blue. I tried to replicate the paintwork on mine; it was wrong, too bright, too much a bad copy. I tried some artistic primitive decoration, copper silk spirals; it might work well for another horse, another time but was insufficiently Dala. I thought again. This isn’t a REAL Dala horse, it’s a memory made real. A ghost, of sorts. So I stitched hints of the Dala decoration in shades of blue suitable for a memory. Chain stitch is easy to work on felt and is extremely effective. On the neck of the horse the curves not only flatten the area that is the mane, but make the fabric wave as if it were moving.
My much younger sister sent me a text when she saw one of the progress photos, unembellished, on Facebook. “That looks like the blue horse!” she said, “I found it in the kitchen of mum’s house and brought it home, I remember it in the kitchen when I was little”. She sent me pictures of the battered and worn blue horse, a memory of her childhood as it is of mine. Now there are two blue horses.
I thought perhaps the blue horse should have a rider, but once the rider was shaped (felted merino, no armature) enough to offer up it was clear the horse carries only memories. So now the rider waits for me to think of something else to do.
I have a lot of blue boiled wool left. Something else is bound to want to become real.
This is complicated and far easier to explain in person when I’m pointing at the bits of your wheel in front of you, but I’ll try to cover the main topics, and I’ll suggest some tweaks that I find useful. If you find this an intimidatingly technical read, I assure you it was just as intimidating to write. It requires precision in the descriptions that makes me feel as though I’m pretending to be an engineer.
‘how do I stop my wheel pulling!’ is the most frequent question when I teach this in person, so I’ll start by discussing take-up (the speed/force with which your wheel pulls the yarn through the orifice and onto the bobbin).
‘how do I add more twist faster?’ Once your wheel isn’t snatching the yarn from your hands you have time to consider another important issue: the thinner your yarn, the more twist is needed to make it competent. So, once you’re happy drafting your fine yarn it’s worth setting up your wheel to add lots of twist fast if that’s possible.
Here’s an example of what is possible with a wheel set up to spin fine thread. At Fibre East in 2014 someone asked if I could spin cotton thread for lacemaking. I said I wasn’t sure, never having seen any. I went home, ordered some 185/2, and experimented. The answer is yes, I can (the thread on my bobbin is 2-ply), but I cannot mercerize the thread so it’s too fuzzy and not shiny enough.
Definitions referred to in the text
Fat-core bobbin: a bobbin that is made with a fatter-than-usual central tube connecting the two ends. You can make a fat-core bobbin by half-filling any bobbin evenly with random yarn, then wrapping a piece of paper around the yarn to give a smooth starting surface. Or just hold a strip of card onto the yarn for a couple of rotations. Or buy some foam pipe insulation with a central hole that roughly fits the tube of your bobbin. I like to have a different (smooth) surface in case my fine yarn starts to sink into the previous yarn, plus I can admire the new fine yarn more easily.
Left: standard Majacraft bobbin and delta flyer on left. Right: fat-core lace bobbin and lace flyer.
Lacing or cross-lacinga flyer: taking the yarn (or the leader, to start with) from the bobbin to a hook on one arm of the flyer, then back to a hook on the other arm [repeat as desired] before taking it to the orifice and out into the world. Each additional hook creates friction that reduces the take-up slightly. You can lace any flyer with hooks. If the one set of hooks is on the other side of the flyer arm I have been told you can put the yarn through a hook, take it under the flyer to a hook on the other side, then back again, but I have not tried this myself. Note that lacing will reduce the amount of yarn you can put on the bobbin: don’t fill to the point that the bobbin is rubbing against the laced yarn.
The ratio of a wheel is the number of times the flyer rotates for each rotation of the drive wheel. The higher the ratio, the more rotations of the flyer. The current Ashford Traditional set up as ‘single drive’ (I think that’s scotch tension) has a maximum ratio of 17:1, which means the flyer rotates 17 times for each rotation of the drive wheel. This is faster than the maximum possible for a normal Lendrum with a top ratio of 10:1. If that is far too slow, then just swap the standard Lendrum flyer for the Lendrum Very Fast Flyer with tiny flyer whorls for a maximum ratio of 44:1 (44 rotations of the flyer for each rotation of the drive wheel).
Take-up: the force with which yarn is pulled onto the bobbin. The flyer of a spinning wheel winds yarn onto the bobbin because the flyer and the bobbin rotate at different speeds. The greater the difference between the bobbin speed of rotation and the flyer speed of rotation, the harder/stronger/faster the take-up will be. The harder/faster the take-up, the faster the yarn is pulled onto the bobbin. Which means less time for you to draft a fine, even yarn, and less time for twist to be added to it before it goes onto the bobbin (the finer the yarn, the more twist is needed to make it competent). All of which means that if you are trying to spin finer yarns, especially weaving yarns or threads, you need to understand how to make sure you can keep the yarn off the bobbin long enough to add enough twist to make that yarn competent.
‘How do I stop my wheel pulling so hard!’
Spinning wheels may be classified according to the way they transfer rotation from the drive wheel to the flyer and the bobbin (in other words, which bits are connected by the drive band). The different ways of transferring rotation mean different ways to control take-up (see the definition above). Here are some suggestions for ways to reduce take-up on different wheels.
On a double drive wheel (not shown in the diagram, I ran out of time!) the drive band forms a figure-of-eight folded back on itself to become two loops. One of those loops goes around the flyer whorl to drive the flyer, the other goes around the bobbin, and then both loops go around the drive wheel. The main control of speed and take-up (the power with which the yarn is pulled onto the bobbin) is slippage, the loss of power caused by the drive band sliding around the whorls instead of making the whorls spin. Thus you can reduce take-up by loosening the drive band (usually by tilting or sliding the mother-of-all toward the drive wheel) to increase slippage. If you want super-fine control consider using a thin, hard-spun drive band such as fine crochet cotton. It is sometimes said that there is a relationship between drive band thickness and the thickness of the yarn you are spinning: thinner and/or harder drive bands have a smaller surface area in contact with the flyer whorl, so finer adjustments may be possible.
Scotch tension wheels the drive band connects the drive wheel to the flyer The flyer begins to rotate and the rotating shaft of the flyer drags the bobbin with it, meaning a more gentle start. As the bobbin fills it gets heavier, which means it isn’t slowed so much by the brake band. You might need to tighten the brake band a tiny bit to maintain take-up as the bobbin fills. To reduce take-up start by loosening the brake band (turn the appropriate knob). You can also lace the flyer and/or use a fat-core bobbin, but Scotch tension offers yet another option: you can change your brake band. A finer/thinner brake band offers finer control because it has a smaller surface applying friction. I use a fine crochet or tatting cotton for my brake bands. I recommend trying this particularly if you are currently using a monofilament (clear plastic fishing line) brake band. You don’t have to cut or otherwise destroy your existing band, just untie it (even if it’s fiddly) and try something thinner. You can always put the old one back. Another issue I’ve seen on some wheels is that the spring fitted on the brake band can be too stiff to ‘even out’ tiny differences in take-up. If you’re having no trouble drafting a fine competent yarn but it sometimes breaks for no obvious reason, consider this possibility. I have made improvements by swapping out both Ashford and Majacraft factory springs for softer springs; rubber bands work very well but don’t last long, hair elastics last longer (you can cut and knot long ones to make them fit). I’m currently trialling the spring from a cheap pen on the Majacraft and so far I like it.
My Majacraft Rose showing brake band of fine crochet cotton with a spring from ballpoint pen.
Irish tension or bobbin-led wheels the drive band connects the drive wheel to the bobbin Wheels such as the Louet S10 transfer rotation directly from the drive wheel to the bobbin. This means the bobbin is the first thing that rotates (hence the name ‘bobbin-led’) before friction between the bobbin and the shaft of the flyer basically drags the flyer into rotating. So on these wheels the bobbin moves first and it moves fastest, which means it starts with a strong ‘tug’ on the yarn you are spinning. They were designed to spin flax which has a long, strong fibre; wools and cottons have shorter, weaker fibres so fine yarns spun from these are more easily broken by that initial tug. To reduce take-up and the strength of that initial tug, after loosening the brake with the screw (you can have it so loose that the brake is just sitting loose on the orifice) try any or all of the following: make sure everything is lubricated so the flyer starts moving as quickly as possible; lace the flyer; use a fat-core bobbin.
‘how do I add more twist faster?’
Not all wheels allow you to do this. On some wheels you will have to sit and hold the yarn and treadle until the yarn has enough twist for your needs and you can allow it flow onto the bobbin.
Note: ALWAYS check the amount of twist by examining the yarn on the bobbin. Frictional contact with everything on the route from your hands to the bobbin – the edge of the orifice, the hooks – holds twist back, so there’s more twist in the make between your hands and the orifice than there is in the yarn on the bobbin. You can and should check this for yourself: pull a loop off the bobbin and allow it to ply back on itself, then allow the yarn outside the orifice to do the same thing. The loop outside the orifice will have a slightly tighter twist. So you need to treadle until you like the yarn coming from your hands, then treadle a little bit more to ensure the yarn on the bobbin has the same twist.
Some wheels allow you to alter the speed at which the bobbin and flyer rotate in relation to the drive wheel (the wheel’s ratio), and this allows you to add more twist faster with the same treadling speed*. For example, if the whorl on your flyer has more than one groove, putting the drive band around the largest whorl means the flyer will rotate fewer times per rotation of the drive wheel than if you put the drive band around the smallest whorl. I can’t think of a better way to say that in words. But if it doesn’t make sense, mark a distance on your (flat) floor; 18″ will suffice. Make a mark on a can of tomatoes, then count the number of times that mark comes around as you roll the can the 18″. Now mark and roll something smaller (a pill bottle, or a pencil) the same distance and count in the same way. The smaller thing rotated more times over the same distance because it has a smaller circumference (my primary school teacher would be so proud…). Which is why using a smaller whorl means your flyer and bobbin rotate more times (inserting more twist) per rotation of the drive wheel. ‘Large drives small’ for maximum rotation.
Some wheels also have whorls on the drive wheel, which allows more variation in the ratio. Using the largest whorl on the drive wheel to drive the smallest whorl on the flyer means the flyer is rotating as many times as possible for each rotation of the drive wheel. On Majacraft wheels where the flyer whorl is easily accessible, sticking out above the drive wheel, it is easy to use different flyer whorls to insert more or less twist, or even to add a third whorl between drive wheel and flyer to further accelerate rotation.
*Note ‘same treadling speed’, not same effort. Nothing is free: the extra rotation/twist requires a little more treadling effort to do the work (of rotating the flyer and bobbin faster).
The photo below shows the back of my Majacraft Rose, with the drive band coming from the largest whorl on the drive wheel to the smallest whorl of the high-speed flyer whorl. This is the ‘accelerator’ or ‘high speed’ head for the Rose; the large whorl to the right can be used to further increase the rotational speed of the flyer and bobbin: run the drive band to the small whorl of the accelerator bobbin to make it rotate as fast as possible, then run the accelerator band (not shown in this photo) from the large whorl of the accelerator to the small flyer (you might notice that to do this I have to reverse the position of the flyer whorl). The grease pencil notations are for calculation of ratios in various configurations.
Here’s a reward for reading all the way to the end. Scotland! looking north from ‘The Devil’s Staircase’ (not as bad as it sounds, Conic Hill was far worse) on the West Highland Way.
I am always curious about where and how my creative friends find inspiration for their projects. I listen with awe as someone describes how a major event in their life became an artwork, how specific images and experiences became fabric and stitches that speak without words. I have thoughts I hope to share one day, when I find the images and textures and my mind, hands and eyes have learned more about how to make things that speak. I understand now that everything I make is working to that end. And I am gaining courage with my understanding: if I see something I love, some image or idea, I am allowed to try to make it my own. So, a story.
in which I encounter unexpected delights in Copenhagen In 2016 we went to Denmark, mostly to see the Vikingskeetmuseum in Roskilde (which is superb), but also to pay my respects to Egtved Girl and other Bronze Age displays in the Danish National Museum in Copenhagen (and eat wonderful food at Torvehallerne). I led my poor husband back and forth through the museum rooms, pursuing trains of thought and interest, returning several times to the display describing ‘The journey of the sun across the sky‘ based on the motifs found on Bronze Age razors and rock carvings throughout Scandinavia. I had vague memories of reading about some of this, somewhere, but seeing the items themselves was gripping. Something about this story, those motifs, caught my imagination, spoke to me. I took photos to be sure I would remember the images but in truth it wasn’t necessary: I have not forgotten the story. I took other photos, too.
This is ‘Skyrdstrup Woman’, who lived and died c.3300 years ago in southern Jutland. Less well-known but more evocative for me than ‘Egtved Girl’. Any of these people might be my ancestors.
The journey of the sun across the sky As summarised on the text of the museum display
At sunrise a [Sun] Fish pulls the Sun up over the horizon from the Night Ship to the Morning Ship. At noon the Sun Horse takes the Sun from the Morning Ship. In the afternoon the Sun Horse delivers the Sun to the Afternoon Ship. As the sun sinks the Serpent takes the Sun and, once it is extinguished, delivers it to the Night Ship.
The captions on this image of the museum display are illegible at this resolution so I’ve summarised them.
Isn’t it a wonderful story? I think of people living by and on the ocean, seeing fish glittering briefly as they catch the light, turning in the water. The waves glitter on the eastern horizon as the sun approaches (see the line of wave symbols on the horizon behind the morning ship as the fish pulls the sun up, up to the surface). And then the sun sinks, dimming (trapped in the coils of a serpent) down into the western ocean to travel through the night and rise again. But where did this story come from? Is this truly a story from the Bronze Age? We don’t know. We can’t know. Since I first read it this has felt to me like a charming storyteller’s tale, a story invented to connect the motifs rather than a story summarised by the motifs. To me this is part of its charm, this proof that humans seek patterns, find stories everywhere.
The images come from razors. Similar (when new) to the replicas shown below, from a website that no longer exists (bronsereplika.no).
The story seems to come from Ships on Bronzes: A Study in Bronze Age Religion and Iconography by Flemming Caul, published in 1998. I can’t find a copy of the book, but the one review I have found doesn’t seem completely convinced by the story. In fact the reviewer points out some rather large flaws. But the motifs are real, the story could be real (I am smiling fondly as I type that) and research into the possibilities continues. I particularly liked Warmenbol’s paper pointing out that in one view (imagine the broad razors in that image turned 180°, broad head to the left and tail curling under the narrowing body to the right) the razors look like a bit like sperm whales, so that the ‘broken ship’ motif could in fact be reference to the razor as sperm whale.
The tale of the razors: how the Bronze Age came to Scandinavia The journey of the sun may be nothing more than a charming story, but the razors are real. They tell us an almost equally remarkable story. Looking idly for more information about Scandinavian Sun Cycle/Sun Cult imagery I found an article about a ‘golden calendar’, a reinterpretation of the designs on a golden bowl found in a Swedish bog in 1847, which in pursuit of documented links between Sumer, Babylon and Scandinavia included mention of the inscription on an obelisk in Nineveh “In the search for cultural trading links to Europe and Scandinavia, it seems significant that, on an obelisk in Nineveh dated at about 1850 BC … the following text is found… “on the sea of changing winds my merchants fish pears, and on the sea where the North Star culminates they fish yellow amber”. The first sea must refer to the Gulf of Persia, and the second is likely to refer to the Baltic (because only there is the North Star high to the north, and the shores full of yellow amber…)” Really? The bronze for the razors came from the Mediterranean? Yes. “The Bronze Age of Scandinavia (1750-500 BC) is characterized by the sudden appearance of bronze objects in Scandinavia, the sudden mass appearance of amber in Mycenaean graves, and the beginning of bedrock carvings of huge ships. We take this to indicate that people from the east Mediterranean arrived to Sweden on big ships over the Atlantic, carrying bronze objects from the south, which they traded for amber occurring in SE Sweden in the Ravlunda-Vitemölla–Kivik area.“
And the Sun Cult is thought to have travelled north with the bronze.
I knew the Vikings traded from Scandinavia to the Mediterranean, but this is far earlier. And even more remarkable because bronze is an alloy of copper and tin: there were Bronze Age copper mines in the Mediterranean, in Cyprus, Turkey and possibly Crete, but the tin often came from Cornwall in the southwestern UK. Tin from Cornwall alloyed with copper on Cyprus, then shipped north to Sweden. Where great ships are carved into the granite, and the jewellery found in graves has the same quadruple spiral ornamentation as the gravegoods in Mycenaean Greece.
Figure 2 from Mörner and Lind’s paper.
I wonder if you share the sense of wonder I feel when I try to imagine some aspects of the lives of these people. We fly across oceans, we travel across the land at speeds unimaginable to them. And yet their work speaks to us, we try to understand them. We invent and reinvent and tell their stories to ourselves, all of us understanding the importance of the sun.
My first sun horse, gold silk on Japanese cotton on a square for a quilt. There will be many more.
Independent UK Psychiatrist. Seeking to restore confidence in UK Mental Health practice, which the RCPsych, GMC and others have allowed to decline. Still providing culturally informed mental health opinion, advice, and a few new facts. Based near London, UK. Main qualifications: BA MBBS MA MRCPsych. New Blog posts from March 2018, older posts 2010-12.