HTTP/2 301
server: nginx
date: Tue, 27 Jan 2026 00:34:38 GMT
content-type: text/html; charset=utf-8
location: https://ajeanneinthekitchen.com/
vary: Cookie
x-ac: 2.bom _dca MISS
alt-svc: h3=":443"; ma=86400
strict-transport-security: max-age=31536000
server-timing: a8c-cdn, dc;desc=bom, cache;desc=MISS;dur=242.0
HTTP/1.1 301 Moved Permanently
Server: nginx
Date: Tue, 27 Jan 2026 00:34:38 GMT
Content-Type: text/html
Content-Length: 162
Connection: keep-alive
Location: https://ajeanneinthekitchen.com/
Alt-Svc: h3=":443"; ma=86400
Server-Timing: a8c-cdn, dc;desc=bom, cache;desc=BYPASS;dur=0.0
HTTP/2 200
server: nginx
date: Tue, 27 Jan 2026 00:34:39 GMT
content-type: text/html; charset=UTF-8
strict-transport-security: max-age=31536000
vary: Accept-Encoding
x-hacker: Want root? Visit join.a8c.com/hacker and mention this header.
host-header: WordPress.com
link: ; rel="https://api.w.org/"
vary: accept, content-type, cookie
link: ; rel=shortlink
content-encoding: gzip
x-ac: 2.bom _dca MISS
alt-svc: h3=":443"; ma=86400
server-timing: a8c-cdn, dc;desc=bom, cache;desc=MISS;dur=583.0
A Jeanne in the Kitchen – I have created this site to help people have fun in the kitchen. I write about enjoying life both in and out of my kitchen. Life is short! Make the most of it and enjoy!
I have created this site to help people have fun in the kitchen. I write about enjoying life both in and out of my kitchen. Life is short! Make the most of it and enjoy!
I feel incredibly honored. I was just interviewed by Steph Avignon at Influential Women and will be featured in their upcoming promotions, magazine and podcasts. Influential Women is a professional media and editorial platform featuring profiles, interviews, and stories that highlight women’s leadership across industries, including our official podcast and magazine. They Believe In The Power Of Women’s Voices at Influential Women. https://influentialwomen.com/
I will definitely keep you posted on when I will be featured, and all the other details, but I literally just got off the phone from my phone interview. I don’t feel like I am an influential woman, but apparently someone at Influential Women headquarters feels differently. I just do what I do and don’t really give it much thought. I’m just me. 🙂 Maybe I am actually influencing people after all. Who knew? 🙂
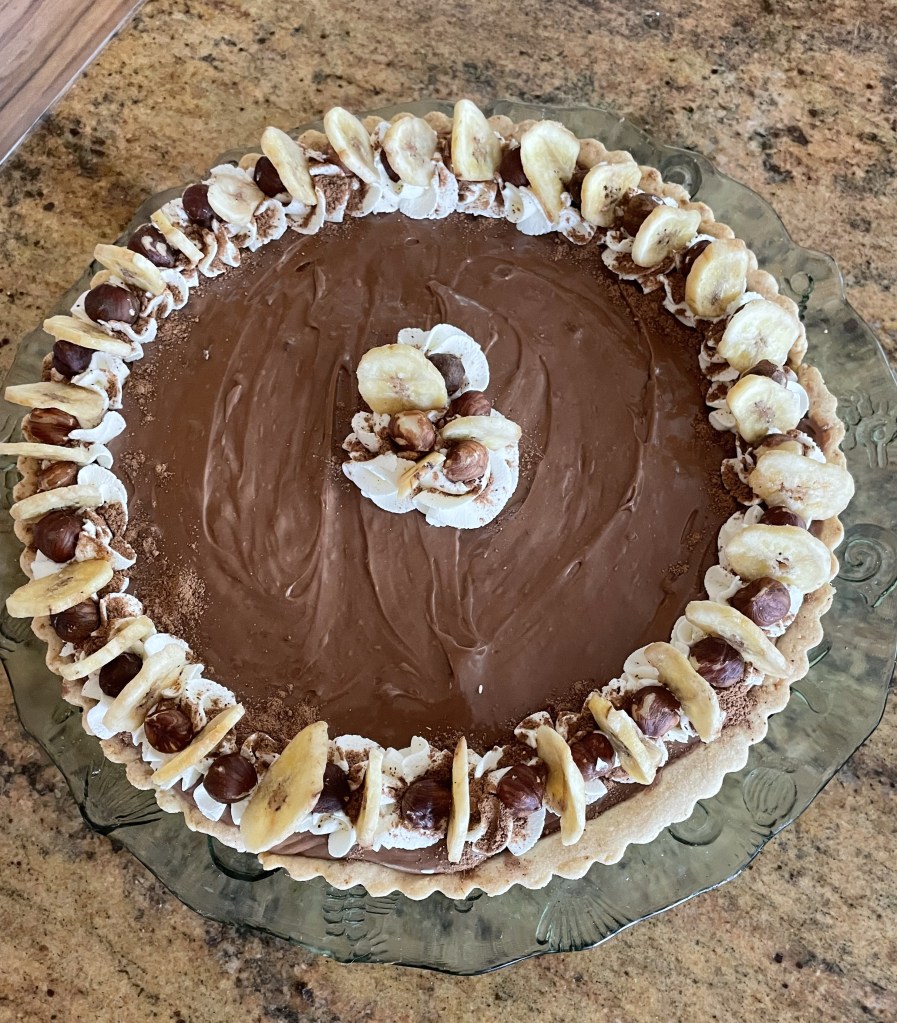
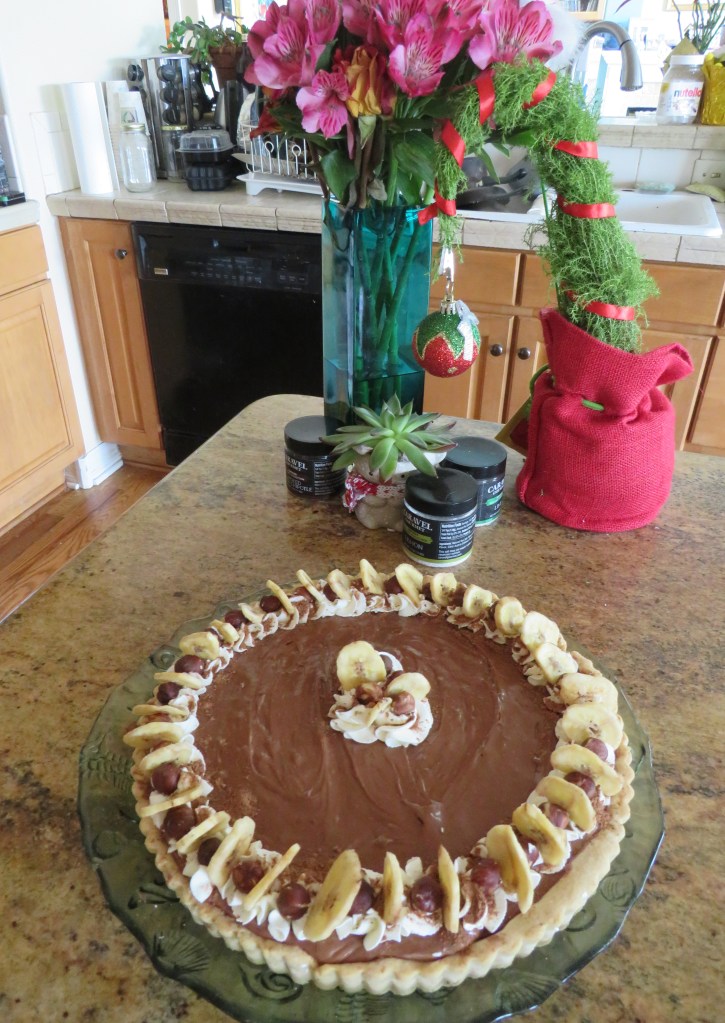
Last night, Larry and I attended a memorial for an old friend of ours. The reason for the gathering was indeed sad, but it was good to reconnect with our old friends from the Denver Museum of Nature and Science, where we all worked for together for many years. The event was a potluck, which I have to admit, I love. I brought some of our wine that we made, a Nutella banana tart and some Asian pork wraps. Today I am going to focus on the Nutella banana tart though.
Nutella Banana Tart
Nutella and bananas is a great flavor combination. Each one highlights the other. This tart was so easy to make, yet it received rave reviews from everyone. It just goes to show things to have to be fancy to be good. 🙂 It only takes a few simple, everyday ingredients too.
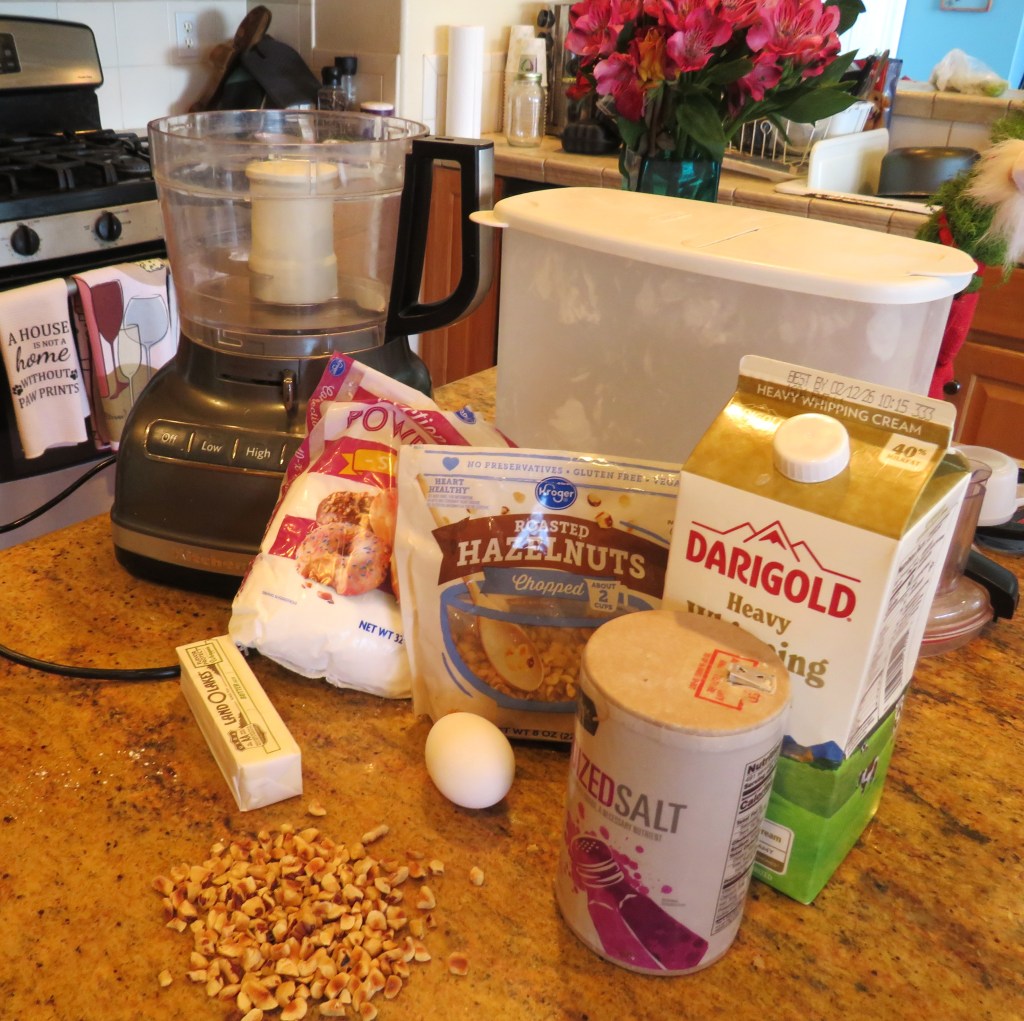
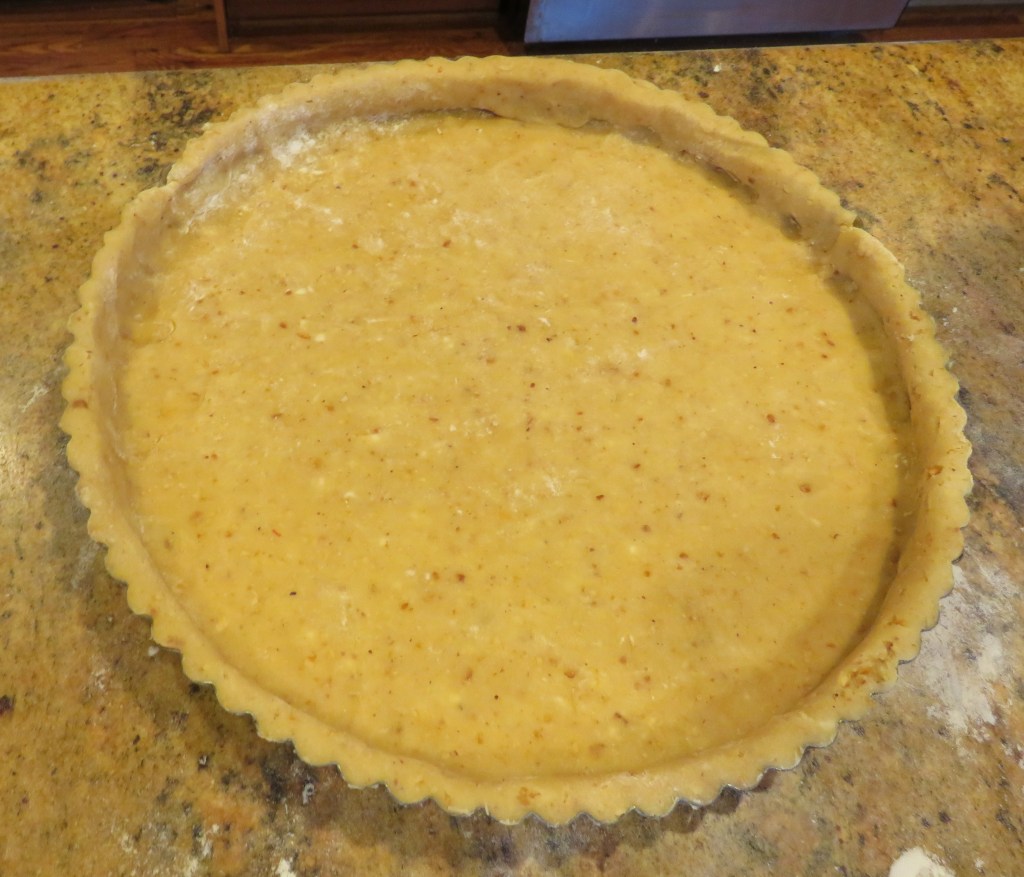
I made the dough first and let it set in the refrigerator for about an hour before rolling it out and baking it. The dough was a simple pate sucre, or sugar dough, with ground hazelnuts.
The Dough
1 1/2 cups flour
6 TBSP cold butter, cubed
3/4 cup powdered sugar
dash of salt
3/4 cup ground hazelnuts
1 egg
5-6 TBSP heavy whipping cream
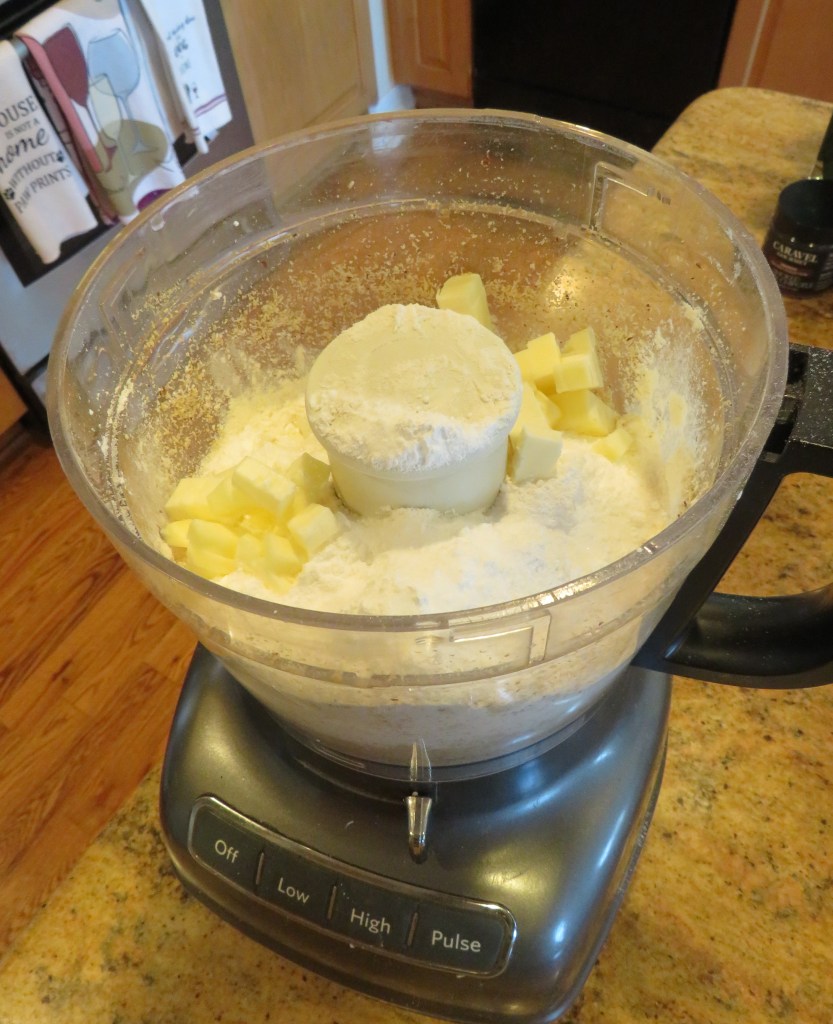
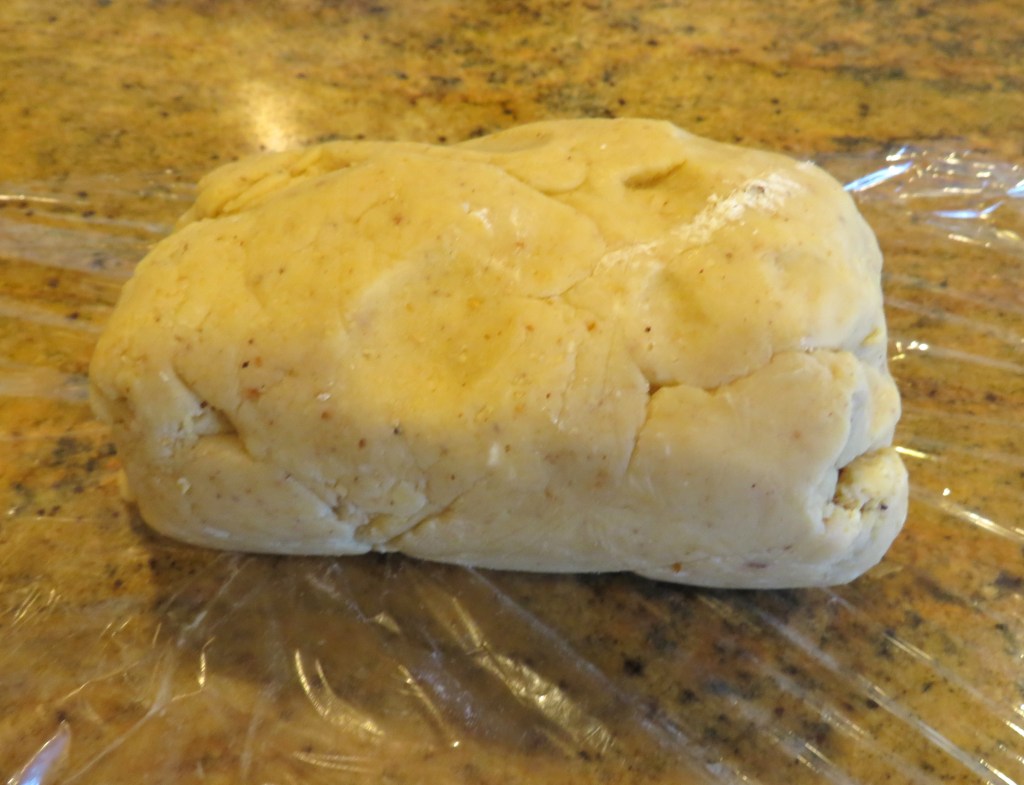
Grind the hazelnuts first, then add the flour, butter, salt and powdered sugar to the food processor and process until it is all blended together. Add the egg and cream and process again until it forms into a dough ball. Wrap in plastic wrap and let refrigerate for at least 30 minutes before using.
When ready to bake, preheat the oven to 350* F or 180*C. Roll the dough out onto a lightly floured surface. You want the dough to be no more than 1/4 inch in thickness. Roll it to the size of the pan you want to fill, then firmly press into the pan. I was using a large fluted tart pan.
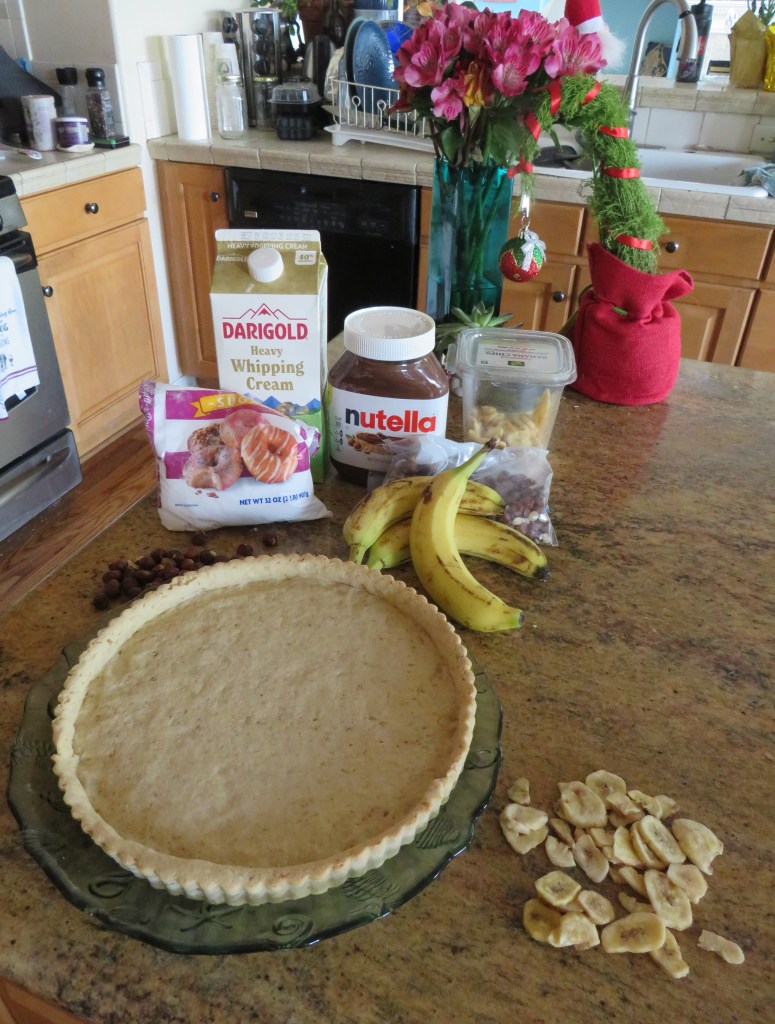
Bake for about 40 minutes or until firm and lightly golden brown. Once it is baked, let it cool completely before filling.
The Filling
3-4 ripe bananas, sliced thin
1 -1 1/2 cups heavy whipping cream
1/2 cup powdered sugar
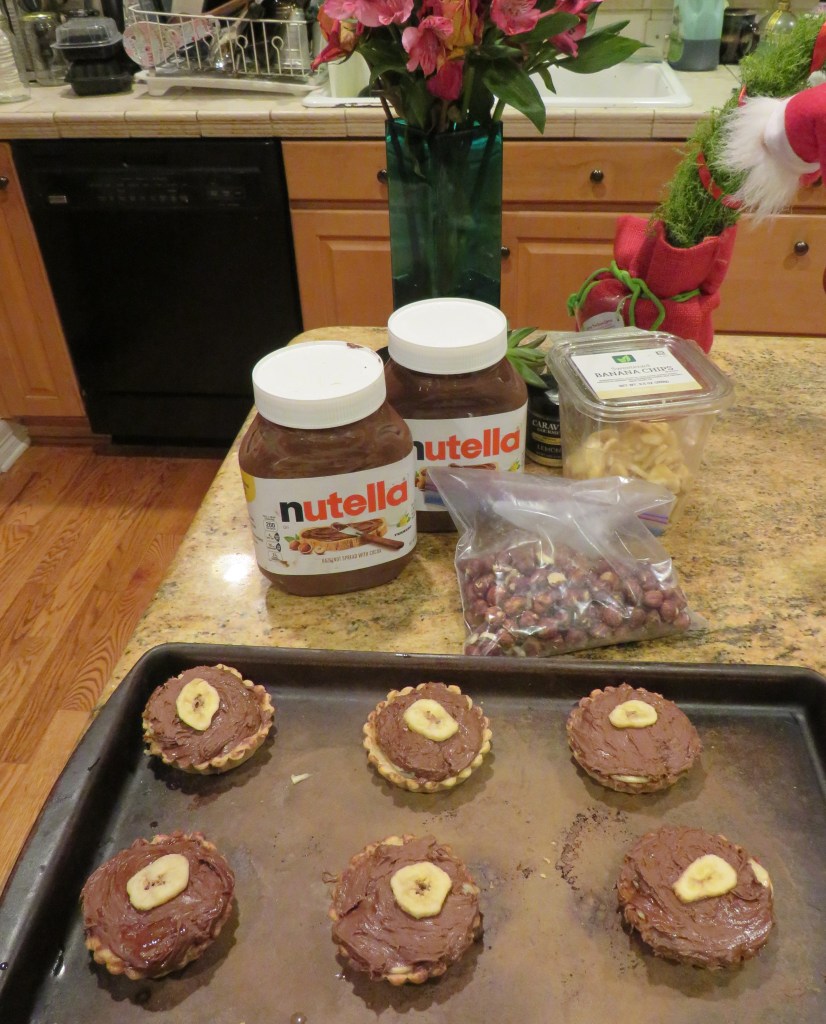
1 cup Nutella hazelnut spread
roasted hazelnuts for topping
dried banana chips for topping
cocoa powder for topping, optional
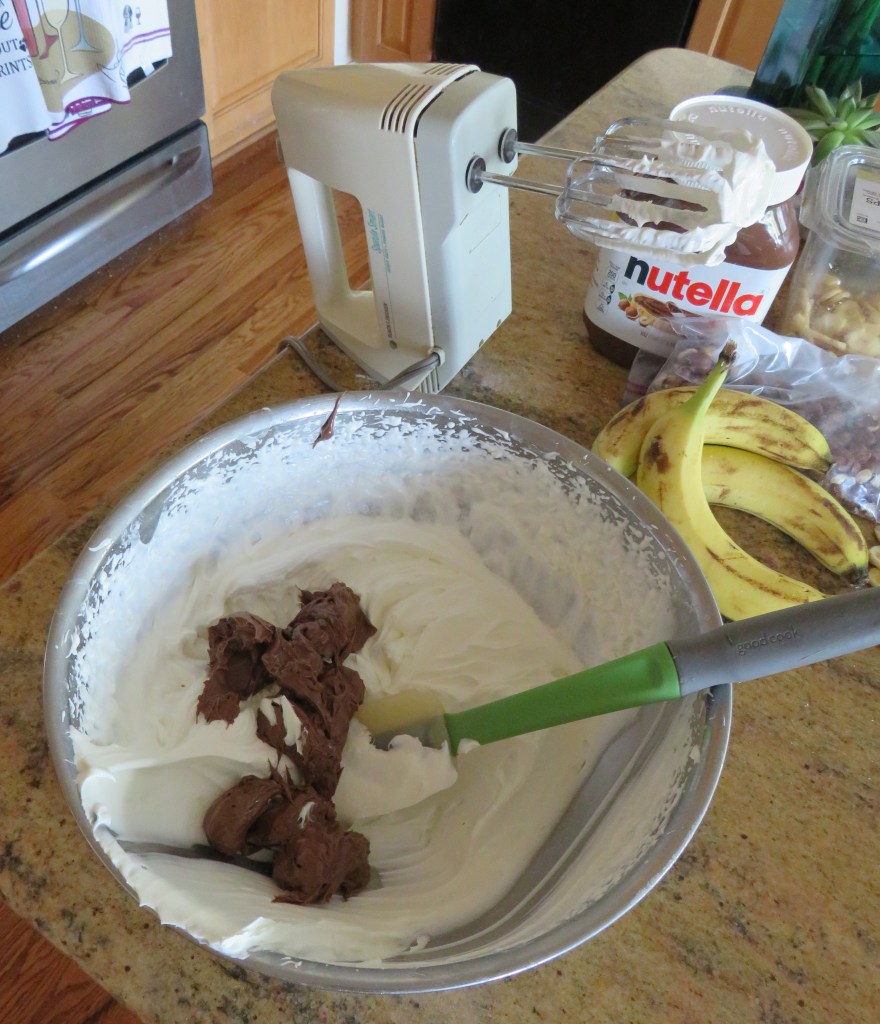
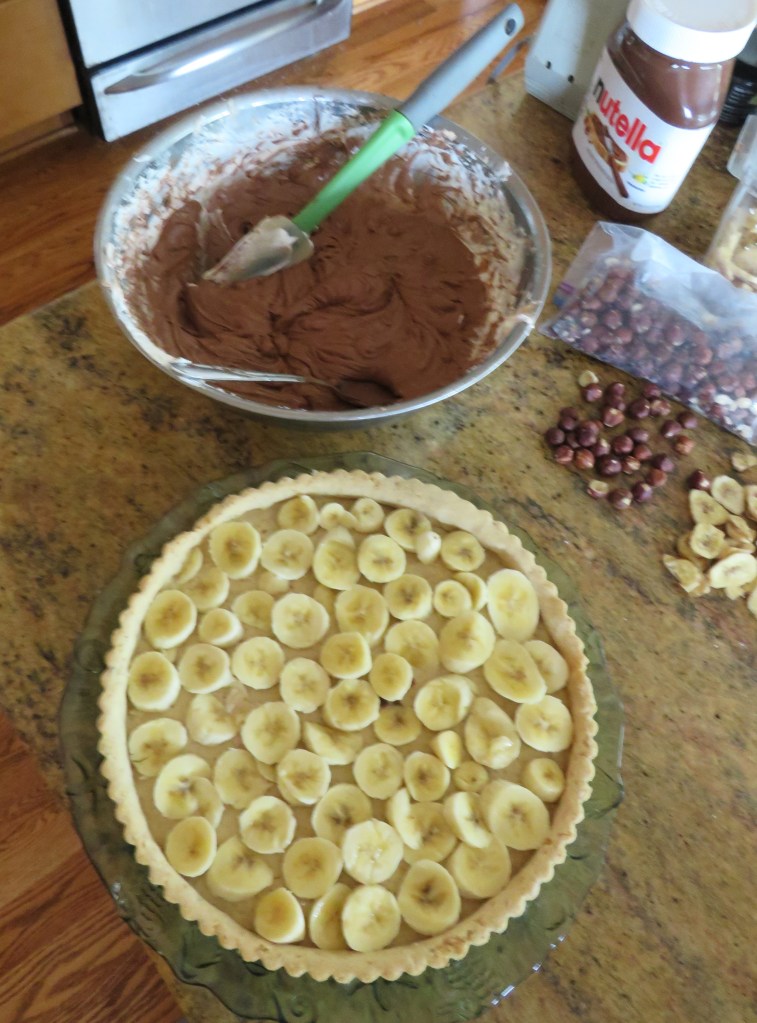
Make the whipped cream first, getting it to medium stiff peaks. Remove about 1 cup and set aside. Add the Nutella to the larger portion and mix together thoroughly.
Fill the bottom of the pastry tart with the sliced bananas, making sure to cover the whole bottom.
Evenly spread the Nutella cream over the bananas. Whip the remaining whipped cream to stiff peaks, then pipe it in a decorative design then add the roasted whole hazelnuts and banana chips. Sprinkle a little cocoa powder over the piped whipped cream too if you like, to add a little extra pizzazz. Cover and refrigerate until ready to serve.
I made enough dough to make some small tartlets for Larry and I to enjoy as well, though these weren’t nearly as fancy. I made them just for us. These weren’t meant to impress anyone else. 🙂 I made these first, and was kind of experimenting. I did not add the whipped cream to this version, but we decided it is much better with the Nutella cream rather than just the plain Nutella by itself. The Nutella cream is also much easier to work with too.
This is a simple, and simply elegant dessert. It was a definite crowd pleaser. Everyone raved about it, and you will too.
Have a great day and make everyday great. Life is what you make it so make it great. May 2026 be filled with happiness, good health and prosperity for all. ‘Til next time.
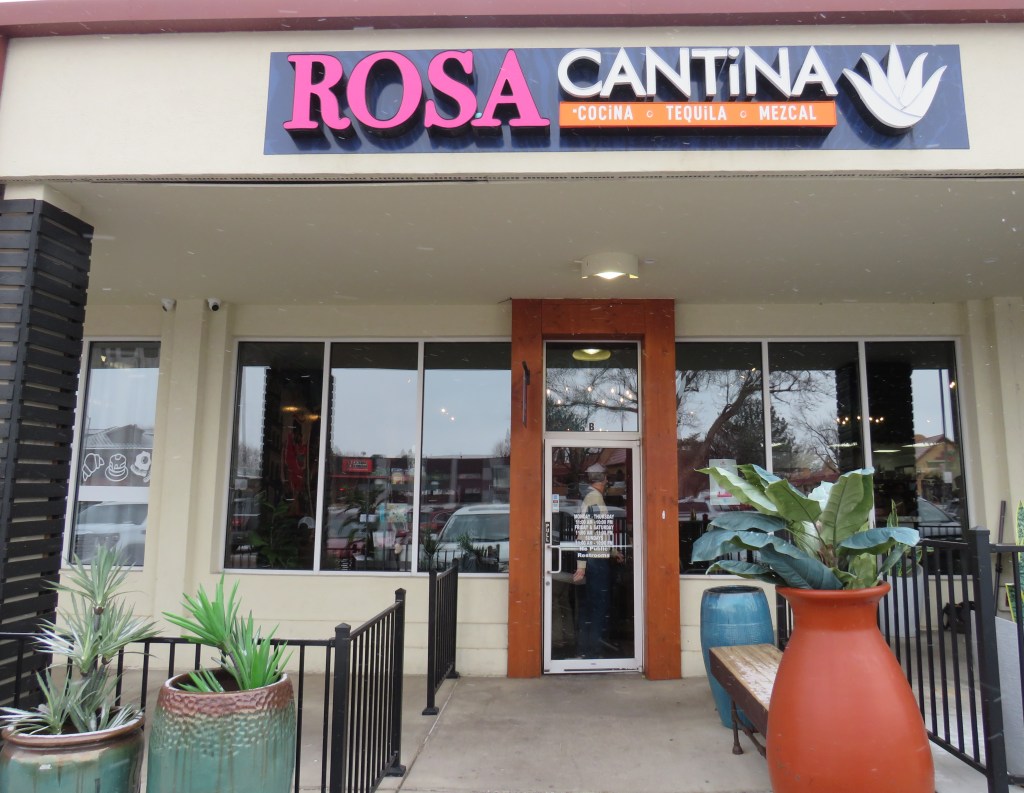
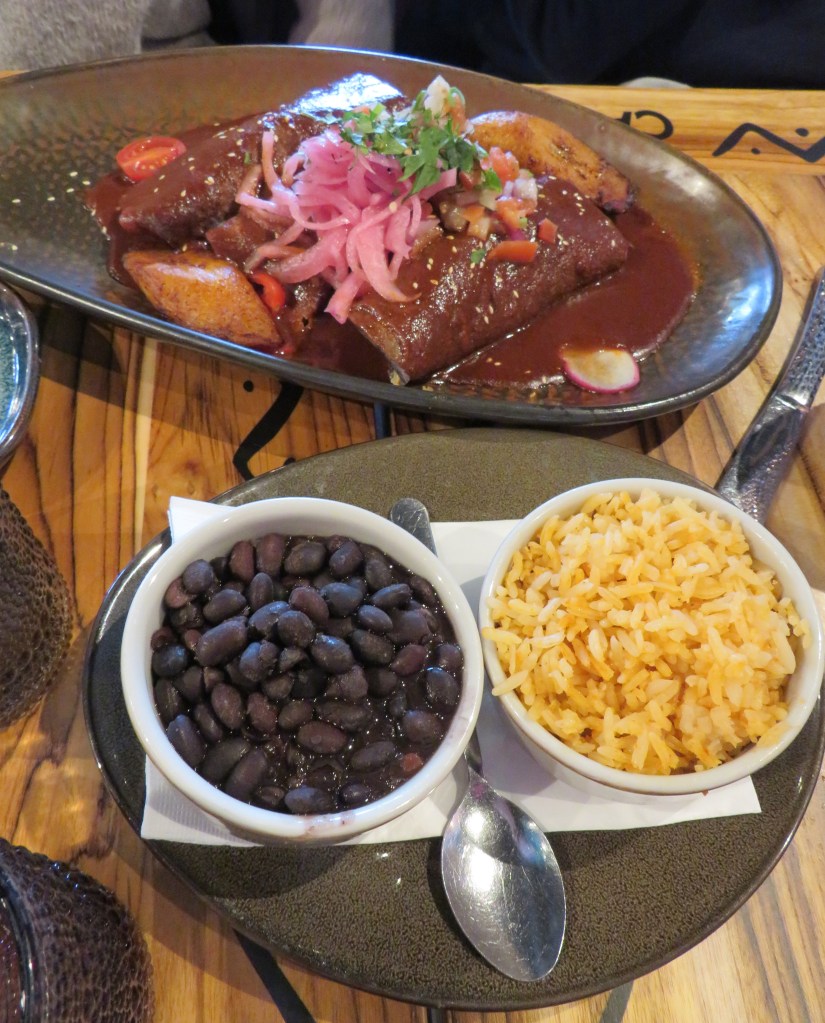
After our fun butter flights at Bella La CremaBella La Crema, it was time for a real meal, although I would have no problem making a meal out of butter. 🙂 While still in Longmont, we drove further down the same street we were on, heading towards a new restaurant (to us), Rosa Cantina. A few friends of Janet and Bob had recommended and referred us to Rosa Cantina.
As soon as we walked in the doors, we knew we were in for a very good meal. The place was packed and was really hoppin”, on a Friday afternoon too.
We started off with some margaritas. Larry was driving and it was an extremely cold, snowy day, so NO margaritas for him. But Janet, Bob and I all enjoyed a margarita. We all ordered something different too. Bob ordered 50/50, Janet ordered a hibiscus margarita and I ordered a prickly pear margarita. All were very good, but we decided Janet’s was the best.
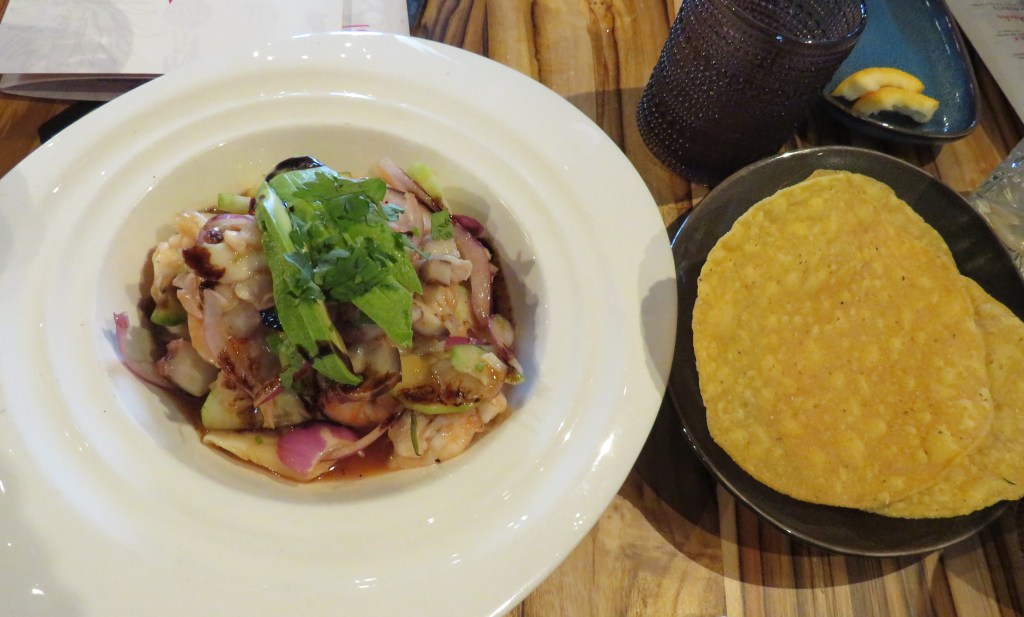
Larry and I love ceviche and eat it quite often. The menu offered a few ceviche options, and we decided on one with fish, shrimp and octopus. Bob, Larry and I all enjoyed it a lot. It was delicious, very fresh and full of flavors that just popped out!
In between our ceviche and our main meal, we were lucky enough to meet and talk to one of the owners, Edgar Ruiz. Edgar told us all about the family history of Rosa Cantina.
Rosa Cantina is a family owned and operated business. All the recipes are family recipes passed down through the generations. Almost all the employees are part of the Ruiz family too, and they all take great pride in what they do. !La comida estuvo deliciosa! We all sampled everything we ordered, and everything was delicious, fresh and very artfully presented. Unbeknownst to us when we ordered, but we all ordered Ruiz family special recipes.
Bob and Janet split an order of chicken enchiladas in a red mole sauce, that was one of the Ruiz uncles’ favorite.
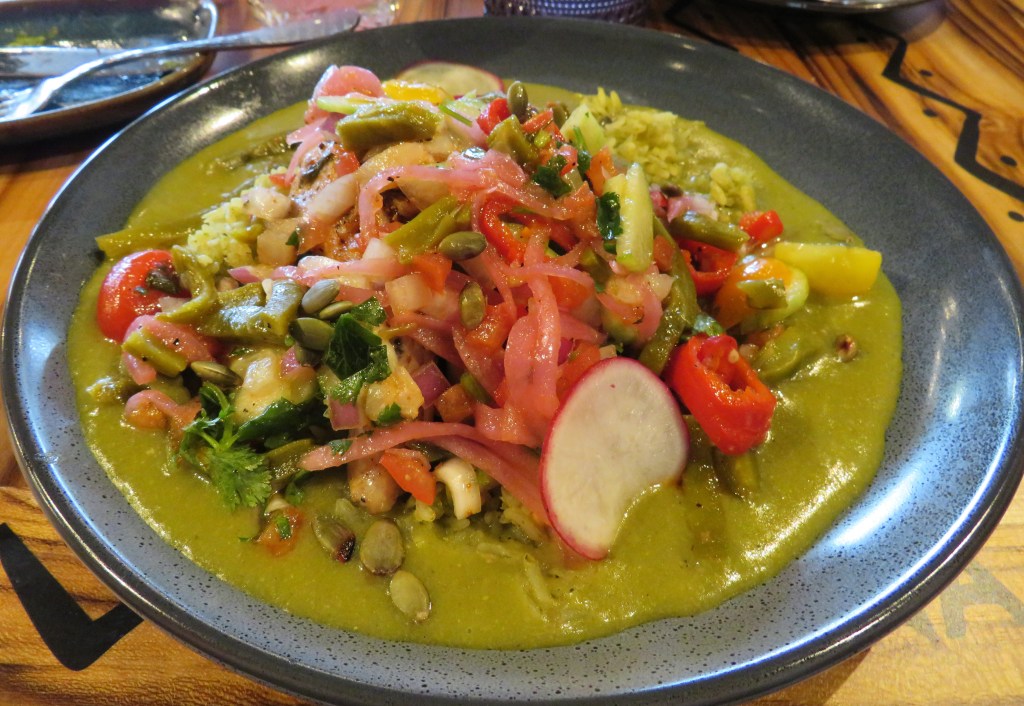
I ordered chicken verde, or a green mole chicken, that was another family favorite.
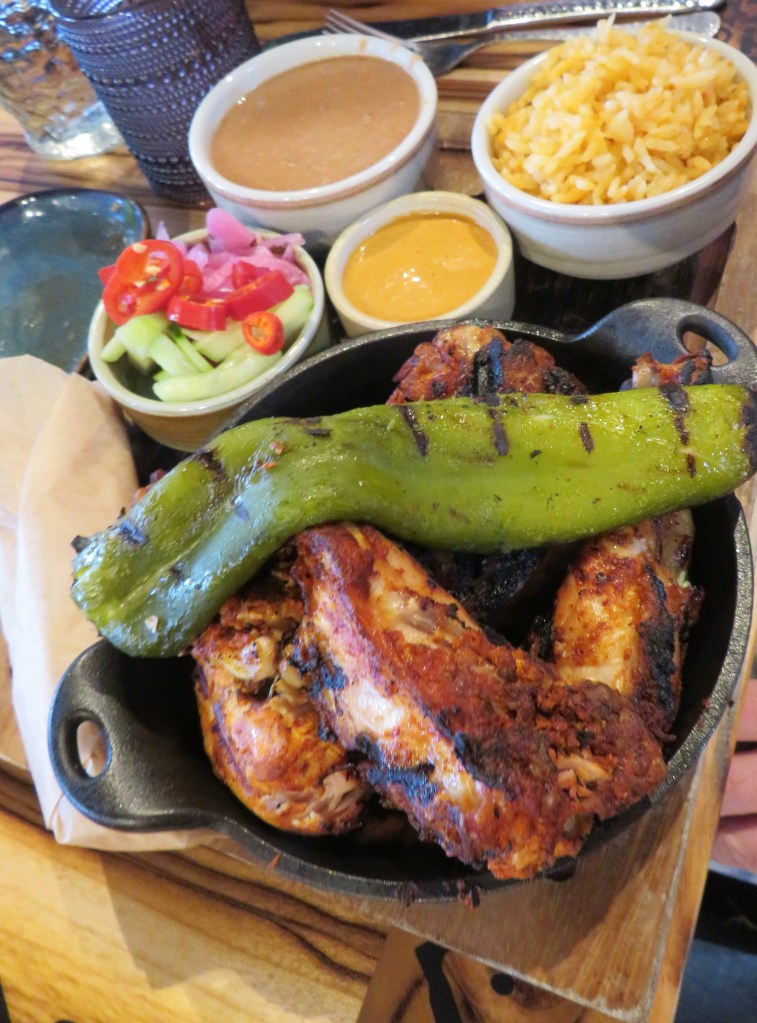
And Larry ordered the pollo asado, which was Edgar’s dad’s recipe.
It was a feast for both the eyes and the palate. Everything was fantastic. We are already making plans on another trip to try other menu items in the very near future. Rosa Cantina was an excellent recommendation that we all thoroughly enjoyed. Our server Jocelyn was a joy as well. She was so personable and helpful in all ways. She too is a member of la familia de Ruiz, being a cousin to Edgar, and her dad and uncle are co-owners along with Edgar. As I said, it is truly a family affair, and everyone takes great pride in serving a beautiful and delicious meal to everyone who walks in the door. It is exactly what truly great hospitality is supposed to be. More restaurants need to follow the Ruiz Family tradition.
Rosa Cantina is located at 2333 Main Street, unit B, Longmont, CO. Whenever you are in the area, definitely stop in and enjoy the whole dining experience con la familia de Ruiz.
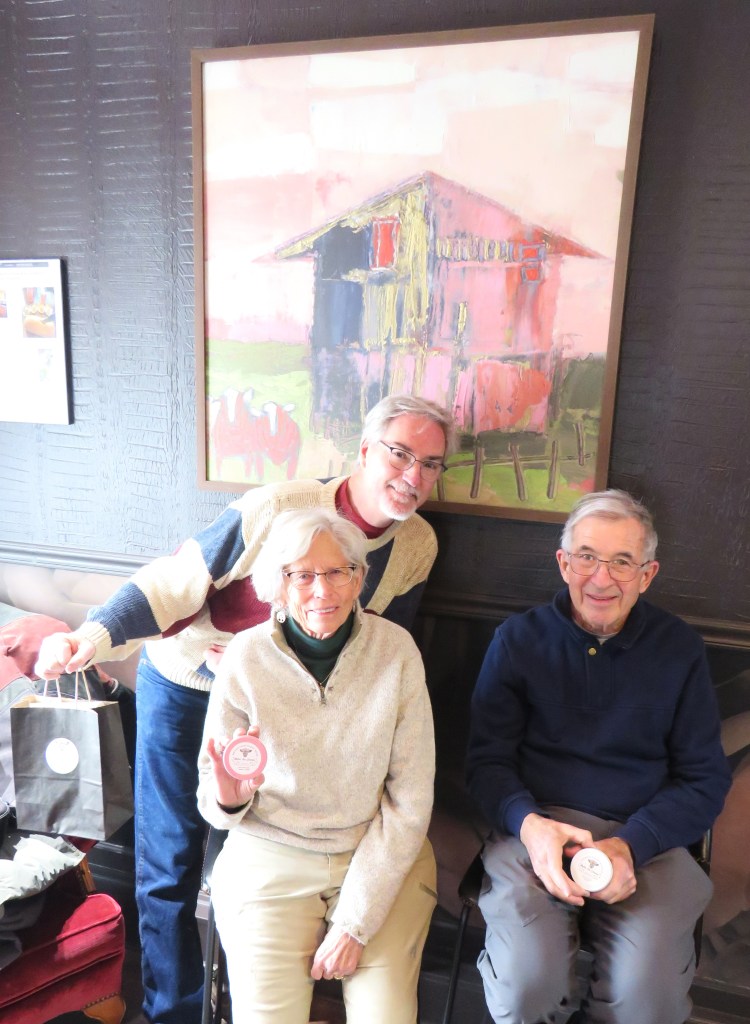
Bob, Janet, Larry and I all had a very deliciously fun day, but then we usually do too. 🙂
Have a great day and make everyday great. Life is what you make it. Make it great. May 2026 be filled with happiness, good health and prosperity for all. ‘Til next time.
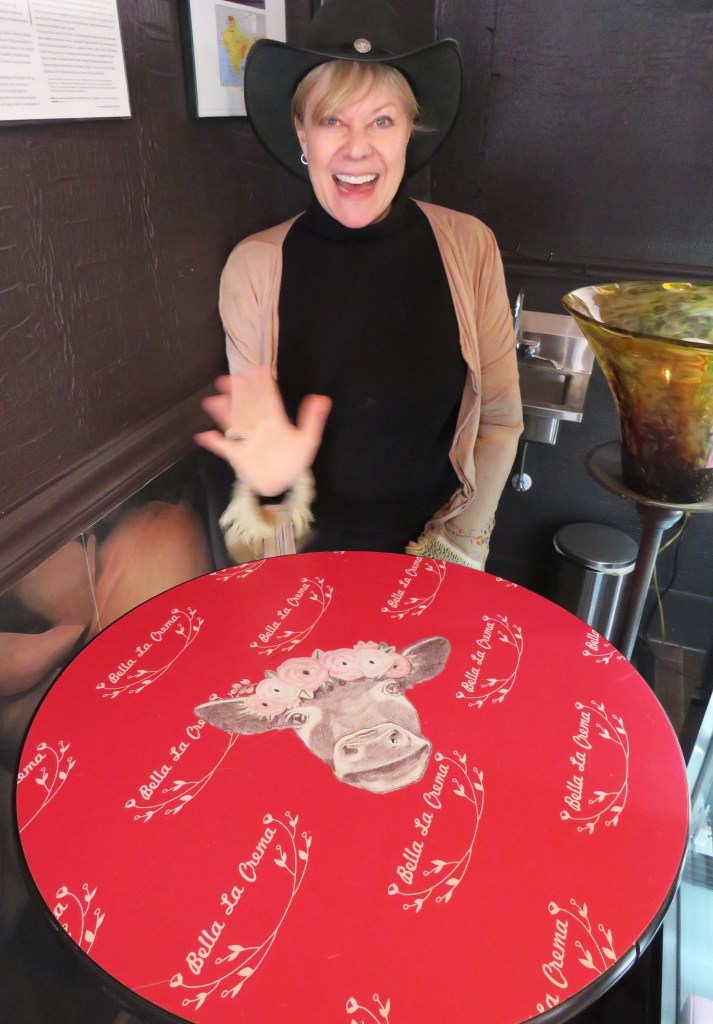
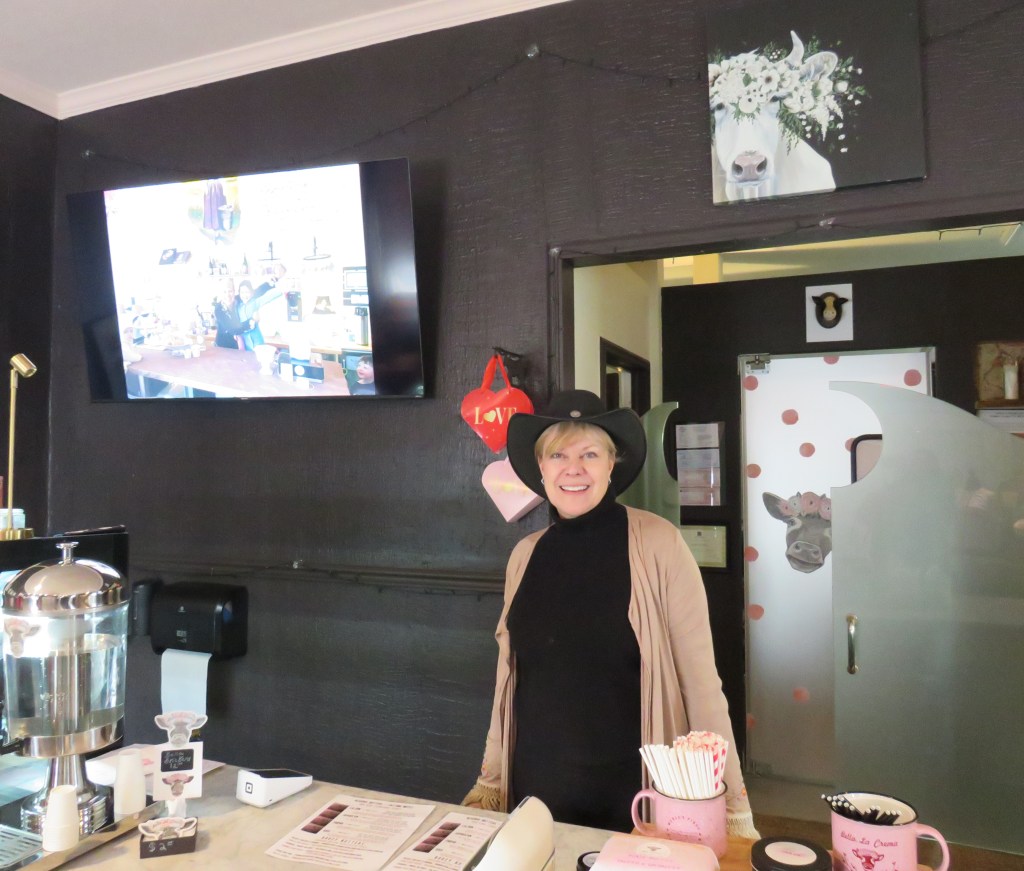
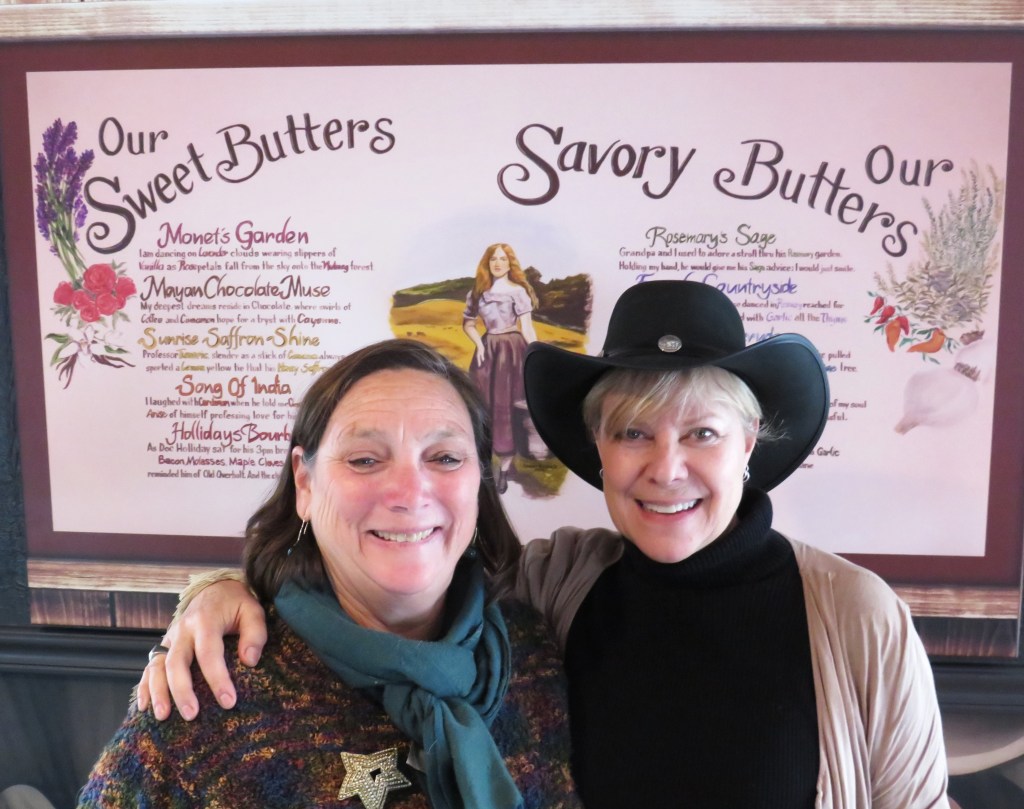
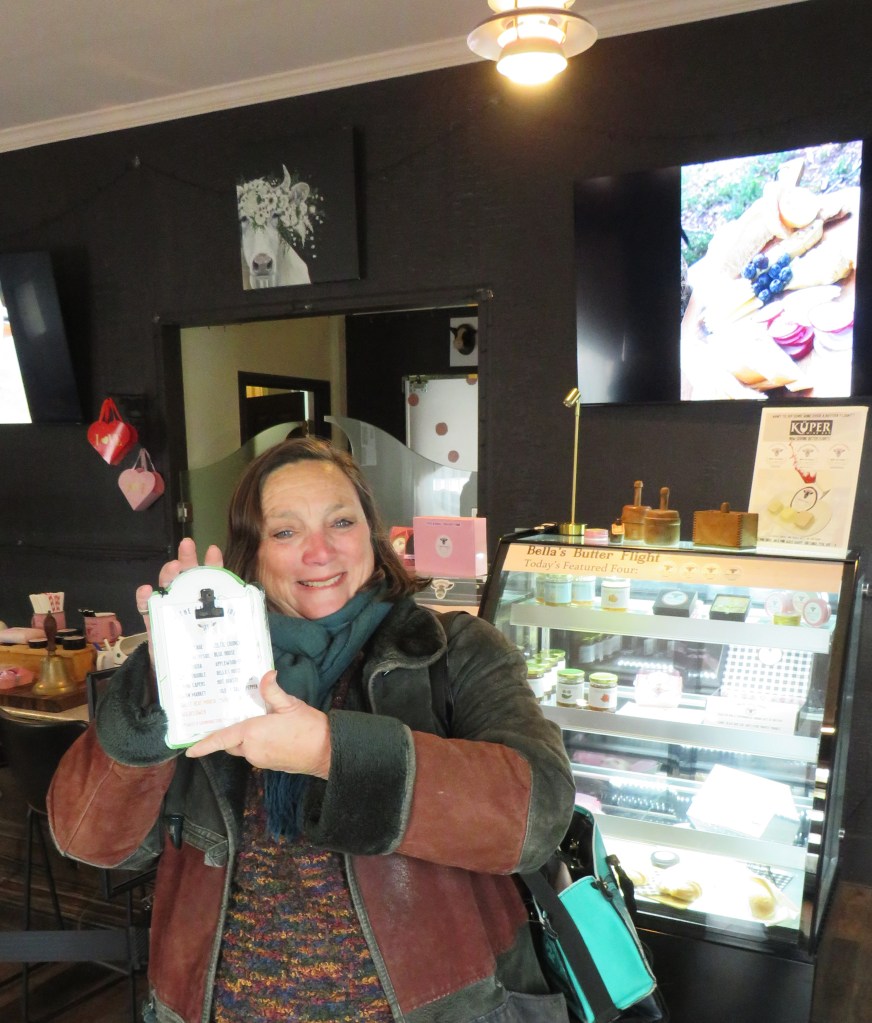
We have been close friends with Janet and Bob for many, many years. They have introduced us to some really cool places over the years too. And they just introduced us to yet another really cool, fun and unique place – Bella La Crema.
Bella La Crema is a small, unique handcrafted butter shoppe located in Longmont, CO, about 30 or so minutes north of us. Bella La Crema was born in 2018, by chef and butter lover Shauna Lee Strecker, aka Shauna Lee. Shauna has been making butter her whole life, starting at the tender age of 5, while still in kindergarten. She describes the art of making butter as a “vacuole of happiness” deep in her soul. As the owner of Bella La Crema in Longmont, Colorado, Shauna uses her years of experience to create small-batch, hand-packed artisanal butters. Shauna was once a ballerina, but now lovingly calls herself the “Prima Butterina.” I love this. 🙂
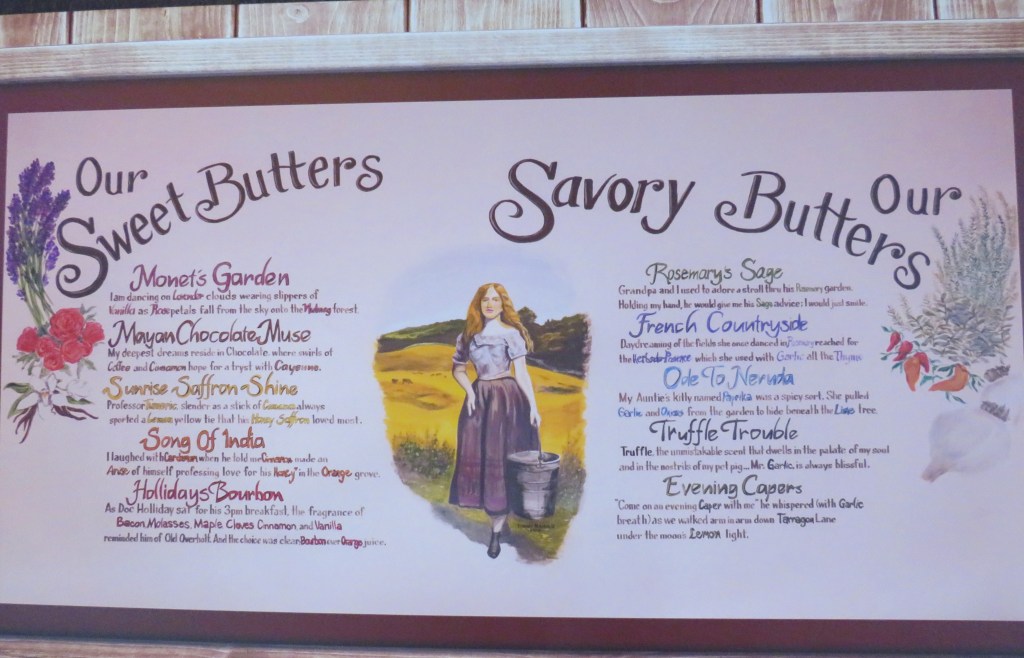
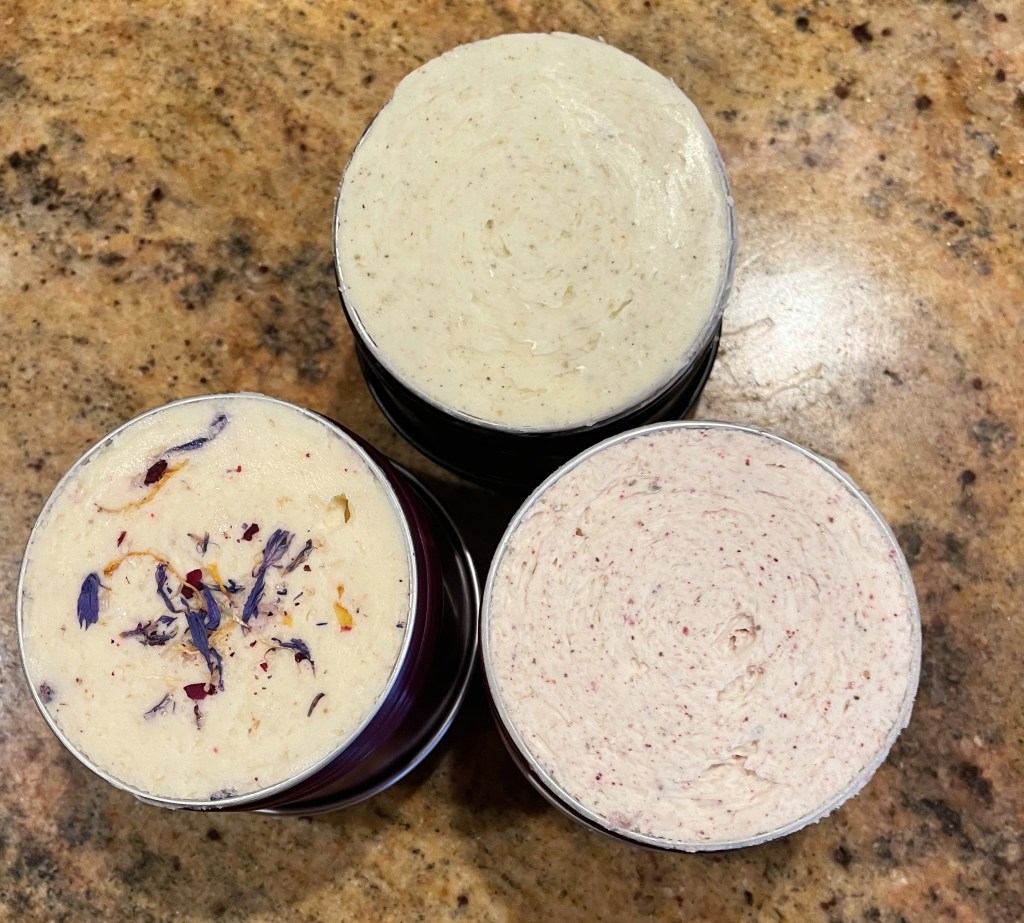
Shauna is a very creative person and was called to open her first “butter restaurant”, A full-service restaurant or bistro, known as the “World’s First Butter Bar” in Lyons, Colorado in 2018. Most of her menu items for lunch, brunch and dinner included some incarnation of this creamy condiment. After the Lyons building was sold, Shauna had to find a new location. In August of 2024, a building on Main St. in Longmont opened up and the community once again embraced her culinary concept. Although not a restaurant, many of the same items such as the butter flights are offered. Her ten “flagship” butters are divided between sweet and savory but she is constantly experimenting with new flavors, just as any foodie would do.
The concept of infusing butter originally came from Shanua’s son, Rooks. Even at a young age, he was fascinated with grinding up various combinations of herbs and spices on their home kitchen island. After combining fennel, lemon and cinnamon, his mother tasted it and exclaimed, “This needs to be in butter. It’s beautiful, unpredictable, and perfect!” This flavor profile became one of Bella La Crema’s most requested products called Fennel-Lemon Delight.
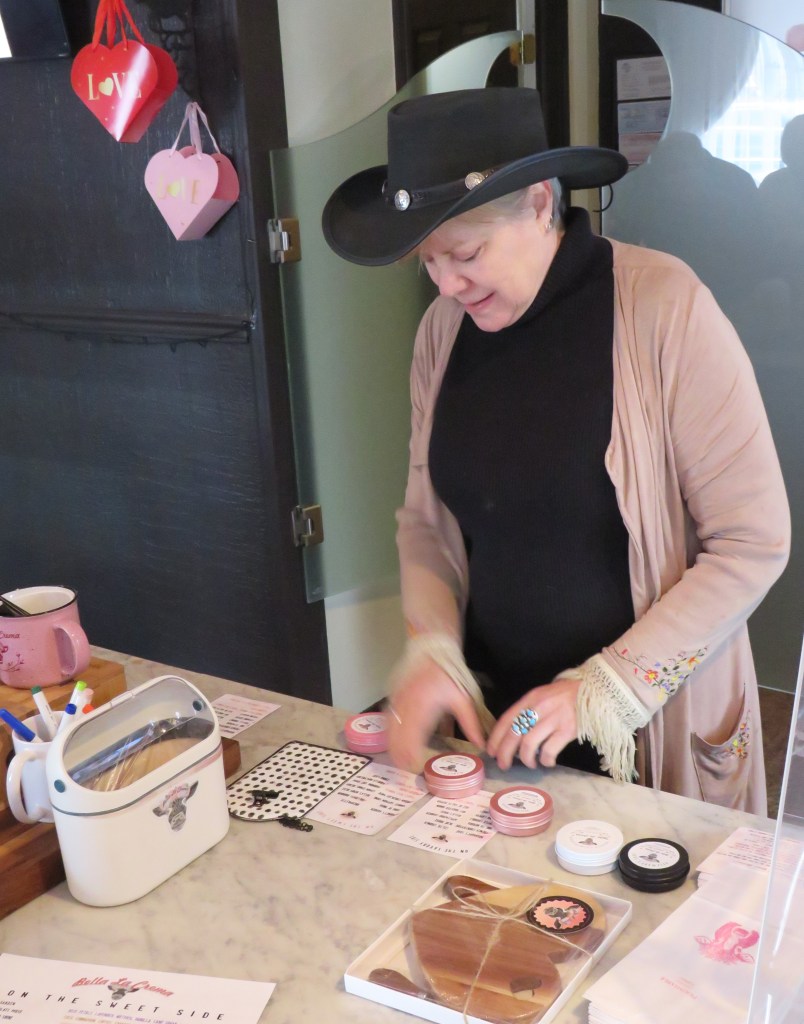
Shauna pays great attention to every detail. She uses only the finest grade ingredients for all her butters and other products too. Each vendor is carefully vetted. Her cream, for instance, comes from small farms that graze grass-fed cows in Delaware, Iowa, and other locations. Flour for her baguettes is sourced from Italy and is non-hybridized and pesticide-free, and this attention to detail has engendered a fiercely loyal following. Her loyal customers, both old and new, have definitely noticed her attention to every detail too. You can taste it in every bite.
We tried six different butters, all of which were delectably delicious and very unique. There are little printed menus that you make your selections on and Shauna lovingly serves them on a hard plastic straw for you to taste her beautiful creations. Instead of a wine flight, you are embarking on a butter flight.
As I was tasting all the butters, I was also creating recipes in my head on how to use them to best showcase their unique flavors.
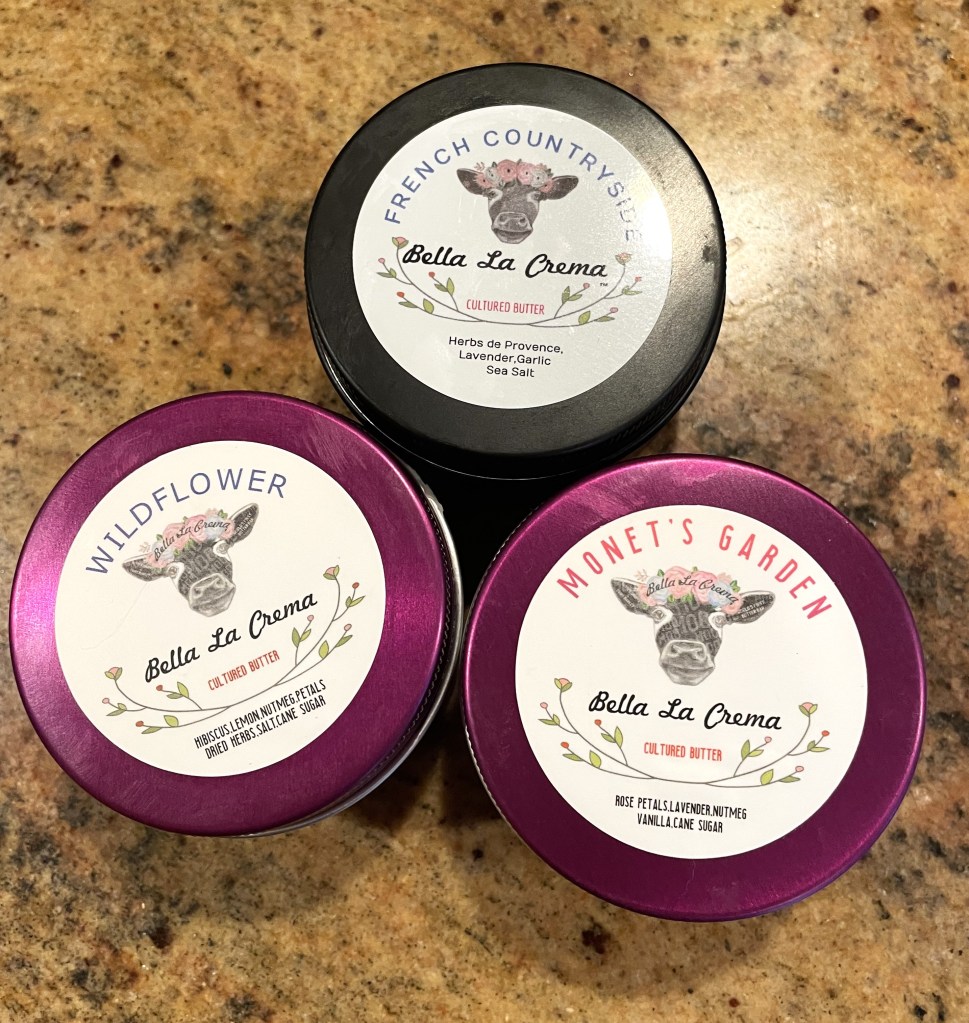
We took three of the fabulous Bella La Crema butters home with us, but I already plan on going back because we missed one that we really liked a lot – the Morello Rum Melody prepared with cherry, nutmeg, lemon, sugar, molasses, and rum. Larry and I bought the Wildflower Butter, Monet’s Garden and the French Country Style Butter. Janet and Bob came home with a couple of new butters as well.
Needless to say, Shauna and I clicked immediately. We both share a love of good food, and of course BUTTER! We talked like we were old friends and shared recipes and stories immediately.
Bella La Crema allows you to walk in and purchase butters in the store, or you can purchase them online too. Shauna will ship them to your door, no matter where you are. When the butters are shipped they are shipped frozen. All of Bella La Crema’s butters are made in house with fresh cream using raw cow’s milk. This raw milk contains “good” bacteria” known as cultures or probiotics that are live cultures. These live cultures are killed in the pasteurization process. There are no preservatives, stabilizers or artificial ingredients used in the making of Bella La Crema’s butter, EVER! They are all fresh and pure. Because there are no preservatives, the best way to “preserve” your butters is to refrigerate them, if they will be out for more than four hours, where they will last and retain their fresh qualities for about three weeks. If you are not going to use them right away, Shauna highly recommends you freeze them, where they will still retain their fresh goodness for about six months. Shauna says “the three enemies of fresh butter are time, temperature and oxygen”. I agree. Though I go through so much butter that it never has time to go bad. 🙂
Bella La Crema is located at 931 Main Street, Unit A, Longmont, CO, 80501. But you can call ahead at (720) 877-3721, or locate them online at either @Bellalacrema or https://www.bellalacrema. We all know life and everything else is much better with butter, and even better still with Bella La Crema butter. 🙂
Have a great day and make it even better with butter. May 2026 be filled with happiness, good health and prosperity for all. ‘Til next time.
It’s not unusual to see multiple hawks all around. We have many different hawks that call our area home. And I love every one of them. I love all the hawks and birds of prey. What is unusual though is to see two different types of hawks so close together in the same area.
I was walking at Metzger Farm when I first spotted a beautiful Red-tailed Hawk perched far off in a tree. Red-tails are probably the most prevalent hawks in our area.
Then just a little further down the path I spotted a Cooper’s Hawk in a different tree. I don’t see nearly as many Cooper’s Hawks as I do Red-tailed Hawks, so this was a treat.
I love all the variety of wild life we have so close to home. It just goes to show you never know what you might see on any given day. We have to keep our eyes, hearts and minds open to any and all possibilities. 🙂
Have a great day and make everyday great. Life is what you make it, so make it great. May 2026 be filled with happiness, good health and prosperity for all. ‘Til next time.
In case you haven’t already figured it out, I am someone who always has my fingers in all kinds of pies, both figuratively and literally. I am insatiably curious about everything and love to try new things all the time. My latest endeavor is something completely new to me. It is a brand new challenge that I am eagerly embarking upon. 🙂 (My friends Karen, Lauren, Lori and I have started this new tradition of picking a word for the year. This is basically a goal for the year for each of us. My word was “challenge” and I am certainly taking on a new challenge with this new path).
I have always been a lover of jewelry and bling. What can I say? I like bright shiny things. 🙂 When I took my craft class the other day More Fun Projects, I viewed the catalog for more fun things to do and came across a series of classes in silver jewelry making. I was intrigued right from the get go. I discussed it with Larry, since it is an expensive new hobby, to see if it was OK to join the class. Little did we know just how expensive it was going to be at the time though, but more on that later. 🙂
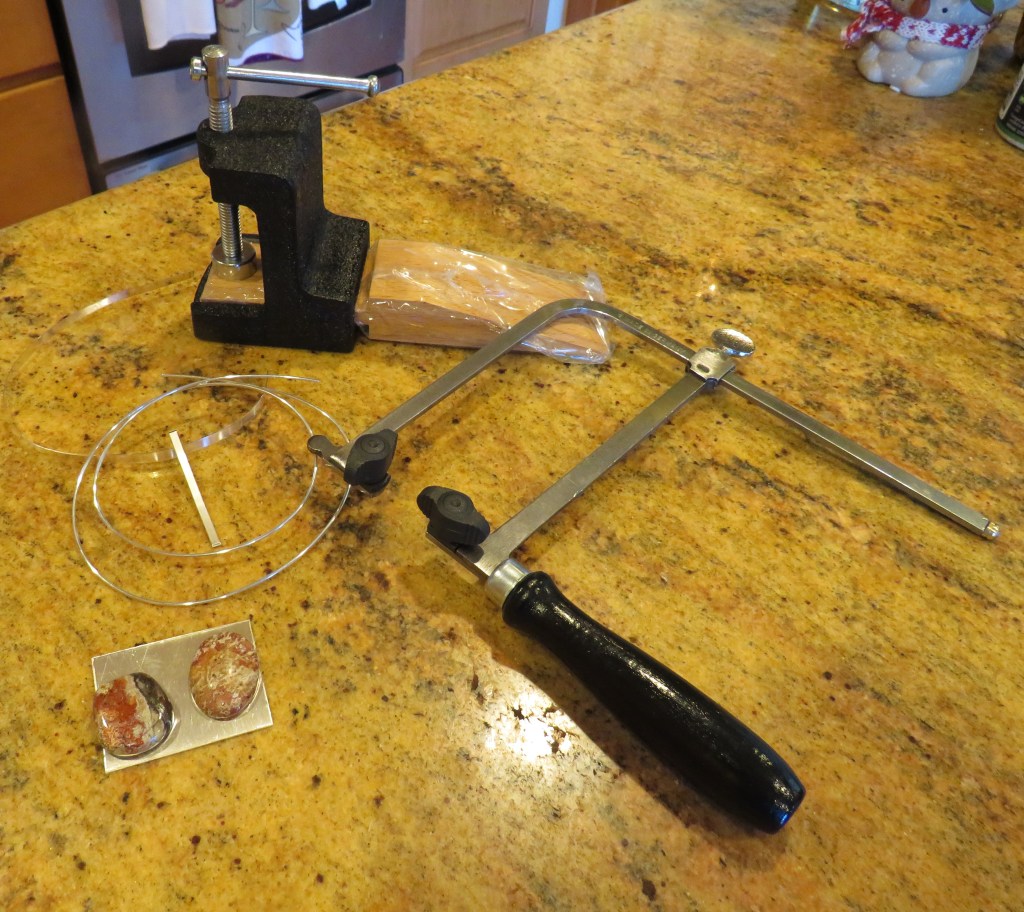
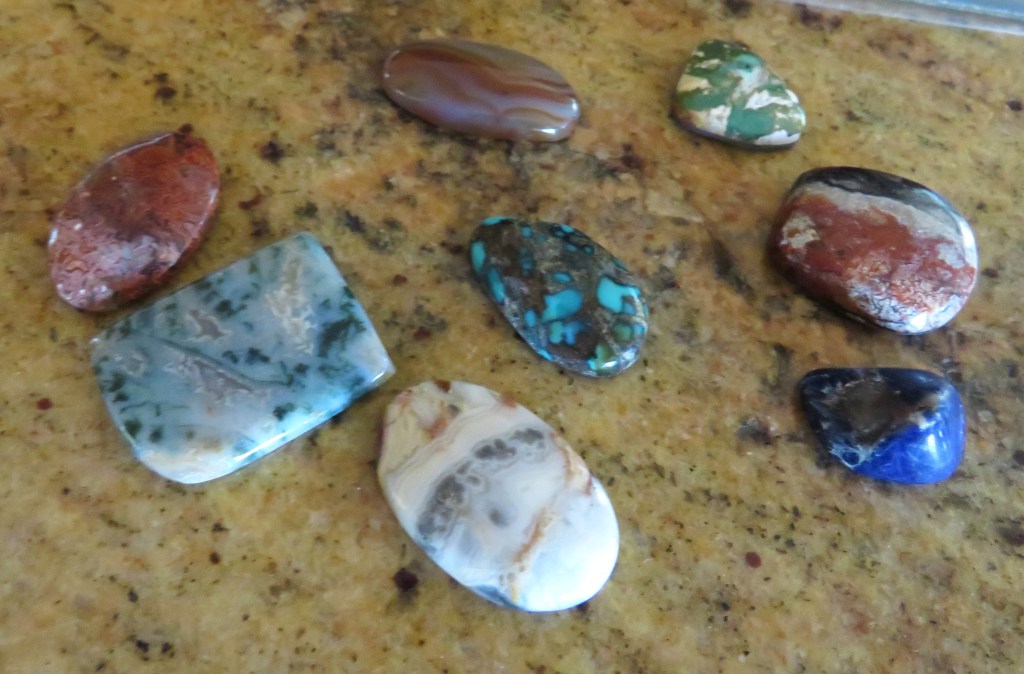
I called to reserve my spot in the class and was told what I needed to purchase for the first project. Larry and I went to the silver and stone store to purchase the necessary items for the first project. I was told what silver I needed and that I also needed a stone for the first project. I got two stones because I liked them both and couldn’t decide between them. I also got a saw and a bench peg. I thought this was all I needed, since I was initially told that the class provided everything else. WRONG!
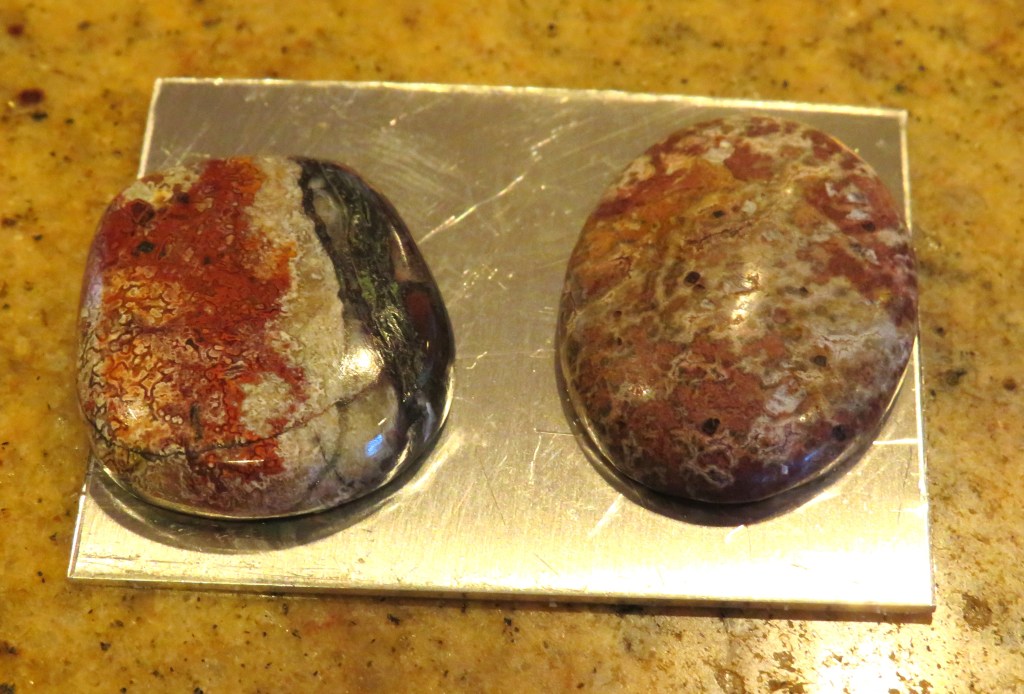
For first time jewelry makers like myself, the person at the stone shop said a hard stone with either rounded corners or a round or oblong stone would be best. These are the two stones I came home with on the first day. They are both agates. I really like the striped stone, and was working with that one initially, but then switched to the more rounded stone since it is more forgiving for a first timer. I will save the striped one for another project at another time. They are sitting on a bed of silver.
I missed the first class because I didn’t know about it at the time, but I made it to the second class, which was actually the first class of instruction. I was introduced to a whole new world.
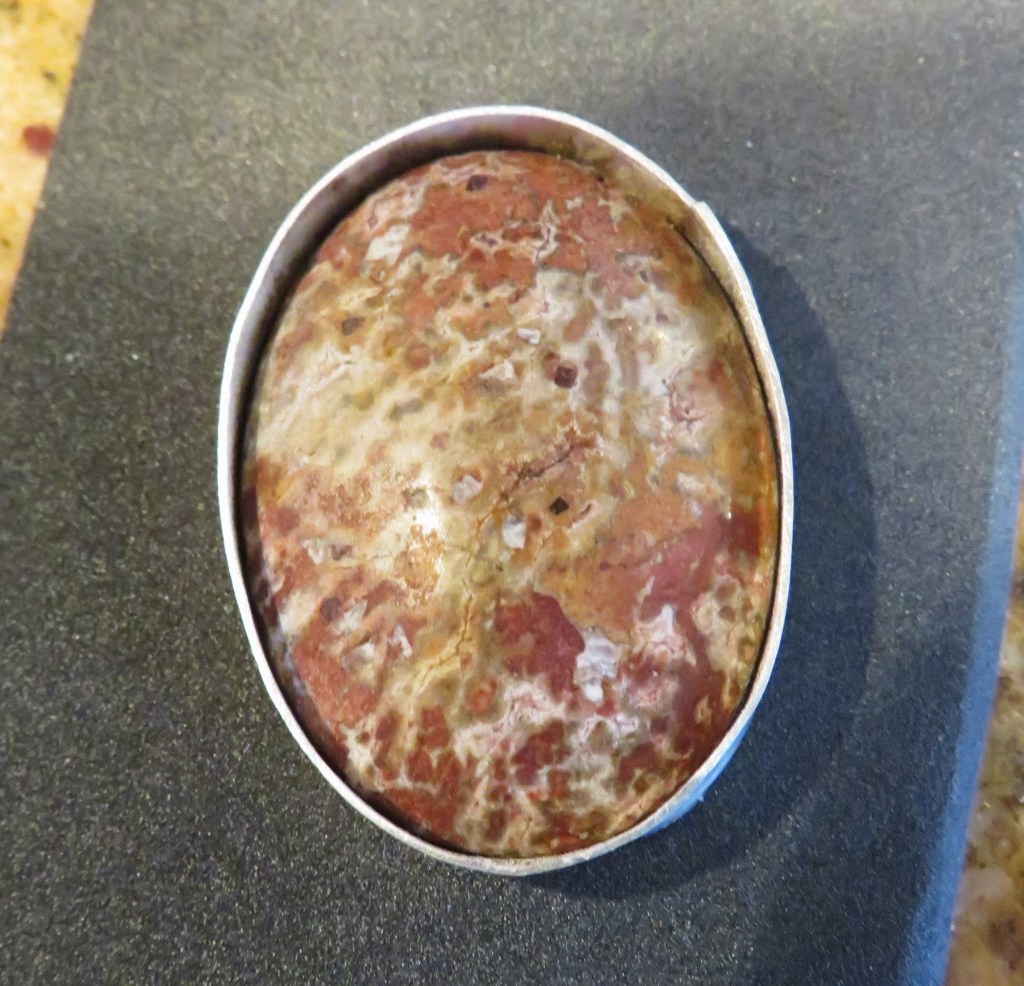
After the class introduction, we learned how to make a bezel for our stones, then we soldered them into shape and learned how to use the machines. After soldering our bezels, we sanded them where we soldered them together. I still have to sand mine a bit more to make it smoother, but this was the result of the first night.
At our next class, we will put the back on to the piece and add some decorative design work on the sides. I think we will also learn how to make the clip for it too.
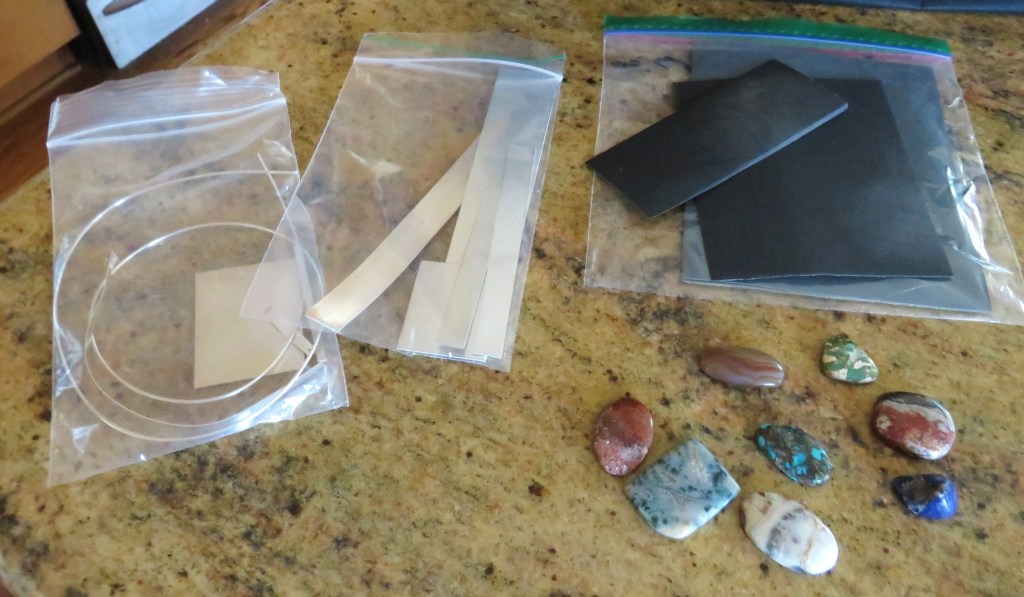
As the class progressed, we learned we needed to purchase a lot more than was initially stated. There was actually a list of things that were highly recommended. They do have them available for people to use in the class, however, I don’t think they have enough for everyone to use at the same time, therefore it was highly recommended we purchase our own tools and supplies. So I went out on a treasure hunt the next day, and spent a “small fortune” getting what I needed. I also bought more stones and more silver for the other projects we will make in the class. Just in case you were wondering, the current price of silver is between $93.50-$95.93 per ounce, depending on the source and exact moment, reflecting daily market movements and dealer premiums over the spot price. I now have about 6 ounces of silver. So this is NOT going to be a cheap, inexpensive hobby, just like scuba diving. 🙂
The tools needed for the class.
And the additional silver and stones needed for the other projects we will make. In this first introductory class, we are making three pieces. We are starting off with a pendant, then will make a bracelet and a ring.
I am still learning my stones, but I have some turquoise, agate, lapis, and I think a malachite here.
This first introduction class is for 10 weeks. Then there is a series of others classes to take after. Each session is for 10 weeks at a time. I will learn more about the different stones and different techniques with each of these classes. Larry and I both know that I will be taking a whole bunch more of these classes after this first introductory class. Anyone who knows me knows how much I love jewelry, so this is a given. 🙂
So now you know, not only am I “A Jeanne in the Kitchen”, but now I am also a Jeanne in the silver mine. 🙂
Life is an adventure. Enjoy and make the most of it. Make everyday and every adventure great. May 2026 be filled with happiness, good health and prosperity for all. ‘Til next time.
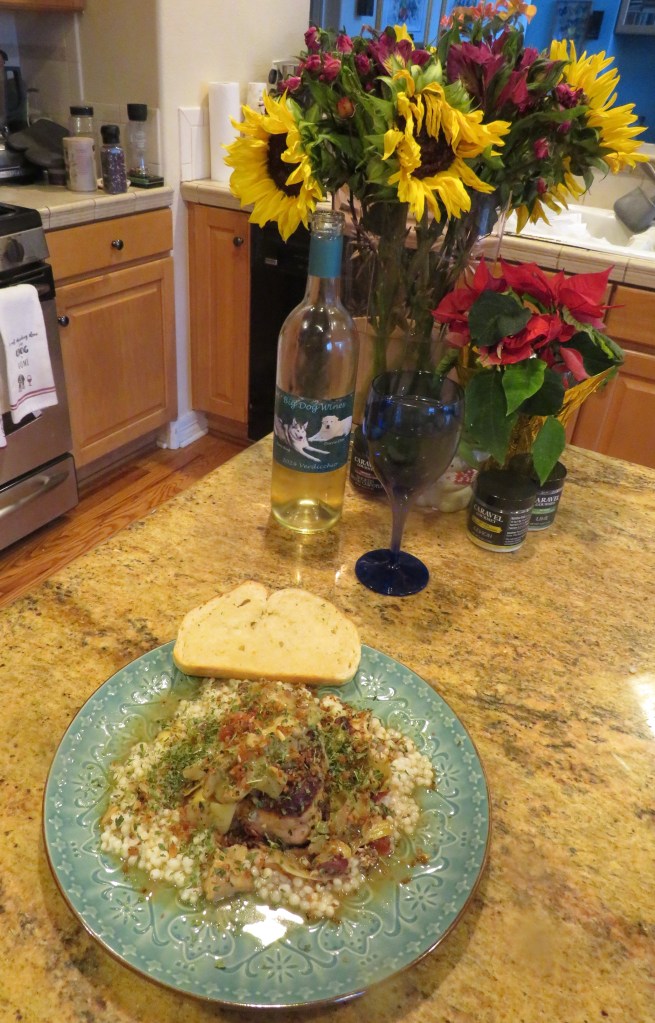
I love all kinds of foods, from all regions and all parts of the world. Every place has good food. But I think one of my favorites is Mediterranean style foods. I love the comfort, warmth and simplicity they provide.
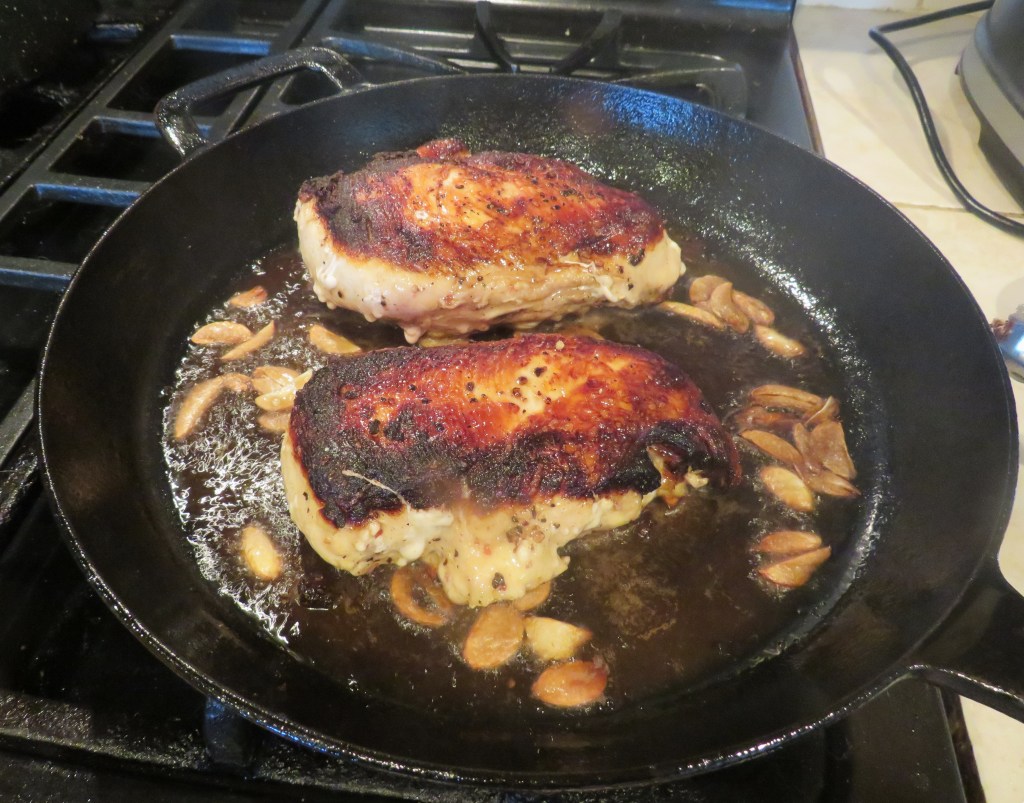
It was a chicken day, and I was looking for a new recipe. I came across one that sounded really good, not realizing at the time how similar it was to other dishes I have made in the past. Subconsciously, I guess I was looking for that good comfort food I love and enjoy so much. It came out very good, and I was not disappointed in the least. It was just what I was looking for. 🙂
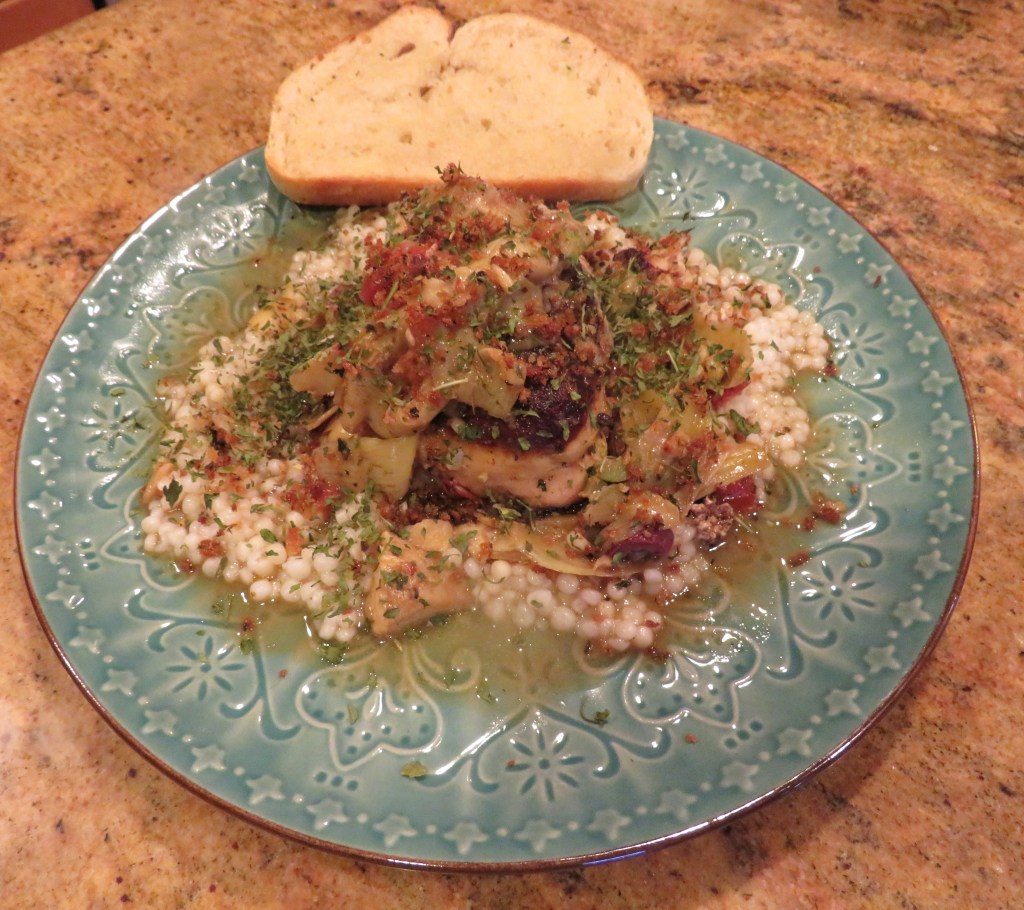
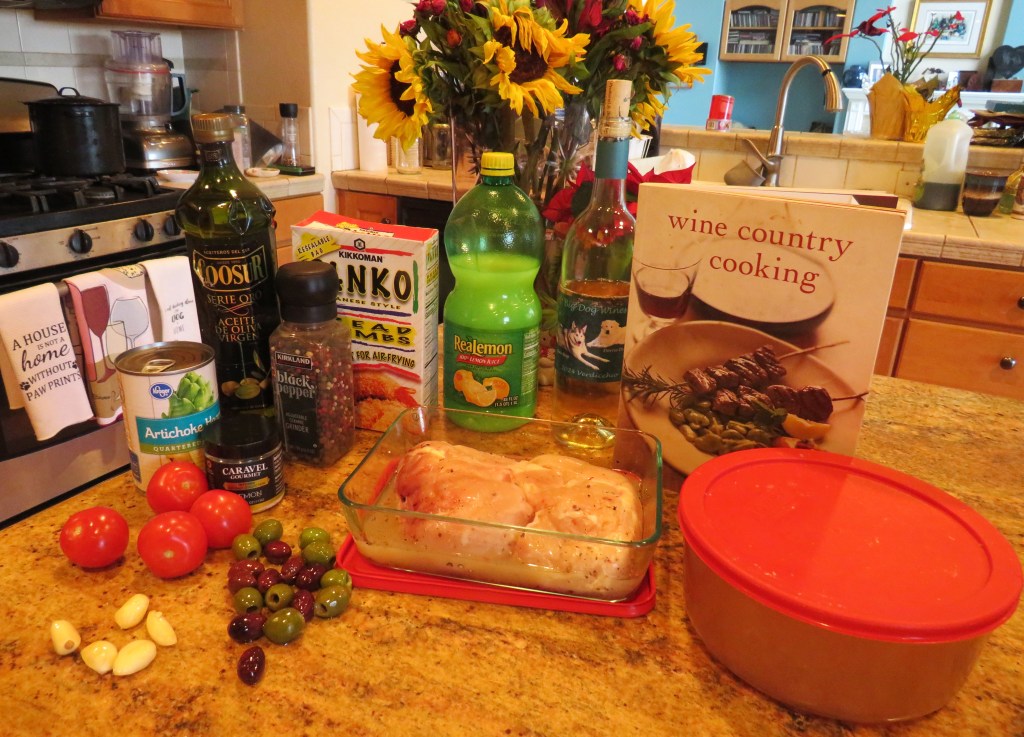
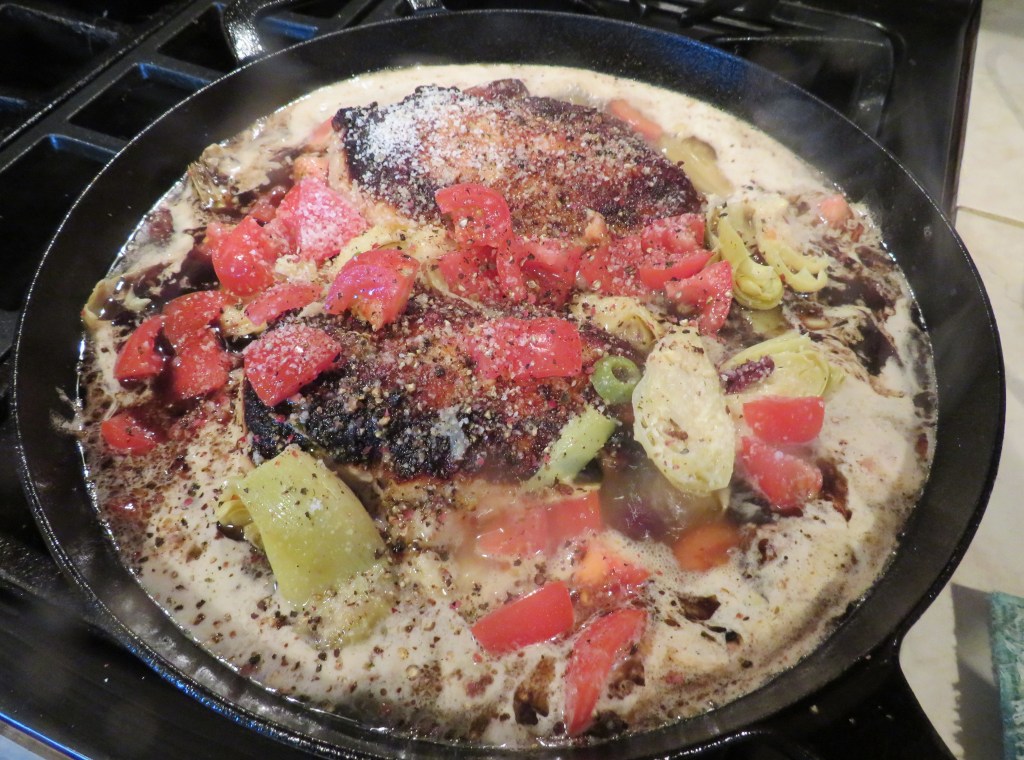
Mediterranean Chicken with Artichokes, Olives and Tomatoes
This is a dish you can find anywhere in the Mediterranean region. It could come from Southern France, Greece, Spain, Italy, Israel or the Middle East. It would have a slightly different “accent” from each region, but it would be similar in all places.
3 lbs chicken breast
1 can artichoke pieces
4-5 tomatoes, diced
1/2 cup mixed olives, sliced
4-5 garlic cloves, sliced very thin
2 cups chicken broth
1 cup dry white wine
2 TBSP lemon juice
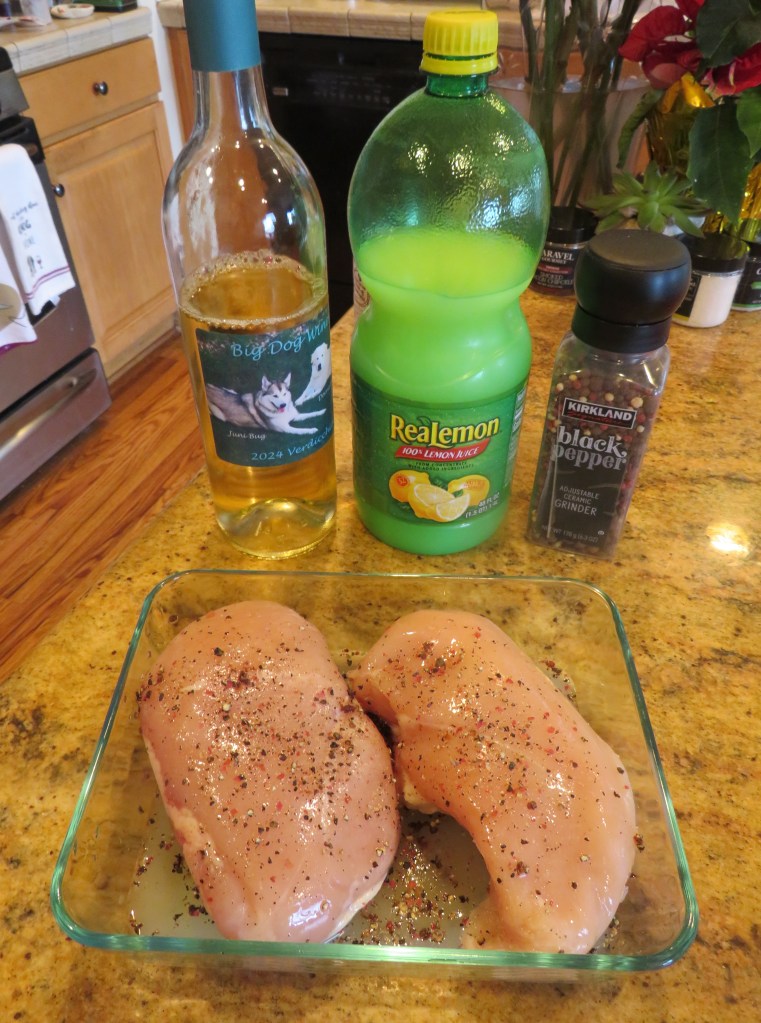
salt & pepper to taste
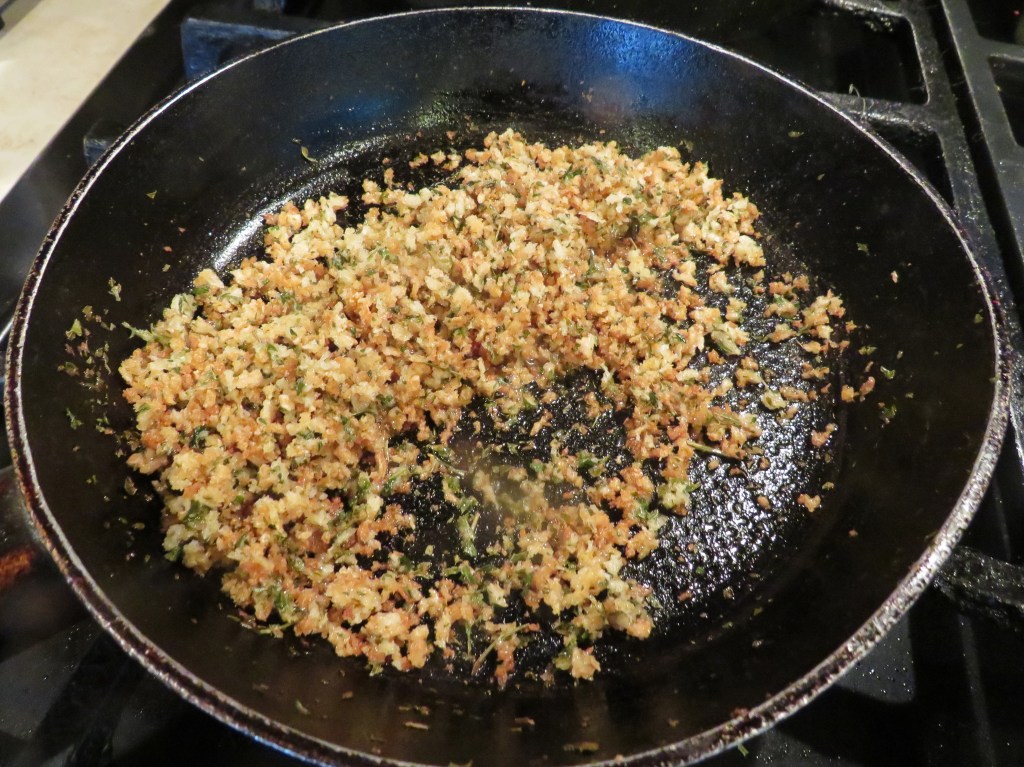
1 cup breadcrumbs or Panko breadcrumbs
2 TBSP fresh parsley, chopped fine
butter
Marinate the chicken in the lemon juice, wine, and salt & pepper for at least 2 hours before cooking.
When ready to cook, get a large skillet VERY hot, then add enough olive oil and butter to coat the pan. Add the chicken and sear for about 4-5 minutes per side, or until it has a nice crust. Add the garlic to the mix at the last 30 seconds or so of the cooking.
Add the marinade into the skillet, along with the artichokes and their juice, the olives and tomatoes. Adjust the seasoning as needed. Bring to a boil, then reduce the heat to a simmer, cover and continue to cook for about 30-40 minutes, stirring occasionally.
In a separate, smaller pan, get it very hot again, and add about 1-2 TBSP of butter. Add the breadcrumbs and some of the parsley and brown. It won’t take long, so watch it carefully.
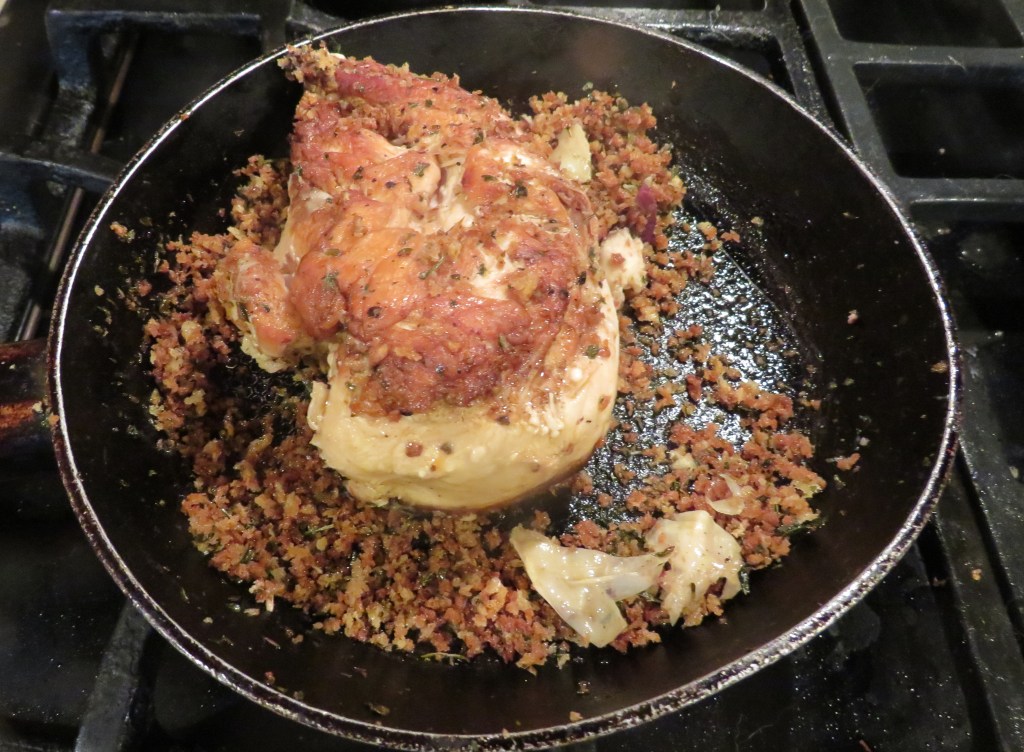
When the chicken is completely cooked, place it the breadcrumbs and coat on both sides.
Serve over cooked couscous and spoon a generous amount of the sauce over the chicken. If you have remaining breadcrumbs, sprinkle them over the top and add more parsley. Serve with the same dry white wine used for the marinade and some warmed bread on the side if you like. It is good, healthy comfort food. You’re going to love it. 🙂
Have a great day and make everyday great. Life is what you make it. Make it good. May 2026 be filled with happiness, good health and prosperity for all. ‘Til next time.
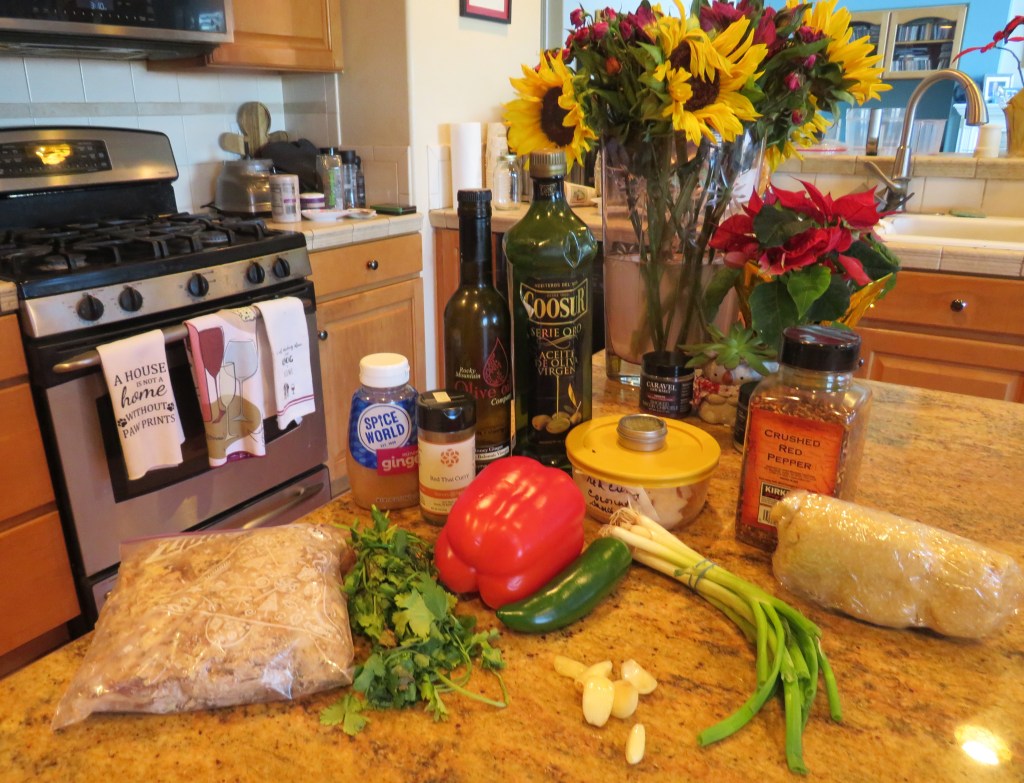
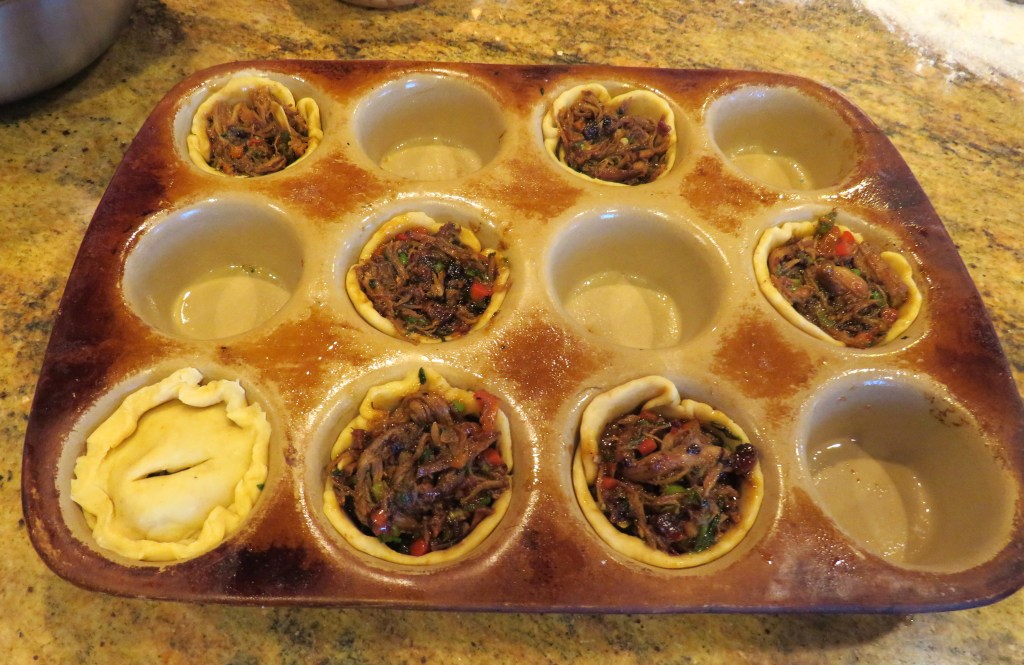
Larry took down some smoked pull pork from the freezer. So that was on the dinner menu. Pulled pork is very versatile and lends itself to so many different recipes, especially since pork is a universal food. At first I wasn’t sure what I was going to do with it. I finally decided to create some little curried pork pots. I was inventing and creating as I went along. They came out to be very filling and very tasty. 🙂
Curried Pork Pots
I made my go-to dough, but added a little it of red curry and red pepper flakes to the dough as I was making it. Once I had the notion of making them Asian styled, I just ran with it and let my creative juices flow.
basic dough
1 1/2-2 lbs cooked, shredded pork, chicken would work too though
1/2 red bell pepper, diced
1 jalalpeno,diced fine
4-5 garlic cloves, sliced very thin
1/4 cup green onion slices
1 TBSP ginger
1 tsp or to taste red curry
1/2 tsp or to taste red pepper flakes
1-2 TBSP honey ginger vinegar, optional
1 TBSP chopped basil
1 TBSP chipped cilantro
salt to taste – I used my Hawaiian Bamboo Jade infused salt
olive oil
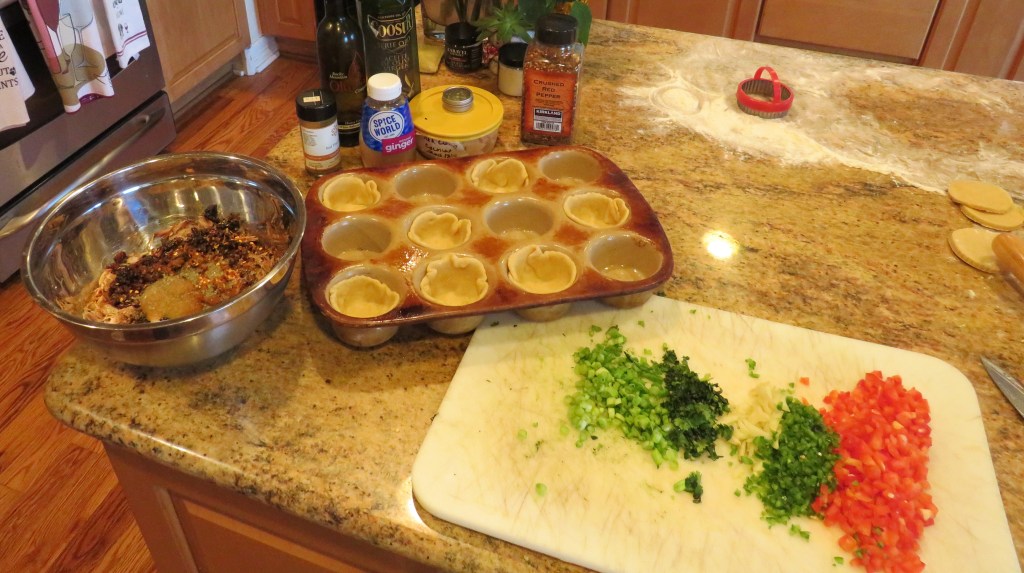
Preheat the oven to 375* F or 191*C.
Spray a muffin tin with cooking spray.
Remove the dough from the refrigerator at least 1/2 hour before rolling so it is easier to work with. Roll it into a thin rectangle, then cut with a round cookie cutter. Roll it out very thin and place 1 round in the prepared muffin tin. Each pocket needs 2 rounds, 1 for the bottom and 1 the top. Mold and press the dough round firmly to fit into the muffin tin.
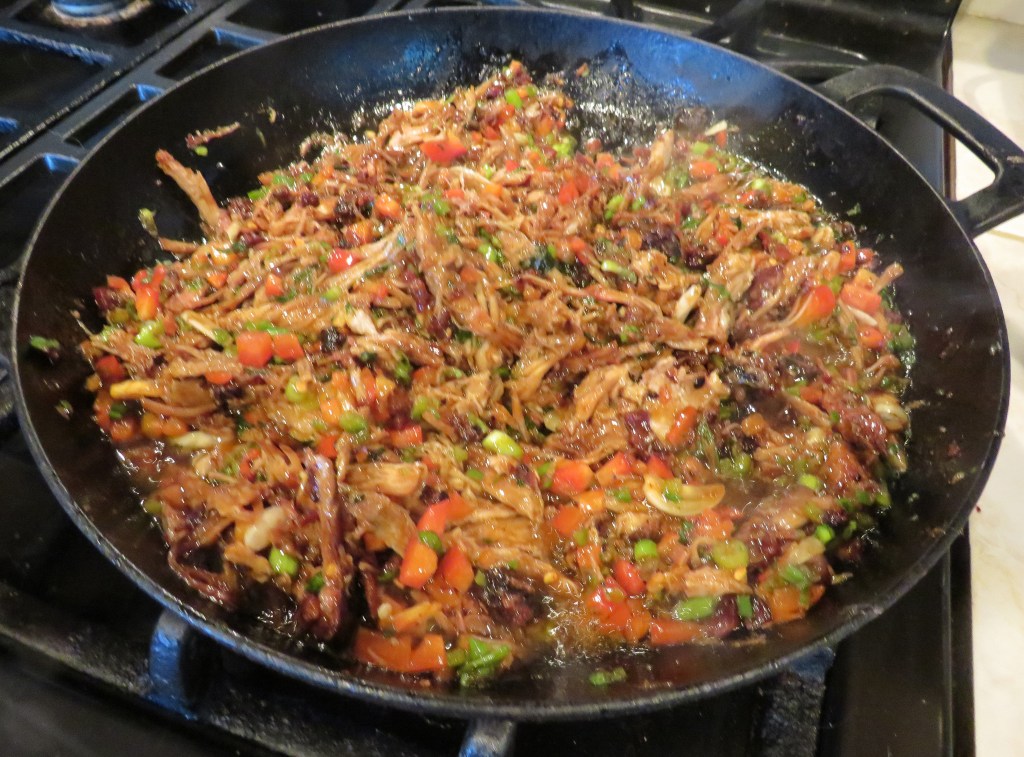
Get a large skillet very hot and add the oil. Add all the ingredients and cook for about 5-7 minutes, stirring frequently. I also added the rest of my bacon and onion jam too. Sliders with Lime Jalapeno Aioli and Bacon Jam
Once the pork mixture is hot and the vegetables are tender, fill the cups with as much filling as they can hold without over flowing. Add the top round to the filled pocket, press firmly and crimp the edges. Slit the tops with a serrated knife.
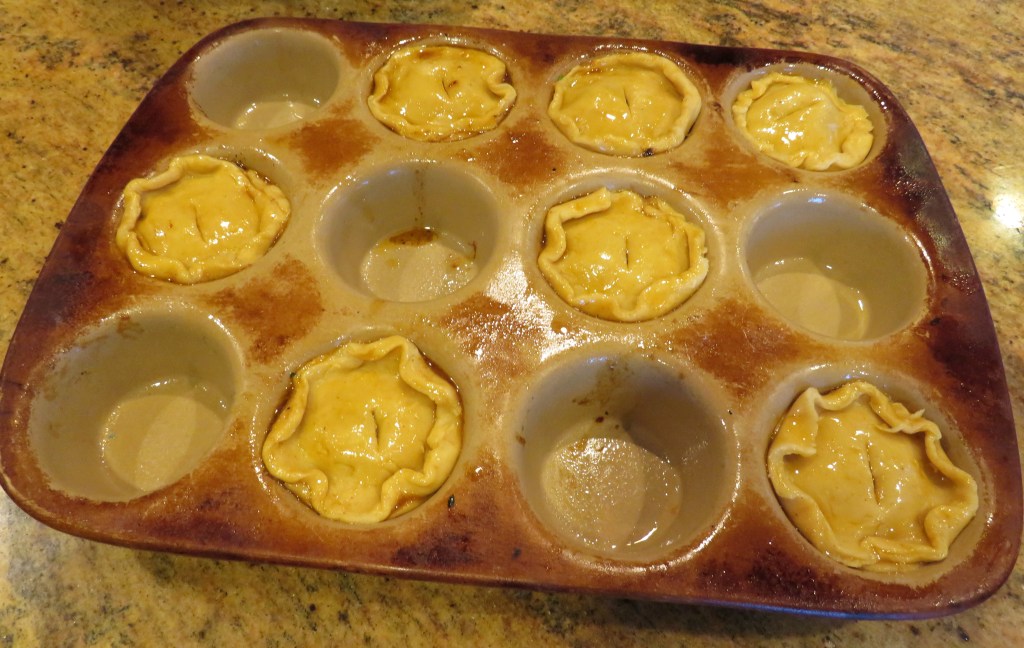
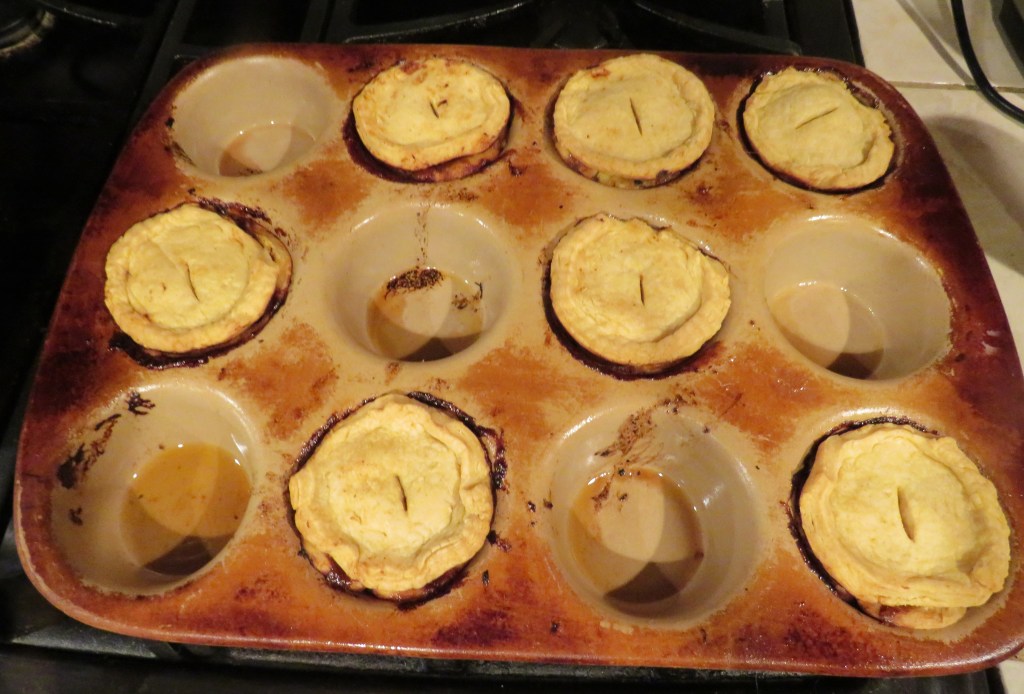
Brush the tops with either an egg wash or the oil from the pork mixture. I used the oil from the pork mixture to add yet another layer of flavor. Bake for about 30-45 minutes or until they are golden brown.
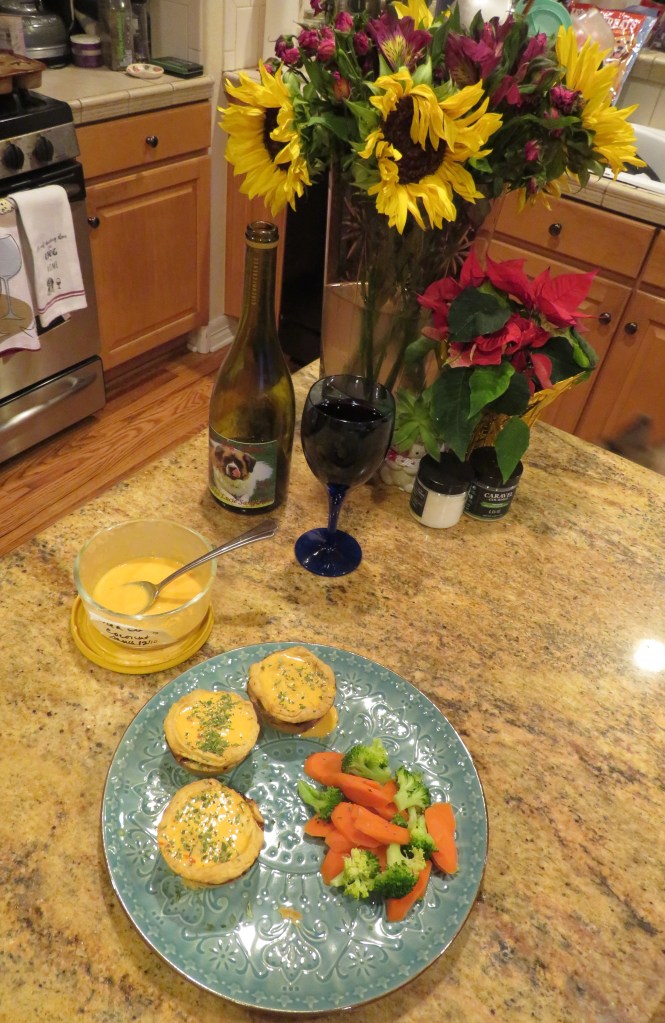
I had some leftover red curry sauce that I heated up and topped my little pork pockets with right before serving. These were loaded with all kinds of goodness and didn’t need much else, so I just steamed some carrots and broccoli to serve on the side, with some red wine to complete the meal. I went with a red wine (one of ours that we made) because the flavors of the pork pockets were bold, strong flavors and needed a bold wine to compliment the flavors.
Have a great day and make everyday great. Life is what you make it. May 2026 be filled with happiness, good health and prosperity for all. ‘Til next time.
Normally I do not like to reblog much, but every now and then, some things just need to be reposted. This is something that came up on my feed today that I thought was worthy of a reblog, since today is Martin Luther King, Jr. Day in the United States. Dr. King was a very wise man. Sadly, a lot of his teachings have been lost in today’s society. I do my best to follow a lot of his teachings everyday. Thank you to DAP for these wise words from Dr. King.
By DAP
“We must develop and maintain the capacity to forgive. He who is devoid of the power to forgive is devoid of the power to love. There is some good in the worst of us and some evil in the best of us. When we discover this, we are less prone to hate our enemies.”
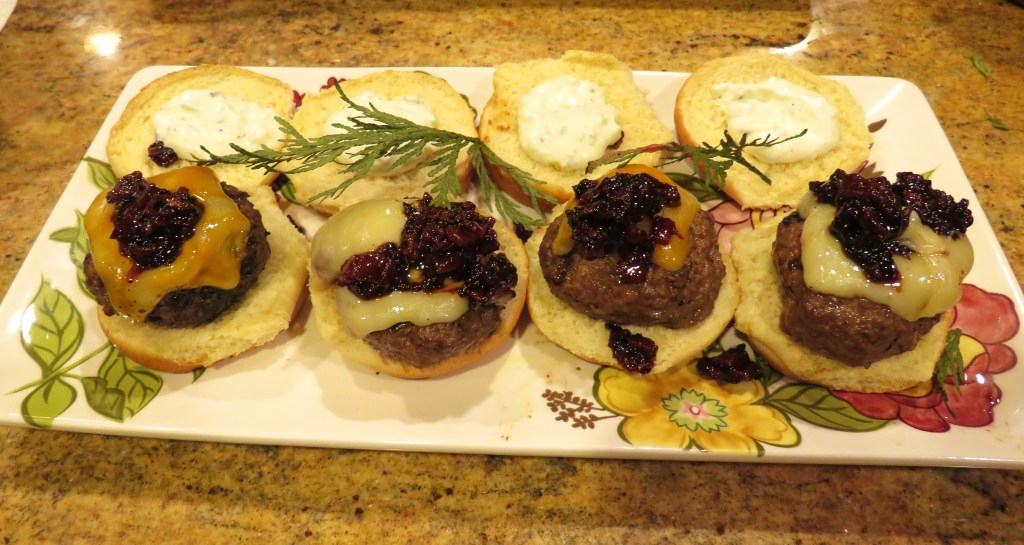
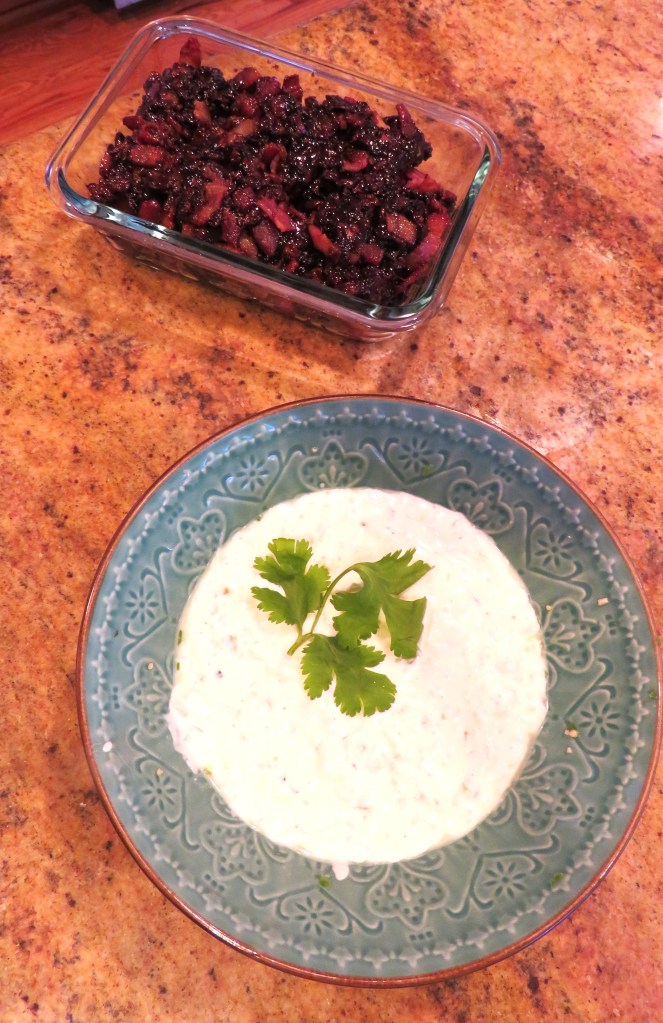
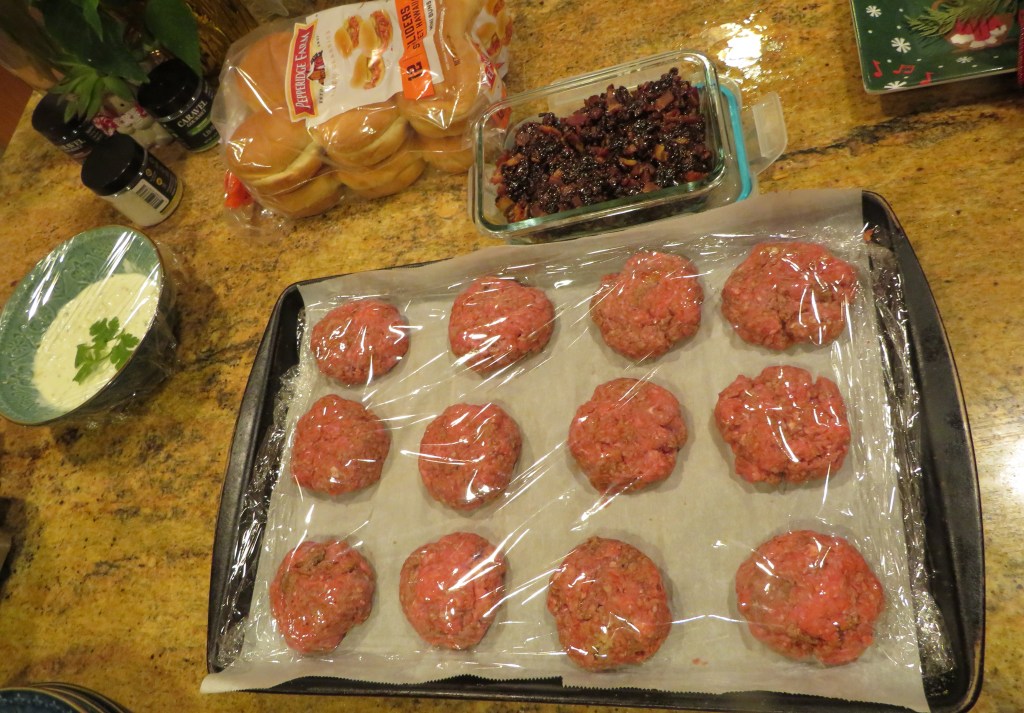
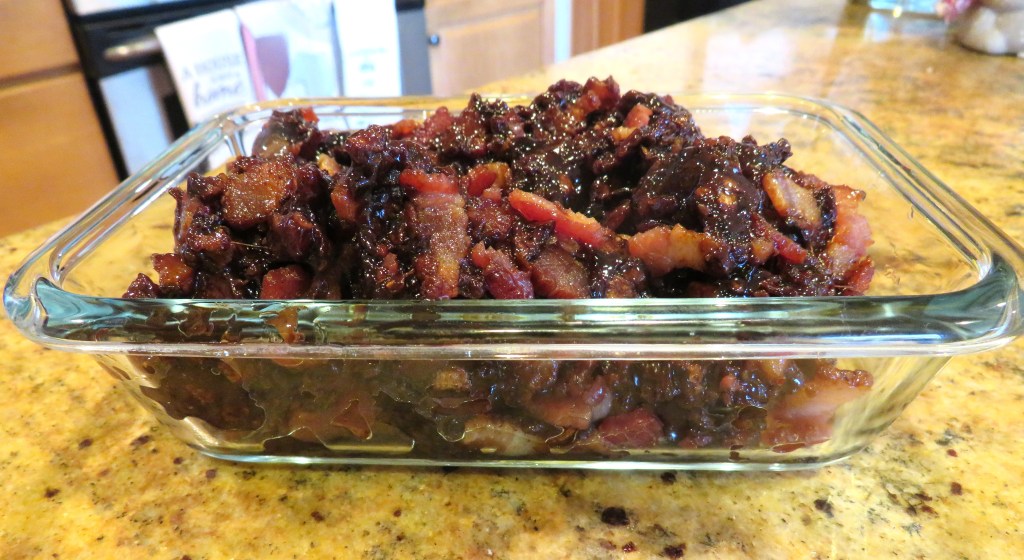
Yesterday, I gave you a little teaser of things to come Lime Jalapeno Aioli. The sliders combined with both the lime jalapeno aioli and the bacon jam came out great. They were a big hit.
We made some with cheddar cheese and some with jalapeno jack melted on top. As you all know, I am not a big cheese eater, but every now and then I eat some. The cheese really helped bring all the flavors together well.
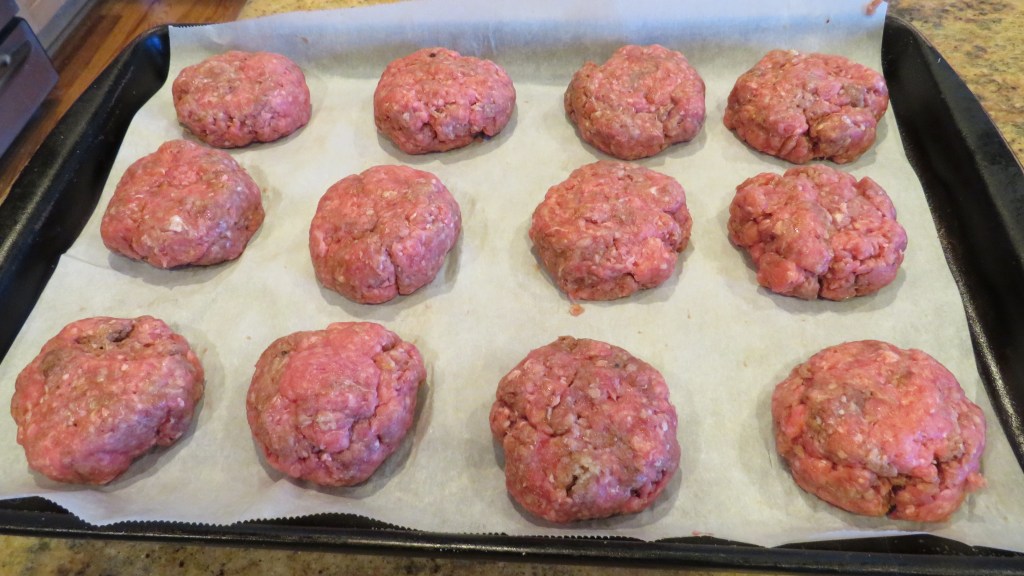
I kept the slider burgers simple to highlight the flavors of both the aioli and the bacon jam. I just mixed in a little chipotle bacon infused salt with pepper, Worcestershire sauce, some Panko bread crumbs and an egg. Once everything was mixed together, I formed them into small patties and refrigerated them until I was ready to grill them.
I removed them from the fridge about 30-45 minutes before grilling them.
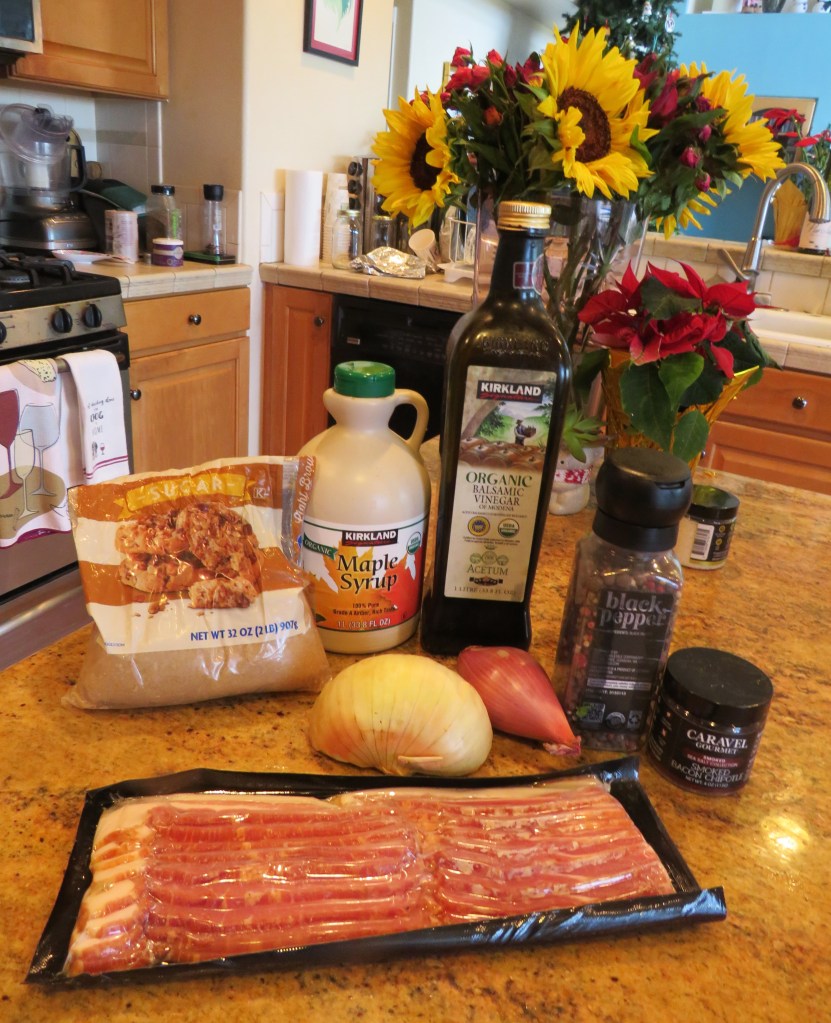
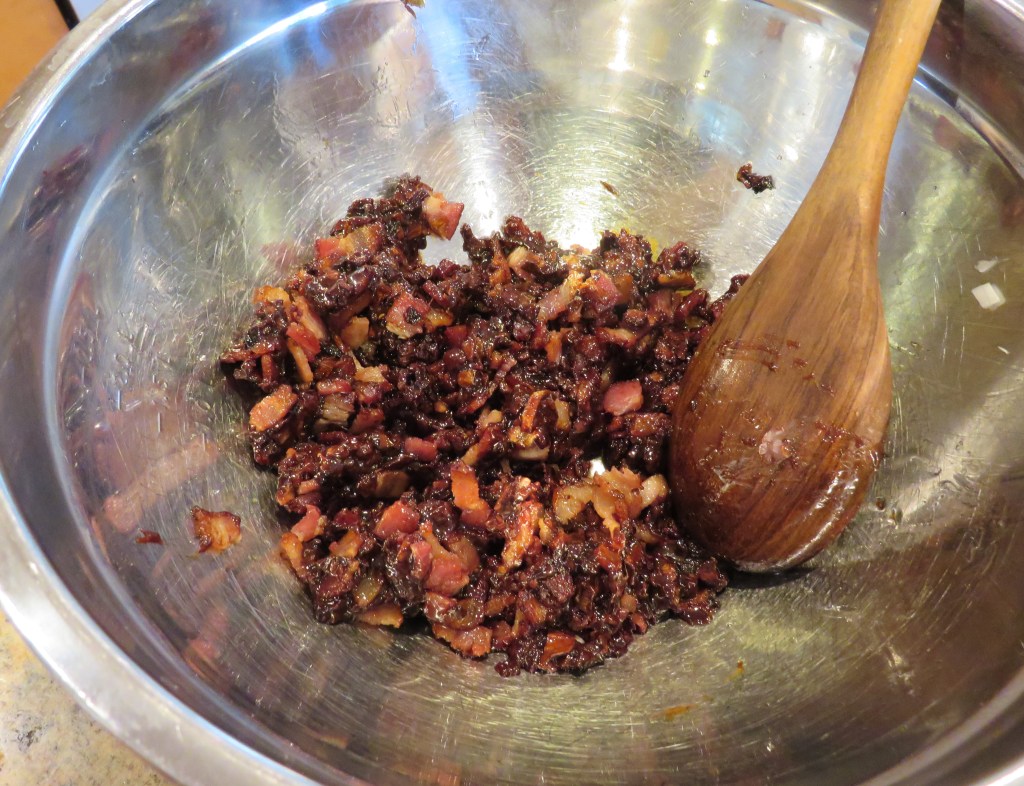
Bacon Onion Jam
This is another simple and delicious recipe made from basic ingredients we all have in our kitchens.
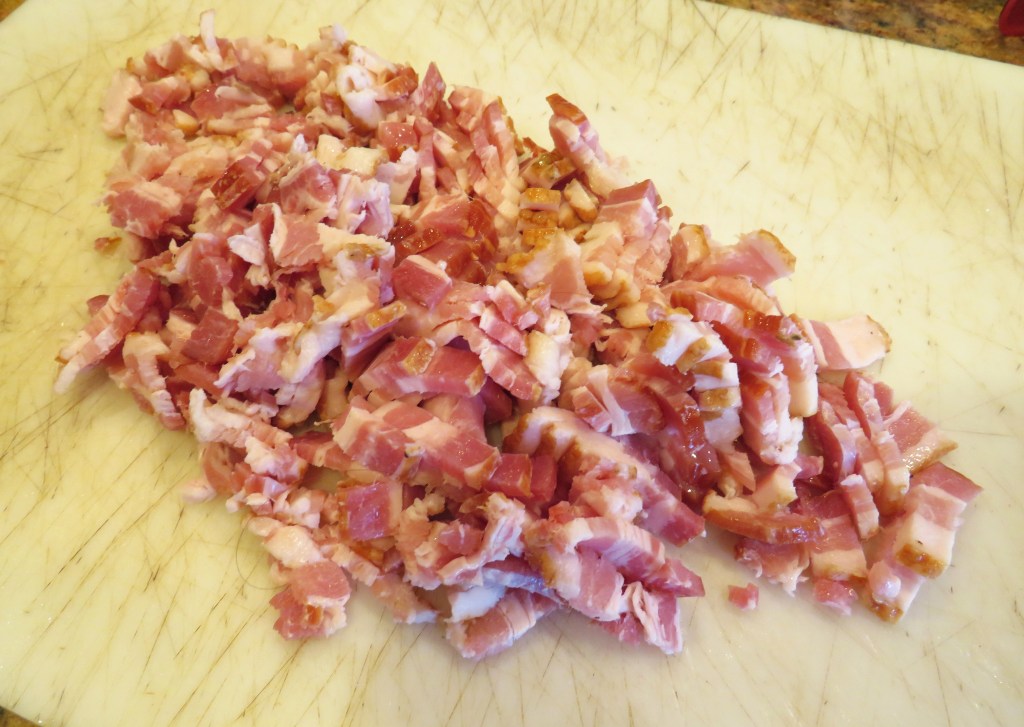
1 lb bacon, cut into smallpieces
1 1/2 onions, diced fine – 1 onion and a shallot or two works just fine too
2 TBSP brown sugar
1 TBSP balsamic vinegar
1/2 cup pure maple syrup
pepper to taste – I also added some chipotle bacon infused salt
Cut the bacon into small pieces, then cook in a hot skillet until done.
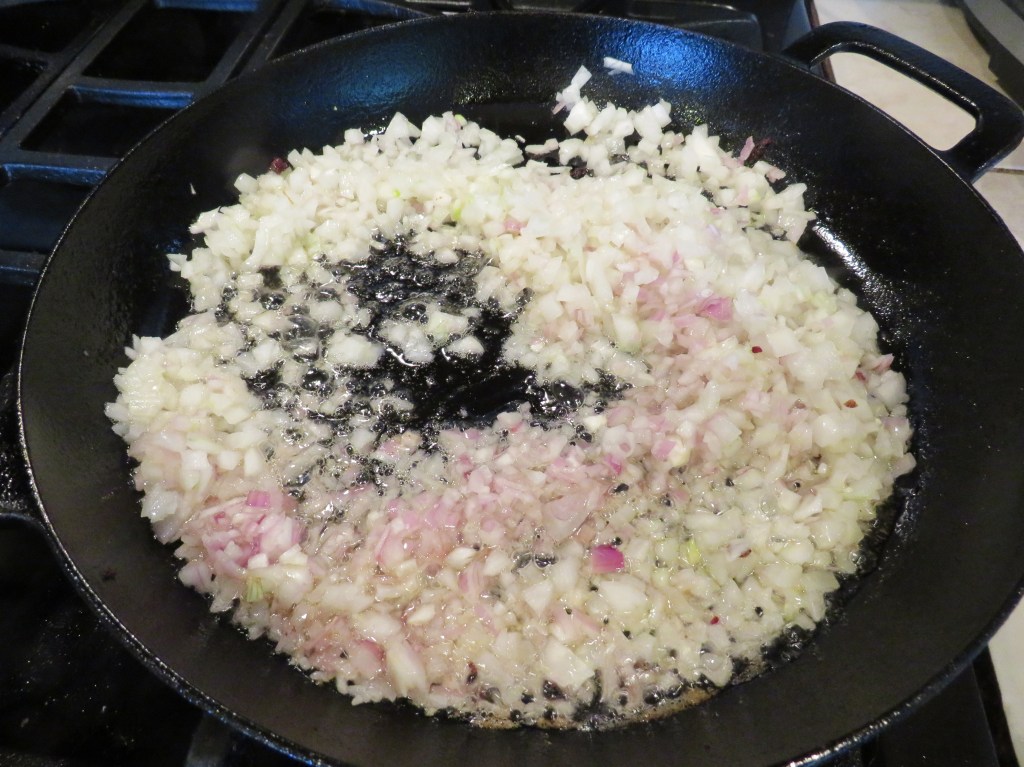
Once the bacon is cooked, remove it from the skillet and set aside to keep warm. Cook the onions in the bacon grease for about 10 minutes, or until they start to caramelize.
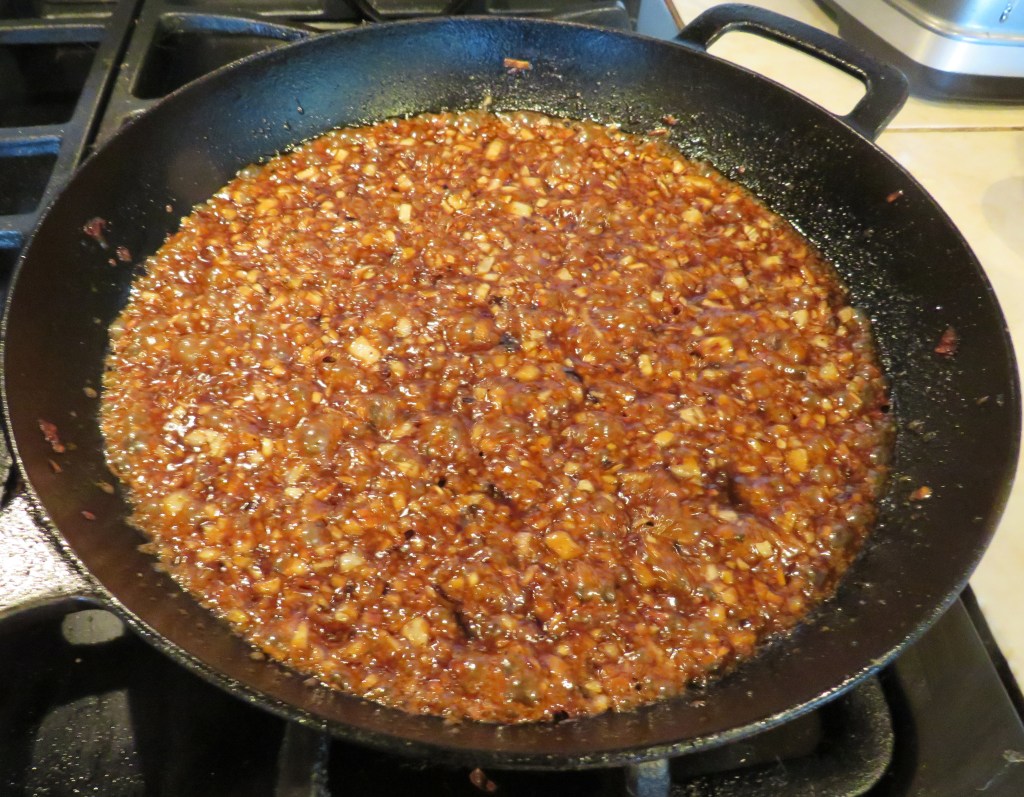
Add the brown sugar, maple syrup and pepper, and continue to cook at a low temperature for an additional 10-15 minutes, or until it forms into a thick jam-like consistency.
Mix in the bacon and allow to cool a bit. You can use it immediately or you can refrigerate it and use it later. If you are using it later, heat it before using so it is nice and warm and not as hard and sticky.
The cool refreshing aioli paired perfectly with the sweet, tangy, savory bacon jam. Everything just melted in our mouths. This is a great, tasty flavor combination. If you are a bacon lover, you’re going to love this one. 🙂
Have a great day and make everyday great, even if they are just low-key days. Life is what you make it, so make it great. May 2026 be filled with happiness, good health and prosperity for all. ‘Til next time.