| CARVIEW |

Java Connectivity with Autonomous Database (ATP or ADW) using 19c and 18.3 JDBC
Oracle Autonomous Database (ADB) is a family of products with each member of the family optimized by workload. Java applications require Java Key Store (JKS) or Oracle wallets to connect to ADB. The enhancements in JDBC driver in DB 19c and 18.3 make Java connectivity to ADB very simple. Follow the instructions to establish a successful connection to ADB.
1. Provision an Autonomous Database (ADB) Instance
Get access to the Oracle Autonomous Database (ADB). Click on these links to walk through the steps to provision an ADB instance if you have not provisioned an ADB instance already.
Remember the password that you used for ADMIN user. For this demo purpose, we will be using ADMIN user but, our recommendation is to create other database users either using SQLDeveloper or using SQL Developer web console.
2. Obtain Client Credentials
- After the creation of an Autonomous Database, follow these instructions to download the client credentials from the Oracle Cloud Console. The client credentials (wallet_[dbname].zip) contains required wallet files and tnsnamea.ora that give mutual TLS, providing enhanced security for authentication and encryption.
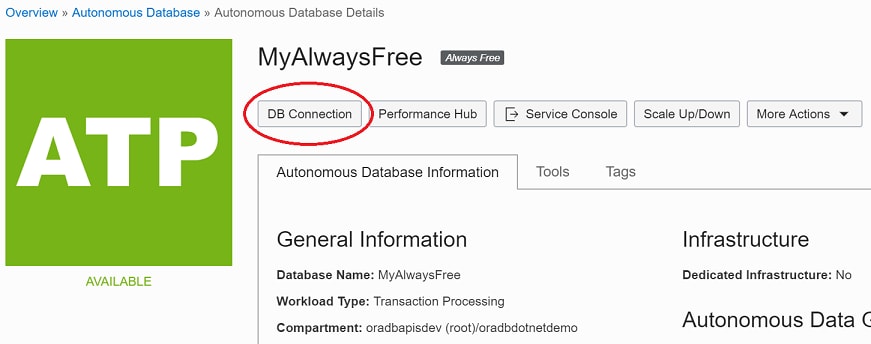
- From the Oracle Cloud Console, go to the Autonomous Database Details page of your Oracle Autonomous Database instance.
- Click the DB Connection button. A new window will appear.
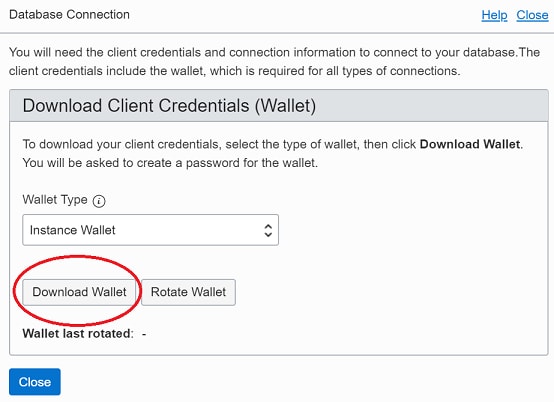
- Click the Download Wallet button. Leave the 'Wallet Type' to be 'Instance Wallet'.
- Enter a wallet password in the Password field and confirm the password in the Confirm password field. Then, click the Download button. The password must be at least 8 characters long and include at least 1 letter and either 1 numeric character or 1 special character.
- Save and unzip the client credentials zip (wallet_[dbname].zip) file to a secure directory. You will need this directory location later on. The contents of the zip file are described below.
-
tnsnames.ora and sqlnet.ora: Network configuration files storing connect descriptors and SQL*Net client side configuration. -
cwallet.ora and ewallet.p12: Auto-open SSO wallet and PKCS12 file. PKCS12 file is protected by the wallet password provided in the UI. -
keystore.jks and truststore.jks: JKS Truststore and Keystore that is protected by the wallet passport provided while downloading the wallet. -
ojdbc.properties: Contains the wallet related connection property required for JDBC connection. This should be in the same path as tnsnames.ora. 3. Install JDK8 or higher
Download JDK81 or higher JDK versions Note : If you are using JDK11, JDK10, or JDK9 then you don't need anything. If your JDK version is less than JDK8u162 then download the JCE Unlimited Strength Jurisdiction Policy Files. Refer to the README for installation notes.
1 Use "java -version" to check the JDK version that you have installed. Use "java -jar ojdbc8.jar" to check the JDBC driver version.
4. Download JDBC driver and other Jars
-
Download either 19c or 18c JDBC driver from the following download page. ojdbc10-full.tar.gz or ojdbc8-full.tar.gz and ucp.jar
ojdbc8-full.tar.gzandojdbc10-full.tar.gzcontainsoraclepki.jar, osdt_core.jar, and osdt_cert.jarrequired for connecting to Autonomous database.Note: If you are using older JDBC driver 12.2.0.1 or 12.1.0.2 then follow the instructions on this page to connect.
5. Download a sample program from Github
-
Download DataSourceSample.java or UCPSample.java from Github JDBC code samples.
- Pass TNS alias (e.g.,dbname_mediumfound intnsnames.ora) as part of the connection string.
- Pass TNS_ADMIN property to the place wherewallet_dbname.zipis unzipped. TNS_ADMIN specifies the path of the wallet files,ojdbc.properties,andtnsnames.oraExample: DB_URL="
jdbc:oracle:thin:@dbname_medium?TNS_ADMIN=/users/test/wallet_dbname/" - Troubleshooting and Debugging: If you encounter any errors, check out Troubleshooting Tips page for some helpful hints.
-
Download DataSourceSample.java or UCPSample.java from Github JDBC code samples.
Pre-requisites
Open all Close all

1. Pre-requisites
Make sure to complete all the steps from pre-requisites section.
2. Uncomment JKS related connection properties
-
The client credentials required to connect to Oracle Autonomus Database are downloaded as
Wallet_dbname.zip.. The zip file contains ojdbc.properties and tnsnames.ora. Uncomment the following JKS related connection properties inojdbc.propertiesfile.# Use the following properties to use JKS, comment out the oracle.net.wallet_location property above # and set the correct password for both trustStorePassword and keyStorePassword. # It's the password provided while downloading the wallet credentials from the DB Connection tab oracle.net.ssl_server_dn_match=true javax.net.ssl.trustStore=${TNS_ADMIN}/truststore.jks javax.net.ssl.trustStorePassword=**password** javax.net.ssl.keyStore=${TNS_ADMIN}/keystore.jks javax.net.ssl.keyStorePassword=**password**Note: Make sure to comment oracle wallets related property in
ojdbc.propertiesfile# Connection property for Oracle Wallets # oracle.net.wallet_location=(SOURCE=(METHOD=FILE)(METHOD_DATA=(DIRECTORY=${TNS_ADMIN}))Note: With 19c JDBC driver, you can use Easy Connect Plus and pass all the connection properties as name-value pair in the connection string. You can open the
tnsnames.oraand copy the hostname, servicename, and certificate details to form a connection string.Example: jdbc:oracle:thin:@tcps://orclhostname:1522/orclservice?oracle.net.ssl_server_cert_dn=\"CN=test.uscom-east-1.oraclecloud.com,OU=Oracle BMCS US,O=Oracle Corporation,L=Redwood City,ST=California,C=US\" &javax.net.ssl.trustStore=/users/test/wallet_dbname/truststore.jks &javax.net.ssl.trustStorePassword=**password** &javax.net.ssl.keyStore=/users/test/wallet_dbname/keystore.jks &javax.net.ssl.keyStorePassword=**password**3. Build and Run a Sample Java Program
-
Compile the Java program Make sure to provide the correct path for the required jars in the classpath.
javac -classpath ./lib/ojdbc8.jar:./lib/ucp.jar UCPSample.java -
Run the sample Java program Make sure to provide the correct path for the required jars in the classpath.
java -classpath ./lib/ojdbc8.jar:./lib/ucp.jar:. UCPSample
-
Using JKS
Open all Close all1. Pre-requisites
-
Make sure to complete all the steps from pre-requisites section.
- You do not need to do anything. The below wallet related property is already pre-loaded in
ojdbc.properties.oracle.net.wallet_location=(SOURCE=(METHOD=FILE)(METHOD_DATA=(DIRECTORY=${TNS_ADMIN}))Note: With 19c JDBC driver, you can use Easy Connect Plus and pass all the connection properties as name-value pair in the connection string. You can open the
tnsnames.oraand copy the hostname, servicename, and certificate details to form a connection string etc.,Example:.,jdbc:oracle:thin:@tcps://orclhostname:1522/orclservice?wallet_location=/users/test/wallet_dbname &oracle.net.ssl_server_cert_dn=\"CN=adwc.uscom-east-1.oraclecloud.com,OU=Oracle BMCS US,O=Oracle Corporation,L=Redwood City,ST=California,C=US\"
-
2. Build and Run a Sample Java Program
-
Compile the Java program Make sure to provide the correct path for the required jars in the classpath.
javac -classpath ./lib/ojdbc8.jar:./lib/ucp.jar:/lib/oraclepki.jar:./lib/osdt_core.jar:./lib/osdt_cert.jar UCPSample.java -
Run the sample Java program Make sure to provide the correct path for the required jars in the classpath.
java -classpath ./lib/ojdbc8.jar:./lib/ucp.jar:/lib/oraclepki.jar:./lib/osdt_core.jar:./lib/osdt_cert.jar:. UCPSample
-
Using Oracle Wallets
Open all Close all1. Create a sample webapp
-
Make sure to complete all the steps from pre-requisites section.
-
Refer to the video Connecting to ATP or ADW using Tomcat for step by step instructions.
-
Copy contents of Tomcat_Servlet from Github to a directory /TOMCAT_HOME/webapps/UCPCloud. You can choose a different name for the application as well.
- Place 19c or 18c JDBC driver(ojdbc8.jar) and UCP(ucp.jar) at
/TOMCAT_HOME/webapps/UCPCloud/WEB-INF/lib. Make sure to have the following jars
oraclepki.jar, osdt_core.jar, and osdt_cert.jarin the same location.
-
2. Create context.xml
Create a UCP Data source under /TOMCAT_HOME/webapps/UCPCloud/META-INF/context.xml. Make sure to use the TNS alias as the service name and also TNS_ADMIN should point to the path where the client credentials (Wallet_dbname.zip) are located. Sample context.xml is shown below.<Context docBase="UCPCloud" path="/UCPCloud" reloadable="true" source="org.eclipse.jst.jee.server:samplejdbcpage"> <Resource name="tomcat/UCP_atp" auth="Container" factory="oracle.ucp.jdbc.PoolDataSourceImpl" type="oracle.ucp.jdbc.PoolDataSource" description="UCP Pool in Tomcat" connectionFactoryClassName="oracle.jdbc.pool.OracleDataSource" minPoolSize="5" maxPoolSize="50" initialPoolSize="15" user="jdbcuser" password="XXXXXXXXXXX" url="jdbc:oracle:thin:@jdbctest_medium?TNS_ADMIN=/Users/test/ATPTesting/wallet_JDBCTEST" /> </Context>3. Start Tomcat and Invoke Servlet
Start Tomcat server and invoke the servlet at https://lcoalhost:8080/UCPCloud/UCPServlet
Tomcat
Open all Close all1. Create a webapp project
-
Make sure to complete all the steps from pre-requisites section.
-
Refer to the video Connecting to ATP or ADW using Web Logic Server (WLS) for step by step instructions.
- WLS v12.2.1.4 is shipped with 19.3 JDBC driver compatible with JDK8 (ojdbc8.jar). So, you don't need to do anything.
-
Copy the servlet from Github WebLogicServer_Servlet to your project.
-
2. Create a Datasource
- Login to Web Logic Console (https://localhost:7001/console) and create either a UCP Data Source or Active Grid Link Data Source (AGL). Refer to the blog for details.
- Connection URL should include TNS alias from tnsnames.ora and TNS_ADMIN should point to the location where the wallet zip file is downloaded.
jdbc:oracle:thin:@jdbctest_medium?TNS_ADMIN=/Users/test/ATPTesting/wallet_JDBCTEST - Click on "Test Configuration" to make sure you are able to connect to ATP successfully.
3. Start WLS and Invoke Servlet
Start WebLogicServer and invoke the servlet at https://lcoalhost:7001/test-app/UCPServlet