A dropdown menu, or sub-menu, shows additional items when you hover or click on an item in your menu. They can be useful for keeping your menu clean and organized. This guide will show you how to create a drop-down menu.
In this guide
Have a question?
Ask our AI assistantFollow the steps below to create a drop-down menu.
To follow the correct instructions, you’ll need to know which type of theme your site uses. Go to Appearance in your site’s dashboard: if you see Editor, use the Site Editor instructions; otherwise, use the WP Admin or Customizer instructions.
Follow these steps to add dropdown items to your site’s menu via the Navigation block:
- From your site’s dashboard, navigate to Appearance → Editor.
- Select Templates and choose a template that includes your menu, such as Home or Front Page.
- Open List View in the top-left corner of your screen.
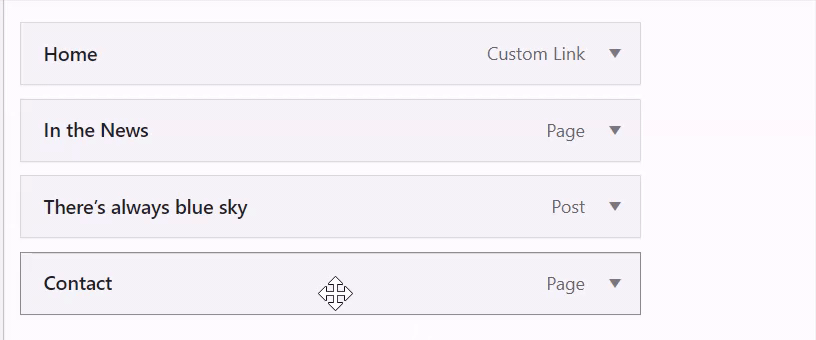
- Select the Navigation block (it may be nested inside other blocks like Header, Group, or Row).
- In the sidebar settings, hover over a menu item and click the three dots (⋮) that appear.
- Click the “Add submenu link” option.
- Select the first page you’d like to appear in the dropdown.
- Repeat steps 3-5 until you have added all desired submenu items.
- Click the Save button.
Alternatively, you can create a drop-down menu using the toolbar of the Navigation block:
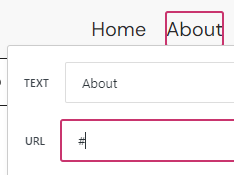
- Click on the menu item you wish to make into a dropdown.
- A toolbar will appear above the menu item, where you will find the “Add submenu” button (the icon looks like a curved arrow with three horizontal lines next to it).
- Click the “Add submenu” button in the toolbar to transform that menu item into a dropdown menu.
- Click the + icon or the “Add link” option that appears to add new links to your new dropdown menu.
- Click Save to save your changes.
You can create an “non-clickable” menu item, which is useful when creating dropdown menus if you want the top-level menu item to include submenu items, without the top-level item leading to any page. The trick is to use a # symbol as the menu item’s link. The item can still be clicked, but will not navigate to a new page. Follow these steps to create an “non-clickable” menu item.
To follow the correct instructions, you’ll need to know which type of theme your site uses. Go to Appearance in your site’s dashboard: if you see Editor, use the Site Editor instructions; otherwise, use the WP Admin or Customizer instructions.
Follow these steps to create an unclickable menu item:
- From your site’s dashboard, navigate to Appearance → Editor.
- Select Templates and choose a template that includes your menu, such as Home or Front Page.
- Open List View in the top-left corner of your screen (it’s the icon that looks like three horizontal lines above each other).
- Select the Navigation block (it may be nested inside other blocks like Header, Group, or Row).
- Click the + block inserter to add a new menu item.
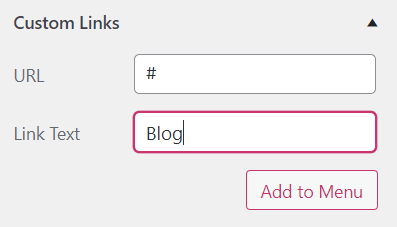
- In the window that appears, click “Add block” and choose the “Custom Link” option.
- Type a # symbol and press Enter or Return on your keyboard.
- Click the pencil icon to edit the new menu item. Write what you want the menu item to say in the “Text” field. Leave only the # symbol in the “Link” field to make it an unclickable link.
- Click the “Save” button to submit the change.
You can also edit an existing menu link to make it unclickable. Click on the existing menu item and a toolbar will appear above the menu item, where you will find the Link button (the icon looks like a literal link from a chain.) Edit the menu item and replace the current link with the # symbol. The GIF below demonstrates the process: