| CARVIEW |

Today, meditation is often suggested as a way to combat the mental ill effects of the digital age and our continuous partial attention lifestyle. But meditation is capable of so much more than staving off unwanted side effects from our new way of life. Many well-known and successful entrepreneurs have used meditation to their advantage. It helps to clear away the unimportant chatter of the mind and focus it on the important problems.
Mindfulness is a simple form of meditation that consists of closing your eyes and breathing in and out in a quiet environment, slowly but deeply, until you feel relaxed enough to contemplate your feelings, thoughts and issues of the day.
[author_more]
Your mind can experience many emotions in a single day, sometimes even subconsciously. Without examination these emotions can become apparent in the form of boredom, depression, stress (mental or otherwise), lack of motivation — even outbursts. A clear mind is a focused mind. In order to better understand what mindfulness meditation is, let’s talk about what it isn’t.
There are many resources that will help you learn the technique of mindfulness meditation in greater depth, and you're encouraged to seek them out and do so. But for the busy entrepreneur who hasn't yet had any experience with the benefits of the practice, here's what you need to know to be able to try it out right now and start getting acquainted with this essential tool.
What Mindfulness Isn’t
- Mindfulness isn’t complicated
- Mindfulness isn’t a religion
- Mindfulness doesn’t require “posing”
- Mindfulness doesn’t require special clothing
- Mindfulness doesn’t require a lot of time
- Mindfulness doesn’t trick you into feeling a certain way
As an example, you can meditate for only 10 minutes a day during your morning commute, wearing your ordinary work clothes.
Why Meditate?
Mindfulness can help you to examine your mental strains and anxieties. Anxiety is a terrible affliction that eats away at you and becomes worse the longer you leave it. Meditation offers you the chance to see firsthand what’s causing it; after that you can begin to construct a solution and ultimately lower your stress levels. Eventually, if you allow your anxieties to grow, your mental stress will turn into physical stress and fatigue.

A troubled or clouded mind tends to make you feel disconnected from the world — more specifically, from those close to you. By meditating on your thoughts and feelings for only a short while every day, you can be free to engage in meaningful conversations, rather than staring into a blank space while your loved ones gradually begin to give up trying to make conversation with you.
In fact, the core aim of mindfulness meditation is to help you focus on the tasks at hand. Not only can it can improve your relationships with others, it can make you more compassionate, more empathetic, more motivated, and significantly happier.
Identifying Bad Habits Through Self-Awareness
It’s natural to develop bad habits over time. Whether its late-night binging or checking Facebook during work hours, we rarely acknowledge our bad habits on a superconscious level; we know we shouldn’t be doing it, but we’re not actively sitting down and saying to ourselves, “I shouldn’t be doing this because…”.
Continue reading %The Entrepreneur’s Quickstart Guide to Mindfulness Meditation%
]]>However, these technologies are not necessary if you just want to display some basic shapes, like a cube. Moreover, they won't help you to understand how they work, and how we can display 3D shapes on a flat screen.
The aim of this tutorial is to explain how we can build a simple 3D engine for the web, without WebGL. We will first see how we can store 3D shapes. Then, we will see how to display these shapes, in two different views.
Storing and Transforming 3D Shapes
All Shapes Are Polyhedrons
The virtual world differs from the real one in one major way: nothing is continuous, and everything is discrete. For example, you can't display a perfect circle on a screen. You can approach it by drawing a regular polygon with a lot of edges: the more edges you have, the more "perfect" is your circle.
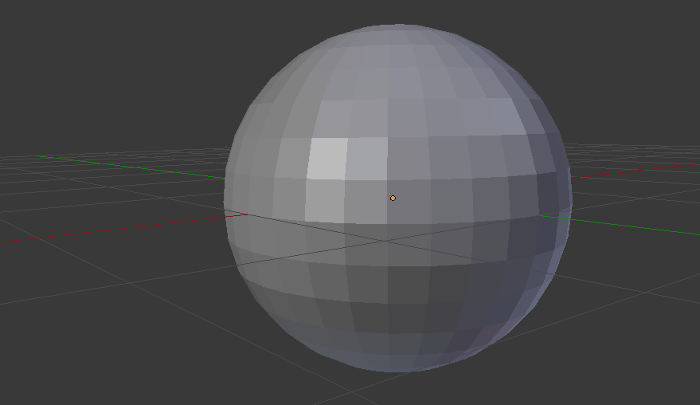
In 3D, it's the same thing and every shape must be approached with the 3D equivalent of a polygon: a polyhedron (a 3D shape in which we only find flat faces ant not curved sides as in a sphere). It's not surprising when we talk about a shape that is already a polyhedron, like a cube, but it's something to keep in mind when we want to display other shapes, like a sphere.
Storing a Polyhedron
To guess how to store a polyhedron, we have to remember how such a thing can be identified in maths. You surely already did some basic geometry during your school years. To identify a square, for example, you call it ABCD, with A, B, C and D referring to vertices that make up each corner of the square.
For our 3D engine, it will be the same. We will begin by storing each vertex of our shape. Then, this shape will list its faces, and each face will list its vertices.
To represent a vertex, we need the right structure. Here we create a class to store the coordinates of the vertex.
var Vertex = function(x, y, z) {
    this.x = parseFloat(x);
    this.y = parseFloat(y);
    this.z = parseFloat(z);
};
Now a vertex can be created like any other object:
var A = new Vertex(10, 20, 0.5);
Next, we create a class representing our polyhedron. Let's take a cube as an example. The definition of the class is below, with the explanation right after.
var Cube = function(center, size) {
    // Generate the vertices
    var d = size / 2;

    this.vertices = [
        new Vertex(center.x - d, center.y - d, center.z + d),
        new Vertex(center.x - d, center.y - d, center.z - d),
        new Vertex(center.x + d, center.y - d, center.z - d),
        new Vertex(center.x + d, center.y - d, center.z + d),
        new Vertex(center.x + d, center.y + d, center.z + d),
        new Vertex(center.x + d, center.y + d, center.z - d),
        new Vertex(center.x - d, center.y + d, center.z - d),
        new Vertex(center.x - d, center.y + d, center.z + d)
    ];

    // Generate the faces
    this.faces = [
        [this.vertices[0], this.vertices[1], this.vertices[2], this.vertices[3]],
        [this.vertices[3], this.vertices[2], this.vertices[5], this.vertices[4]],
        [this.vertices[4], this.vertices[5], this.vertices[6], this.vertices[7]],
        [this.vertices[7], this.vertices[6], this.vertices[1], this.vertices[0]],
        [this.vertices[7], this.vertices[0], this.vertices[3], this.vertices[4]],
        [this.vertices[1], this.vertices[6], this.vertices[5], this.vertices[2]]
    ];
};
Using this class, we can create a virtual cube by indicating its center and the length of its edges.
var cube = new Cube(new Vertex(0, 0, 0), 200);
The constructor of the Cube class begins by generating the vertices of the cube, calculated from the position of the indicated center. A schema will be clearer, so see below the positions of the eight vertices we generate:

Then, we list the faces. Each face is a square, so we need to indicate four vertices for each face. Here I chose to represent a face with an array but, if you needed, you could create a dedicated class for that.
When we create a face, we use four vertices. We don't need to indicate their position again, as they are stored in the this.vertices[i] object. It's practical, but there is another reason why we did that.
By default, JavaScript tries to use the least amount of memory possible. To achieve that, it doesn't copy the objects that are passed as functions arguments or even stored into arrays. For our case, it's perfect behavior.
In fact, each vertex contains three numbers (their coordinates), plus several methods if we need to add them. If, for each face, we store a copy of the vertex, we will use a lot of memory, which is useless. Here, all we have are references: the coordinates (and other methods) are stored once, and only once. As each vertex is used by three different faces, by storing references and not copies, we divide the required memory by three (more or less)!
Do We Need Triangles?
If you have already played with 3D (with software like Blender for example, or with libraries like WebGL), maybe you have heard that we should use triangles. Here, I've chosen to not use triangles.
The reason behind this choice is that this article is an introduction to the topic and we will be displaying basic shapes like cubes. Using triangles to display squares would be more of a complication than anything else in our case.
However, if you plan to build a more complete renderer, then you need to know that, in general, triangles are preferred. There are two main reasons for this:
- Textures: to display images on faces we need triangles, for some mathematic reasons;
- Weird faces: three vertices are always in the same plane. However, you can add a fourth vertex that isn't in the same plane, and you can create a face joining these four vertices. In such a case, to draw it, we don't have choice: we must split it into two triangles (just try with a sheet of paper!). By using triangles, you keep the control and you choose where the split occurs (thanks Tim for the reminder!).
Continue reading %Building a 3D Engine with JavaScript%
]]>For about a year and a half now, I have been lucky enough to have a Meta 1 Developer Kit and have spent a bunch of time experimenting and putting together my own concept prototype app. The SDK makes the process in Unity a lot easier than many expect it would be. The Meta 2 looks like it will be leaps and bounds ahead of the device I've spent countless hours tinkering with!
What is Meta?
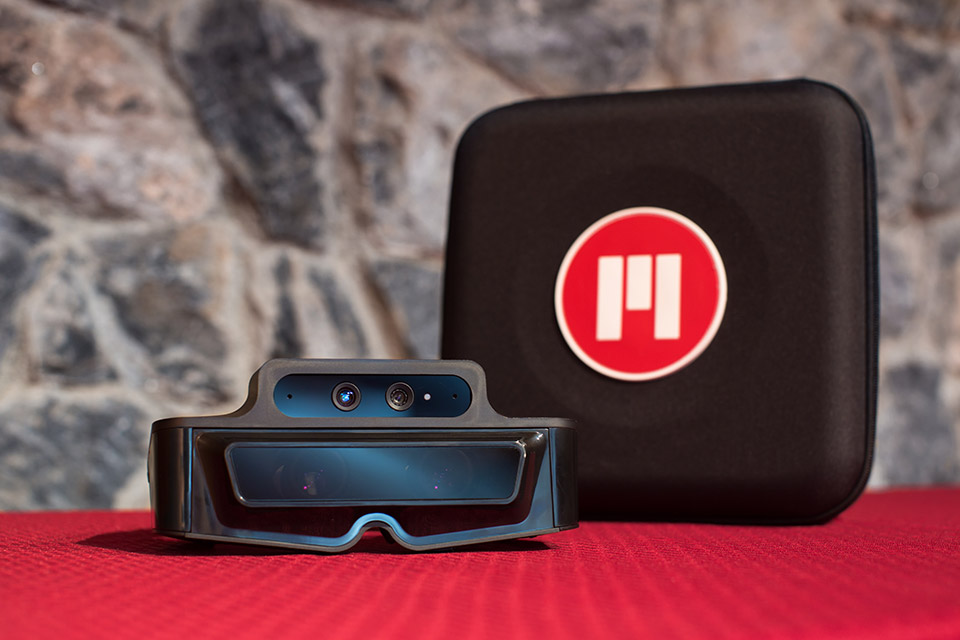
Meta are a Silicon Valley based company who've been working on augmented reality since a successful Kickstarter campaign in May 2013. Not long after that campaign, they were also accepted into the well known Y Combinator program. In September 2014, they began shipping the Meta 1 Developer Kit to developers around the world. This kit looked like so:
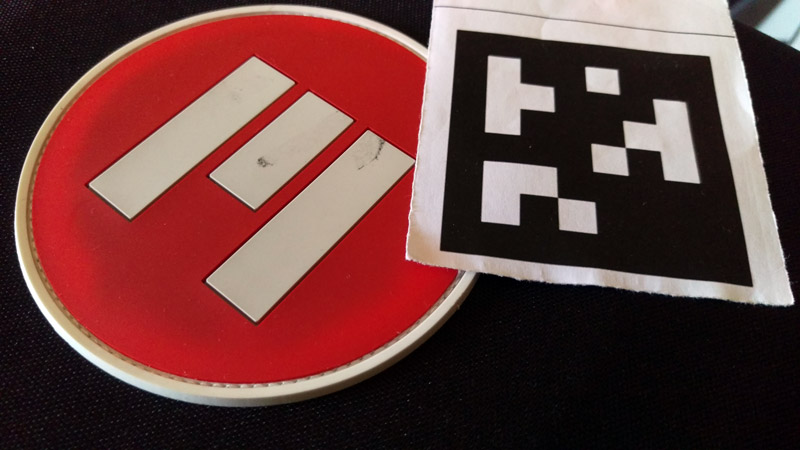
The Meta 1 provides an augmented reality headset experience where 3D objects are projected in front of you within a limited field of view. These objects appear as if they are in the room with you and can be touched, grabbed and pinched providing some great real world interaction! The augmented reality objects were even able to lock onto areas in the real world via square markers like this one which I use for my own AR app:
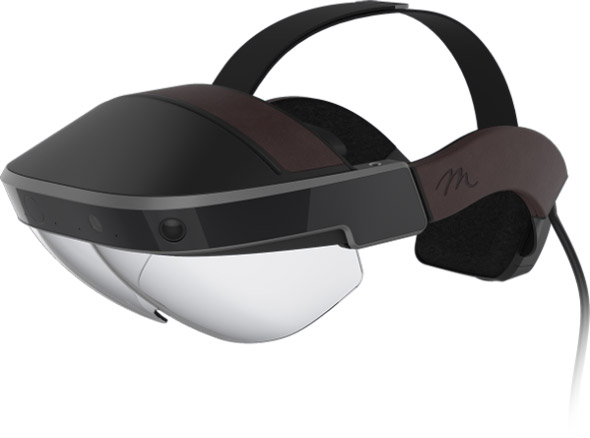
Last week, they released the details of their entirely new headset concept — the Meta 2. The Meta 2 appears to have all the capabilities mentioned above and more. It looks like this:
Improved Field of View
One of the challenges of AR headsets so far is getting as much of the headset view to be augmented as possible. The Meta 1, ODG R-7 Smart Glasses and Microsoft HoloLens each have a slightly limited field of view, best imagined as a transparent screen in front of your vision that reveals augmented objects when you look in their direction. The best image I have found which shows this field of view concept is this one from a Microsoft HoloLens demo video:
[caption id="attachment_126193" align="aligncenter" width="600"] Source: Polygon for the GIF and Microsoft for the demo video itself[/caption]
The Meta 1 came with two different lens hoods — one with a 23 degree field of view and another with a 32 degree field of view. The HoloLens has approximately a 30 degree field of view and ODG's latest unreleased prototype has a 50 degree field of view. While each of those measurements might not be comparable (some are horizontal and others diagonal?), you can get a sense of the typical FOV range from those numbers.
The Meta 2 is leaps and bounds above these, with a 90 degree field of view. This means that quite a large part of the display is now augmented. Meta's Meta 2 Product Launch Video visualizes the field of view like so:

This will give developers a great way to showcase their augmented reality apps in a more immersive way and also expands what is possible within an AR application. A greater field of view opens up more possibilities in the interface that might otherwise have been confusing with the smaller view size.
High Resolution Display
The Meta 1 provided a 960 x 540 resolution for each eye (each eye has a separate projected screen). I have seen some specs that say the Microsoft HoloLens and ODG's R-7 Smart Glasses have a larger 1280 × 720 resolution for each eye.
The Meta 2's display has a 2560 x 1440 DPI overall display, which is high resolution enough to be able to read text comfortably and see finer details. With the field of view, it ends up being 20 pixels per degree. I'm not quite sure how this measures up to the HoloLens and R-7 Smart Glasses, taking into account the different types of display technology.
Continue reading %What the Meta 2 Means for Augmented Reality Developers%
]]>font-weight property on link states? If yes, you may have noticed that the text shifts.
In this quick tip, we’ll first learn what causes this undesired behavior and then we’ll examine two possible solutions.
[author_more]
Identifying the Problem
As a first step, let’s identify the problem by looking at a simple example. Consider the following visualization:

The items are links, so in your CSS you might try something like this:
[code language="css"]
a:hover {
font-weight: bold;
}
[/code]
Because we usually don’t define a fixed width for items like this, when the user hovers over the links, the text shifts. Of course, this happens because the width of each link gets bigger on hover. To test it, we assign the active class to the first link and add this CSS rule:
[code language="css"]
.active {
font-weight: bold;
}
[/code]
Lastly, we change the text of the second link to be equal to the first one, like so:

Continue reading %Quick Tip: Fixing the font-weight Problem on Hover States%
]]>(hint: make sure you’ve read it first), I showed one way to implement a range
operator in PHP. Initial implementations, however, are rarely the best, and so
it is the intention of this article to look at how the previous implementation
can be improved.
Thanks once again to Nikita Popov for proofreading
this article!
Previous Implementation Drawbacks
The initial implementation put all of the logic for the range operator into the
Zend VM, which forced computation to take place purely at runtime when the
ZEND_RANGE opcode was executed. This not only meant that computation could
not be shifted to compile time for operands that were literal, but also meant
that some features would simply not work.
In this implementation, we will shift the range operator logic out of the Zend
VM to enable for computation to be done at either compile time (for literal
operands) or runtime (for dynamic operands). This will not only provide a small
win for Opcache users, but will more importantly allow for constant expression
features to be used with the range operator.
For example:
// as constant definitions
const AN_ARRAY = 1 |> 100;

// as initial property definitions
class A
{
	private $a = 1 |> 2;
}

// as default values for optional parameters:
function a($a = 1 |> 2)
{
	//
}
So without further ado, let’s reimplement the range operator.
Updating the Lexer
The lexer implementation remains exactly the same. The token is firstly
registered in Zend/zend_language_scanner.l
(line ~1200):
<ST_IN_SCRIPTING>"|>" {
    RETURN_TOKEN(T_RANGE);
}
And then declared in Zend/zend_language_parser.y
(line ~220):
%token T_RANGE "|> (T_RANGE)"
Continue reading %Re-Implementing the Range Operator in PHP%
]]>With digital restriction management, copyright, licenses, and trademarks, we live in an era where we are constantly reminded to be careful to not step on each other's toes. Avoiding such issues can avoid both major headaches and 'time-sinks' when working on a project.
That is exactly where Zoomy App promises to deliver.
Zoomy is a small, yet very useful stock photo aggregator app, drawing together thousands of Public Domain photos from multiple sources. For ease of use the photos are licensed under the Creative Commons Zero (CC0) license, meaning they in the public domain and free of any kind of restriction.
The app is available for Windows, Mac OS X and even Linux (I'm especially happy about this one) and costs of just $4 USD. That is a minimal price to pay for easy access to a vast pool of unrestricted visual goodness. You receive an application token key which you can use in your Zoomy installation.
The application also includes some extra Zoomy-exclusive photos not available via any other sites. Zoomy fetches CC0 photos from over 30 sources, including Unsplash, the Public Domain Archive and others.

Features:
Furthermore, the app also offers the ability to:
- Filter photos by color–10 colors available from warm to cool shades
- Search photos by layout format (Square, Landscape or Portrait) dimensions
- Selected photo can be favorited, downloaded, organized in collections or simply copied by the URL
- Photos can also be searched by tags
You can also visit the original source of the photo, if you ever need to do so.
The interface is simple and organized, offering a responsive experience when exploring the tons of photos Zoomy aggregates.
Having said that, your experience might be compromised to some extent if you have a slow-ish internet connection. As a lot of the stock photos on Zoomy are over 4K in resolution, that might be not surprising.
WordPress Plugin
Interestingly, Zoomy offers also a WordPress plugin which seamlessly integrates the Zoomy library into your WordPress installation.
It is not available yet on the official WordPress.org website, but you can download it from its GitHub repository, and manually add it to your self-hosted WordPress site.
Check out the ReadMe if you struggle with the plugin.
Continue reading %Quick Read: Search 11,000 Free Stock Photos with Zoomy%
]]>
Imagine we have some code where we want to accomplish things in a variety of ways. One way to do this is with conditional branching:
class Animal
  def speak(kind)
    puts case kind
    when :dog then "woof!"
    when :cat then "meow!"
    when :owl then "hoo!"
    end
  end
end

Animal.new.speak(:dog)
This works, but what if a developer wants to add a new way? With conditional branching, the entire method would need to be overwritten. Instead, we can separate the implementations into modules:
class Animal
  module Adapter
    module Dog
      def self.speak
        puts "woof!"
      end
    end

    module Cat
      def self.speak
        puts "meow!"
      end
    end
  end

  def speak
    self.adapter.speak
  end

  def adapter
    return @adapter if @adapter
    self.adapter = :dog
    @adapter
  end

  def adapter=(adapter)
    @adapter = Animal::Adapter.const_get(adapter.to_s.capitalize)
  end
end

animal = Animal.new
animal.speak
animal.adapter = :cat
aanimal.speak
This is a lot more code! However, if we want to add another module,
Continue reading %Improve Your Ruby with the Adapter Design Pattern%
]]>
If you’re ready to jump into the lucrative white hat hacking industry, don’t miss this deal. It’s your last chance to pay what you want for the White Hat Hacker Bundle at SitePoint Shop.
Get seven courses worth $765 that’ll teach you how to think like a hacker to protect companies against them. You’ll learn all the skills you need to secure a job in penetration testing and ethical hacking, like cracking passwords, gaining remote control of devices, using debuggers, hack Windows systems, key logging, and more. Lifetime access to all of the material means to can polish your skills whenever you need to—like before your next job interview.
This deal is going fast, so don’t miss your last chance to grab it. Pay what you want for the White Hat Hacker Bundle at SitePoint Shop.
Continue reading %Last Chance to Pay What You Want for the White Hat Hacker Bundle%
]]>
Facebook has maintained its position as perhaps the top-ranking social media ad platform over the past few years, and that is largely thanks to their dedication to continued innovation. In this social network’s history we’ve seen the additions of a new and improved Power Editor, Call to Action buttons, and image carousel ads.
Most recently, we’ve also been given Lead Ads.
[author_more]
Facebook Lead Ads have gotten a ton of attention since they were announced, even overshadowing the long-awaited “dislike” button (which more closely resemble emojis). Created to make forms easier to fill out, and thus increase conversions—not to mention cut the cost per lead—Lead Ads have finally come out of testing and are now available to advertisers and marketers.
Since Lead Ads are new, we’ve written this “How To” blog post to give you all the information you’ll need to starting running successful, highly-converting Lead Ads campaigns as soon as possible. We’ll go over what they are, why you should use them, how to create them, examples of how to use them, and upcoming additions to the format.
Facebook Lead Ads: What Are They?
When Facebook announced Lead Ads (sometimes called “Lead Gen Ads”), they were advertised as ads that made filling out forms as simple as “Tap, Tap, Done.” It is a surprisingly accurate description of how this new type of ad works.
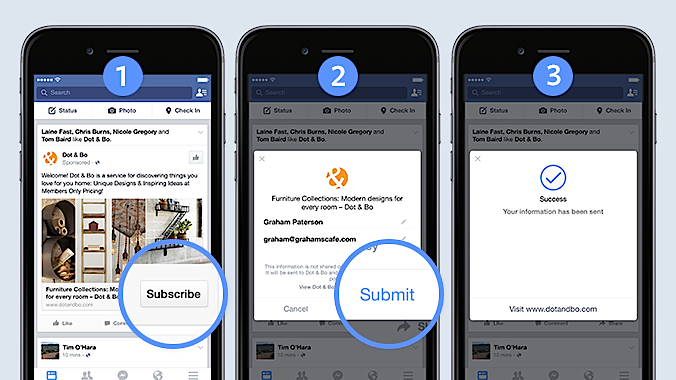
From the user’s point of view, Lead Ads look just like the mobile ads we’re already familiar with, except when a user clicks on a Lead Ad, rather than being taken to a landing page, a form opens up in which to gather their contact information. Facebook will automatically fill out as many of the fields on the form as possible with information from the user’s profile, such as name, email address, and phone number. Users can review the information, change it if they choose, and fill in any blank fields. The form can only be submitted manually so people can be assured of their privacy.
From a brand’s point of view, these forms are fully customizable and while name and contact information from Facebook profiles are always used, businesses can choose to request additional info that is beneficial for acquiring and nurturing new leads. For example, you can ask for the size of people’s business, their relationship status, or their current field of study.
Facebook Lead Ads are currently only available for mobile newsfeed placement and only feature a “standard” ad format—which includes headline, image, description, and CTA button—that will then take you to the lead generation form. Both of these limitations are temporary, but we’ll talk more about that a little later on.
Unique Benefits of Lead Ads
Lead Ads offer several unique benefits that no other ad objective or ad format has yet offered either users or marketers.
Increased mobile conversions is one of the most obvious benefits you can expect. Mobile engagement typically does well, but many marketers have a hard time getting conversions through mobile ad placements, with some case studies showing that only 34% of conversions come from mobile ads despite the fact that mobile devices reliably garner more clicks than desktop ads (63%, to be exact, in 2014). This is especially true when any type of forms are involved; it’s normally too much of a hassle for the user to leave Facebook, go to an off-site landing page (often with slow loading times), and manually fill out all those fields on a tiny mobile screen.
So it’s no surprise that a lot of mobile users will click, see the form, change their mind, and leave the landing page. The lack of conversions is particularly significant considering how high the click-through rates are, and the fact that an average of 57% of a business’s Facebook Ads budget goes to mobile ads.
With Lead Ads, not only will the user stay on Facebook, but the forms will give them a head start by auto-filling as much information as possible for them. The less effort required, the better—and Lead Ads capitalize on that idea.
Lead Ads don’t just save users time; they save marketers and businesses plenty of time, too. With fully customizable forms available on Facebook, marketers don’t have to create a landing page (or multiple landing pages) for lead generation campaigns anymore. It’s all right there on Facebook and easier to do than ever. You can create multiple forms for different campaigns in a matter of seconds, and when you compare that to creating, running, and hosting different landing pages, it’s easy to see why this is such a huge development for businesses.
How to Create Lead Ads
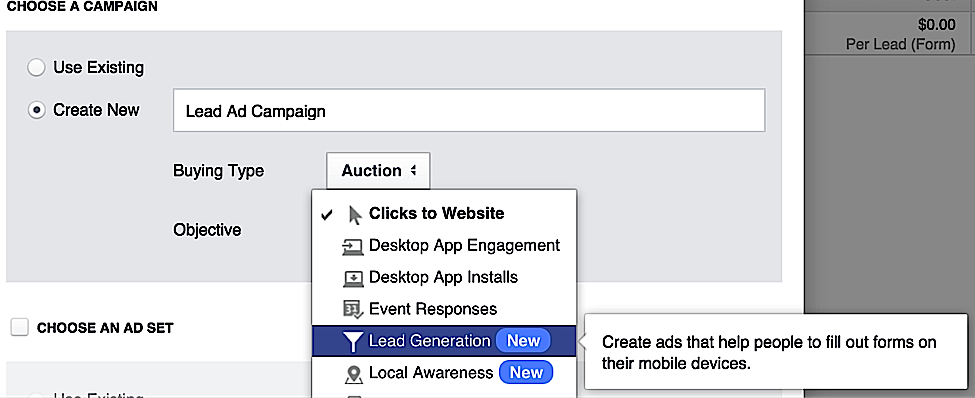
Facebook Lead Ads are currently available only through Power Editor.
They are an ad objective, so you will need to create a Lead Ad campaign specifically. When you go to create a new campaign, select “Lead Generation” as your objective.
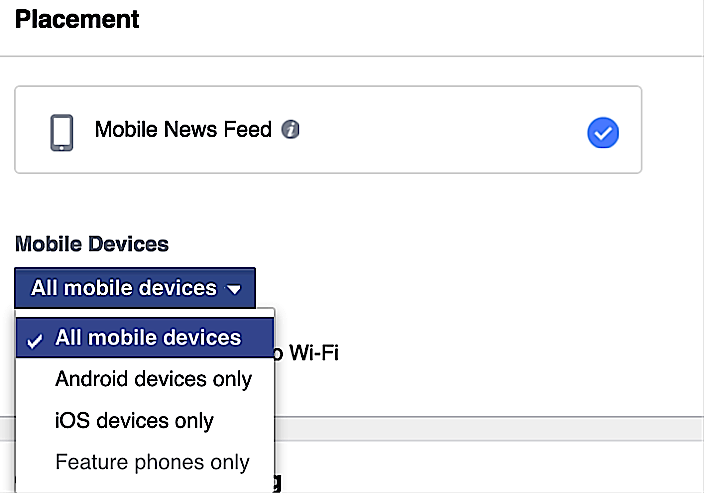
After you’ve created your new campaign, go to the ad set level, where you’ll choose the Facebook Page for which you want to advertise. You’ll also see that mobile placement is currently the only placement option. You can adjust your audience targeting and choose what you want to optimize for (in this case, leads or link clicks). For the mobile placement option, you can choose to only target certain device types.
At the ad level, you’ll create the creative aspects of your campaign as you normally would. Pay attention to the Lead Form and the CTA button, as these are different for Lead Ads.
You’ll see a section of the creative aspects that is devoted to the Lead Form. You can either choose to use a form that you’ve already built or you can create a new one. Either way, it takes just a few minutes, and we’ll talk about Lead Forms in the next section.
CTA buttons are mandatory for Facebook Lead Ads, and come with the options of:
- Sign Up
- Subscribe
- Learn More
- Get Quote
- Download
- Apply Now
Choosing an appropriate CTA will depend largely on how you’re motivating users to submit their contact information and what you’ve promised in return. Each individual ad run might require a different CTA depending on your offer, and it’s something you should pay close attention to when split testing or changing ads quickly through Power Editor.
For what it’s worth, some statistics show that while “Shop Now” is the most popular CTA choice, “Learn More” has the best performance for click-through rates.
Once your ad is ready to go, you can preview it as it will appear on both the mobile newsfeed and certain selected devices. Just be sure to check your Lead Form before submitting it, because it won’t show up in the preview.
Continue reading %Facebook Lead Ads: How to Increase Mobile Conversions%
]]>
Not to be all “everyone’s out to get you!” but, hey, sometimes they really are. Save yourself—or just your Mac—from privacy and security threats with the Ultimate Mac Shield Bundle, now $29.99 at SitePoint Shop.
Get this deal and you’ll get the following apps for protecting your privacy…and helping you (and your Mac) work a little smarter in the process:
- Cookie 5, which keeps your data safe from snooping third parties by removing cookies on an automated schedule and keeping targeted ads away.
- WiFi Spoof, a privacy safeguard that changes your Wi-Fi Mac address so hackers can’t trace you.
- Invisible, which makes files disappear from view and password protects your data.
- Privatus, which saves you from having to delete your cookies—it’ll do it for you after each browsing session.
- Hides, a tool for clearing your desktop apps you can focus on the task at hand—not on clutter.
- Email Address Extractor, which is aptly named—use it to extract valid email address from any text file without duplicates, and output them to CSV or TXT files.
Upgrade your Mac experience and get added security with this Ultimate Mac Shield Bundle for $29.99.
Continue reading %Protect and Upgrade Your Mac with This Six-App Bundle for $30%
]]>