| CARVIEW |
Navigation Menu
-
Notifications
You must be signed in to change notification settings - Fork 1
How to use HD44780 LCD from Rust
This how-to is currently a work in progress.
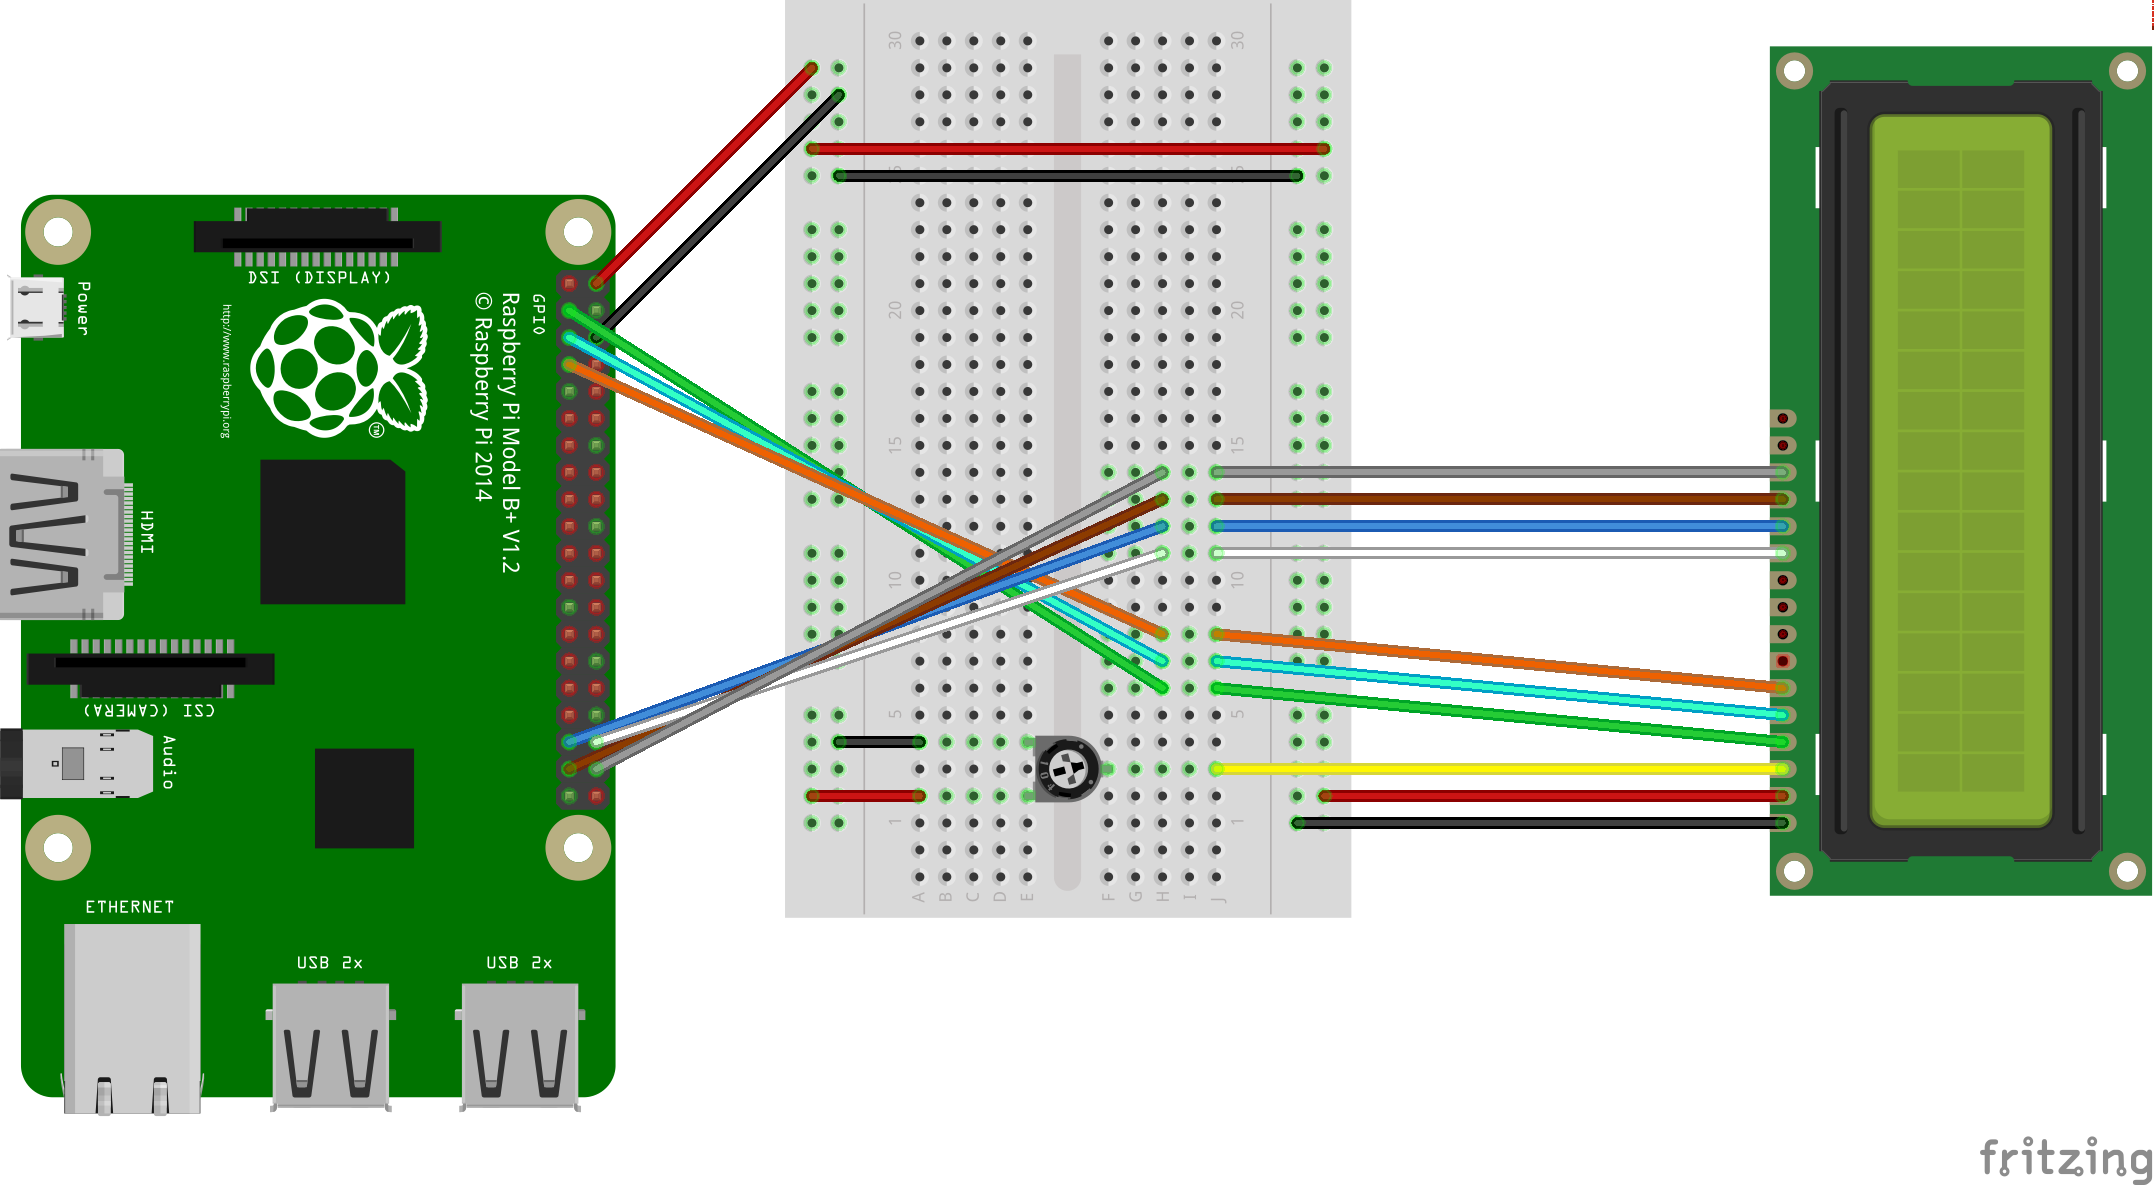
This How-to will show you how to connect a HD44780 compliant LCD display to a RaspberryPi B+ v1.2 and control it via clerk, which is a hardware agnostic HD44780 driver written in Rust. The executable will be cross compiled on a Host (PC or Laptop) and send to the Target (RaspberryPi).
The hardware setup is described for a RaspberryPi B+ v1.2 but should be easily adaptable for other versions, too. We will use the 4-bit data mode, which requires only four data lines to be connected. Later we will see how to extend this setup to enable read access, which can be used to read the busy flag and the current cursor address as well as the RAM of the display. The following list shows the pin setup using the GPIO numbering scheme:
 GPIO  2      - register selection signal
 Ground       - read/write signal
 GPIO  4      - clock (enable) signal
 GPIO 16      - data bus 4
 GPIO 19      - data bus 5
 GPIO 26      - data bus 6
 GPIO 20      - data bus 7
Use the following command to clone clerk with all its examples into your current directory:
git clone https://github.com/kunerd/clerk.git
Before we can build applications that can be executed on a RaspberryPi (our target), we need to install a cross toolchain on our PC (Host). After that we also need to tell cargo how and where to find this toolchain.
-
Download the RaspberryPi tools:
git clone https://github.com/raspberrypi/tools -
Install
build-essentialpackage containing common build tools like compiler and stdlib:$ sudo apt-get install build-essentialNote: This step might slightly differ for the various operating systems.
-
Add the file
.cargo/configwith the following content:[target.arm-unknown-linux-gnueabihf] linker = "<PATH_TO_PI_TOOLS>/arm-bcm2708/arm-rpi-4.9.3-linux-gnueabihf/bin/arm-linux-gnueabihf-gcc"into the directory in which we previously cloned clerk. Replace
<PATH_TO_PI_TOOLS>with the path in which we cloned the RaspberryPi tools in the first step.
Now we should be able to cross compile Rust applications for the RaspberryPi. For detailed information on how cross compiling Rust applications work see https://github.com/japaric/rust-cross.
Now that we are able to cross compile Rust source code, we will try to compile the raspberry_hello_world example shipped with clerk. To create the executable for usage on your RaspberryPi run the following command:
cargo build --example raspberry_hello_world --target arm-unknown-linux-gnueabihf
Now that we have created a binary of the Hello world application, we only need to upload and run it on the RaspberyPI like described in the next section.
To run the Hello world application we need to upload it on to the RaspberryPi, first. After that we connect to the PI via ssh and run the application.
-
Upload the binary on to the PI:
scp target/arm-unknown-linux-gnueabihf/debug/examples/raspberry_hello_world pi@<IP_ADDRESS_OF_PI>:~where
<IP_ADDRESS_OF_PI>has to be replaced by the IP address of your RaspberryPi. -
Connect to the Pi and run the executeable:
ssh pi@<IP_ADDRESS_OF_PI>
./rasberry_hello_world
The display should now show the message Hello world!.
coming soon ...